


The BCC PixelChooser is an integrated matte and masking system, fully re-engineered to include mocha planar tracking and more robust and intuitive masking/matting tools and provides numerous techniques for selecting which areas of an image will be affected by a filter. to
The PixelChooser appears at the bottom of most filters in BCC and effectively creates a matte/mask between filtered and unfiltered pixels allowing far greater control over the design process. The matte/mask can be defined in numerous ways:
- Mocha planar spline tracking.
- Host spline import (in Adobe After Effects).
- Basic geometric shapes/gradients.
- Luma/alpha/channel mattes with thresholding.
- Robust color keying.
Note: The Pixel Chooser is also available as a standalone filter in the Key & Blend category.
There are 5 main sections in the PixelChooser, which are Matte, Mask, Gradient, Mocha, and (in BCC+ Filters) Depth Map ML. Each of these sections can be combined or used separately to isolate a filter effect to a user specified portion of the image. The PixelChooser can accept an alternate source input as the matte source or it can use pixels from the same source clip to which the filter has been applied.
Matte – this feature is used to generate a raster pixel matte based on pixels from a specific channel of the input source clip. There are tools in the PixelChooser for altering the pixels of the selected channel to fine tune the matte, such as a levels control which clips pixels on either end of the scale. The Matte section also includes a two step keyer, which can be used to isolate particular portions of the input source based on user defined color components, such as skin-tones or a graduated sky. The Matte group includes an advanced edge-preserving blur option to enable smoother matte generation without loss of important image details.
Mask – this feature is used to generate a single vector based mask and includes many pre-built geometric shapes, such as a rectangle or circle, all of which can be scaled and repositioned in the frame. Edges of the selected shape can be feathered to generate a soft blend mask shape.
Gradients are generated procedurally and options are included for linear, radial or strip ramps.
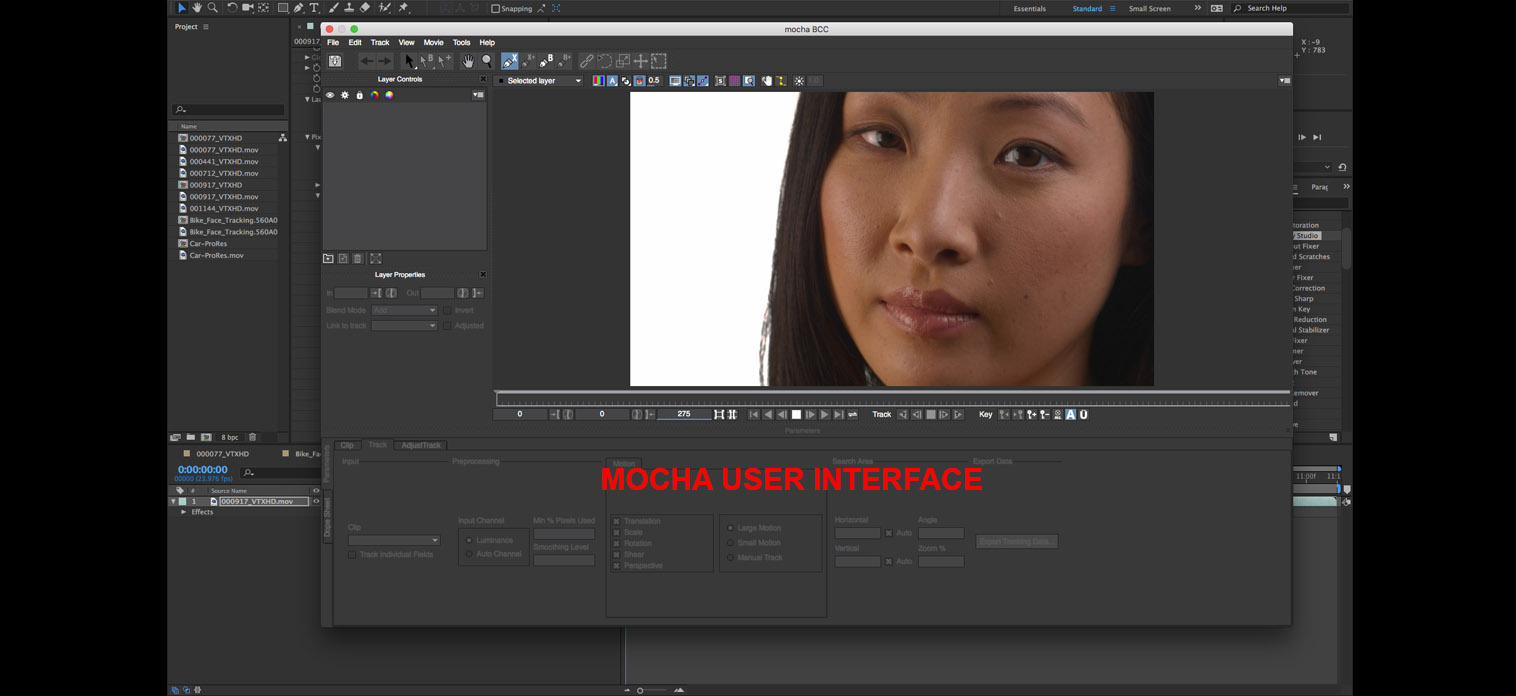
Mocha – this feature is used to generate vector spline mask shapes which can be tracked to lock a mask shape to the movement of a camera or a moving object in the scene. Unlike the Matte and Mask features, which use host native controls, mocha has a custom user interface which is launched when the mocha button in the PixelChooser is clicked. Once the mask data is generated, the user clicks a button to close the mocha custom UI and is returned to the host interface.
Depth Map ML - in BCC+ filters, Depth Map ML automatically generates a depth map from the filtered source, which can be used for compositing elements into a scene. Typical use may include sky replacement, compositing elements such as fog, smoke or text behind other still or moving objects in a scene, selective color correction, grading or blurring isolated objects in the filtered source.
Included in the PixelChooser is a load/save mechanism that allows you to save a matte/mask and recall it later for use in another project. The saved mask/mattes are filter agnostic, meaning that a mask/matte can be created in one BCC filter, then once it has been saved it can be used in any other BCC filter. Note that the mocha mask data is not saved with the PixelChooser load/save mechanism so instead, save the mocha project to the desktop and load it via the merge option inside of the mocha ui.
For more information about working with presets and other common controls, Click Here.
Legacy PixelChooser
In order to ensure compatibility with older projects the older Legacy PixelChooser is still preserved where necessary. Click here for documentation on the Legacy PixelChooser
Depth Map ML
Integrated into the BCC+ series of filters, Depth Map ML automatically generates a depth map from the filtered source, which can be used for compositing elements into a scene. Typical use may include sky replacement, compositing elements such as fog, smoke or text behind other still or moving objects in a scene, selective color correction, grading or blurring isolated objects in the filtered source.
Filter Parameters
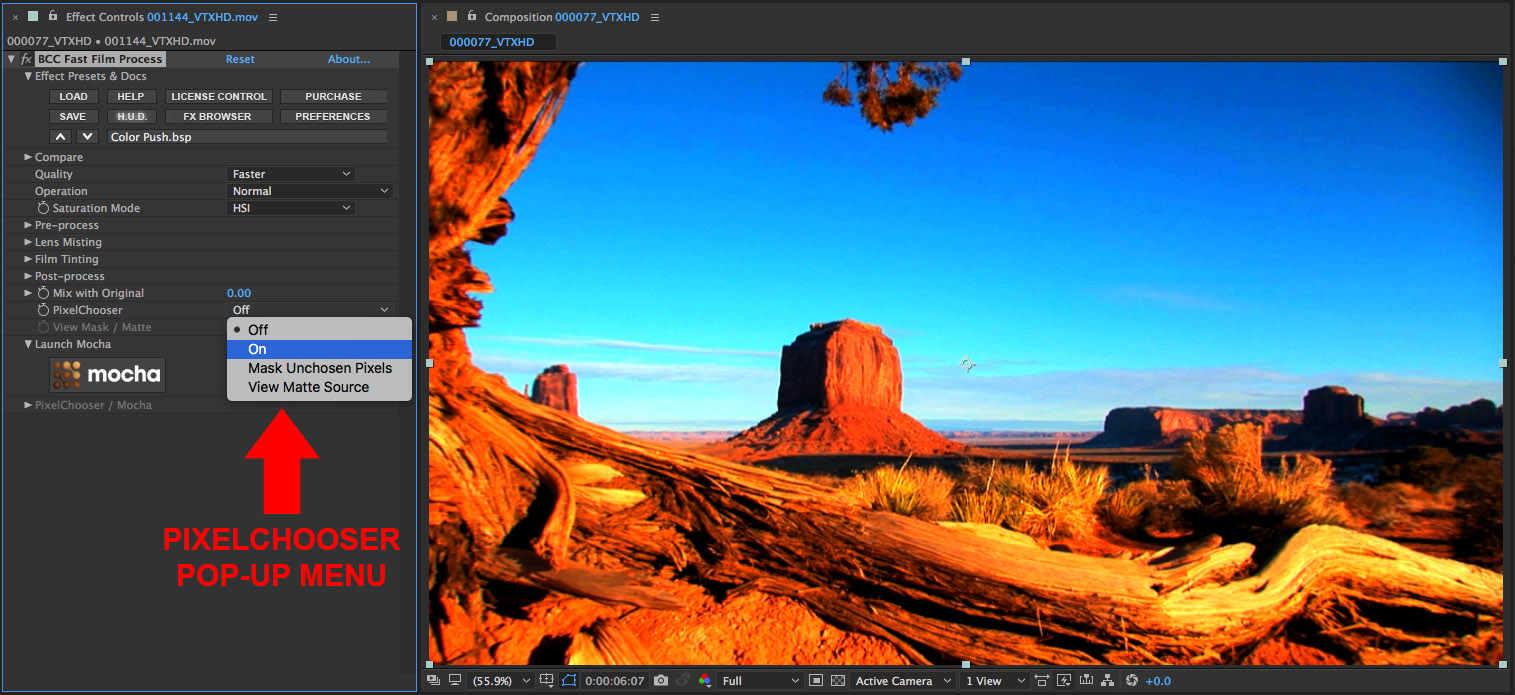
PixelChooser: Used to enable the PixelChooser and is always the first step in the process of using the PixelChooser to generate a mask/matte. There are four options :
- Off: The PixelChooser is disabled
- On: The PixelChooser is enabled and ready for use
- Mask Unchosen Pixels: Displays the mask/matte in a red transparent overlay
- View Matte Source: Displays the source image for the PixelChooser
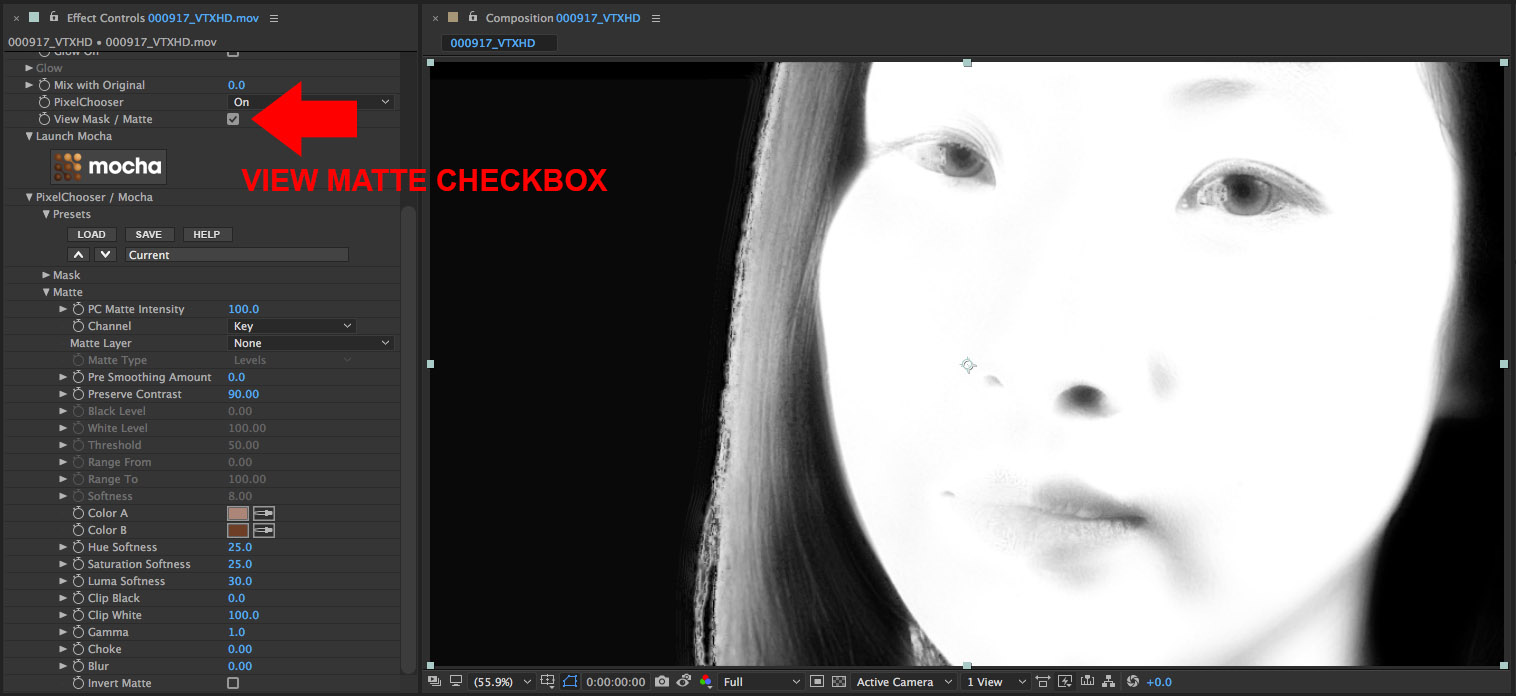
View Mask/Matte: Enables a grayscale preview of the combined PixelChooser mask/matte.
Launch mocha button:
Clicking this button will enable the PixelChooser and launch the mocha custom user interface. A quick introduction to using mocha within BCC is included in Example 2, further below on this page. For more in-depth help on using mocha, launch the mocha help documentation from within the mocha custom UI. A wealth of additional mocha training is also available on the BorisFX website.
• Apply PixelChooser pop-up options :
Some BCC filters include an “Apply PixelChooser” option which controls how the PixelChooser data is used. This option is used to instruct the filter where in the processing pipeline the mask/matte is to be applied. There are typically up to 4 options : Post Effect, Pre Effect, Both, and Spread Selected Pixels.
– Post Effect : the mask is unaffected by the filter. the order of operations is : (1) the filter is applied to the image (2) the filtered result is blended back with the original source image based on the mask shape
– Pre Effect : the mask is affected by the filter. the order of operations is : (1) the image alpha is clipped by the mask shape (2) the clipped image is filtered (3) the masked, filtered image from step 2 is composited back into the original source
– Both : first the Pre Effect result is created then the Post operation remasks the output by blending it back against the original source image based on the mask values.
– Spread Selected Pixels : works like the Pre Effect, however, the filtered result from the Pre Effect stage is masked a second time by the shape to generate alpha (transparency) and the result is composited back into the original source
• Effect-specific PixelChooser Apply options:
A small number of effects support additional customized ways to use the PixelChooser data. The default PixelChooser behavior is always to mask back the final filtered result against the original source image. However some filters contain additional options to allow the PixelChooser to be applied to individual stages of the filter as opposed to the final filtered result. (For example masking only the lighting, bump mapping, or distortion instead of masking the complete effect.)
• Presets group
This group contains the load/save mechanism for storing and recalling factory installed or user generated matte/mask setups. All filters read from the same directory so custom saved matte/mask setups generated in any one BCC filter are accessible in any other BCC filter
Clicking the Save button will prompt the user to specify a name (and directory) for the current PixelChooser settings
Clicking the Load button will prompt the user to select a factory installed or user generated preset
Clicking on the pop-up bar will display a list of available presets. Clicking on any name in the pop-up window that appears will load that preset
Clicking on the up/down arrows will load consecutive presets from the default directory. The name of the currently selected preset is loaded into the pop-up bar
————————————————————————————————
• Mask Group
This group contains parameters to create and control the PixelChooser geometric mask shapes
• PC Mask Intensity : use to alter the intensity of the mask
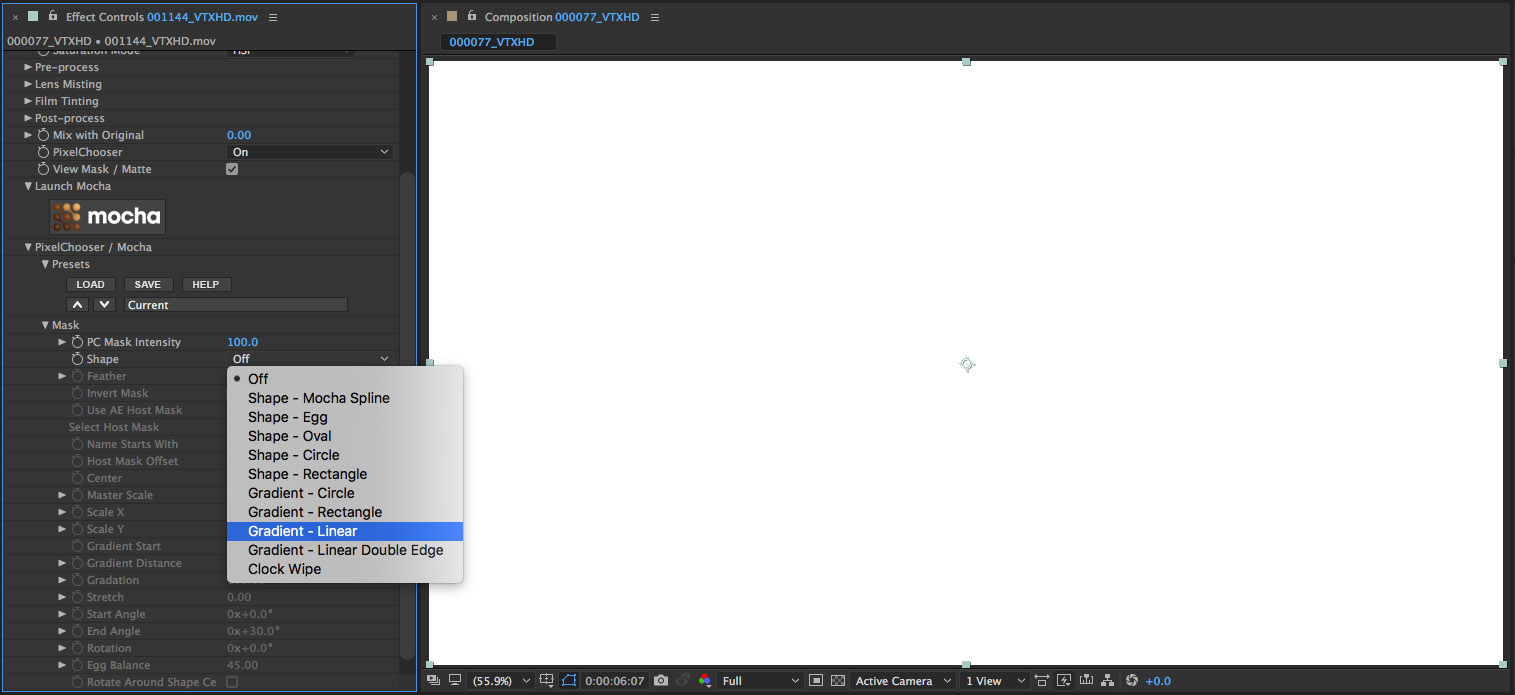
• Shape pop-up options :
– Off
– Shape – Mocha Spline
– Shape – Egg
– Shape – Oval
– Shape – Circle
– Shape – Rectangle
– Gradient – Circle
– Gradient – Rectangle
– Gradient- Linear
– Gradient – Linear Double Edge
– Clock Wipe
– AE Host Mask (After Effects Only)
• Feather : Use to soften or feather the edges of the mask shape
• Invert Mask checkbox : inverts the mask when enabled
• Use AE Host Mask : provides options for using Adobe After Effects native host mask shapes
– Use All : uses all mask shapes in the selected PixelChooser layer
– Choose Single : allows the user to select a single AE native mask shape. When this option is selected, the Select Host Mask pop-up become active and displays a list of the current AE native host mask shapes that are present in the selected PixelChooser layer. Select a single mask shape from the list to use it
– Choose By Name : allows the user to select mask shapes based on their naming convention. When this option is selected, the Name Starts With pop-up becomes active and displays a list from which the user can select.
Options are :
– Anything (selects all masks regardless of the name)
– Letters A through I (only masks beginning with the chosen letter are selected)
– Mask (all masks shapes that are named Mask are selected)
• Host Mask Offset : use to reposition the host mask shape along the x/y axis
• Center : use to reposition the mask shape along the x/y axis
• Master Scale : use to increase or decrease the size of the mask
• Scale X : use to scale the mask along the x axis only
• Scale Y : use to scale the mask along the y axis only
• Gradient Start : use to set the starting point of the gradient shape
• Gradient Distance : use to set the length of the gradient
• Gradation : use to set the ramp of the gradient
• Stretch : use to distort the gradient shape along the x or y axis
• Start Angle : use to set the angle for the start of the clock wipe
• End Angle : use to set the angle for the end of the clock wipe
• Rotation : use to rotate the linear gradient around it’s center
• Egg Balance : use to set the pinch for the egg shape. positive values generate a triangle, negative values generate an upside down triangle. A zero value generates a perfect circle
• Rotate Around Shape : use to rotate multiple AE native host mask shapes about their individual center points. When disabled, the masks will rotate around a combined center point of all mask shapes
————————————————————————————————
• Matte Group
This group contains parameters to create and control the PixelChooser pixel based matte shapes
• PC Matte Intensity : use to alter the intensity of the matte
• Channel pop-up : use to select a channel for the PixelChooser source clip for the matte
– None : no pixels from the input source are used
– Luma : only values from the luma channel are used
– Red : only values from the red channel are used
– Green : only values from the green channel are used
– Blue : only values from the blue channel are used
– Alpha : only values from the alpha channel are used
– Key : only pixels that fall into the range set by the color swatches are used
• Matte Layer : use to select a source layer for the matte section of the PixelChooser
• Matte Type : use to select an operator which can modify pixels in the selected channel
– Levels : matte is based on user determined black and white levels
– Threshold : matte is based on a user defined midpoint
– Range : matte is based on user defined start and end points
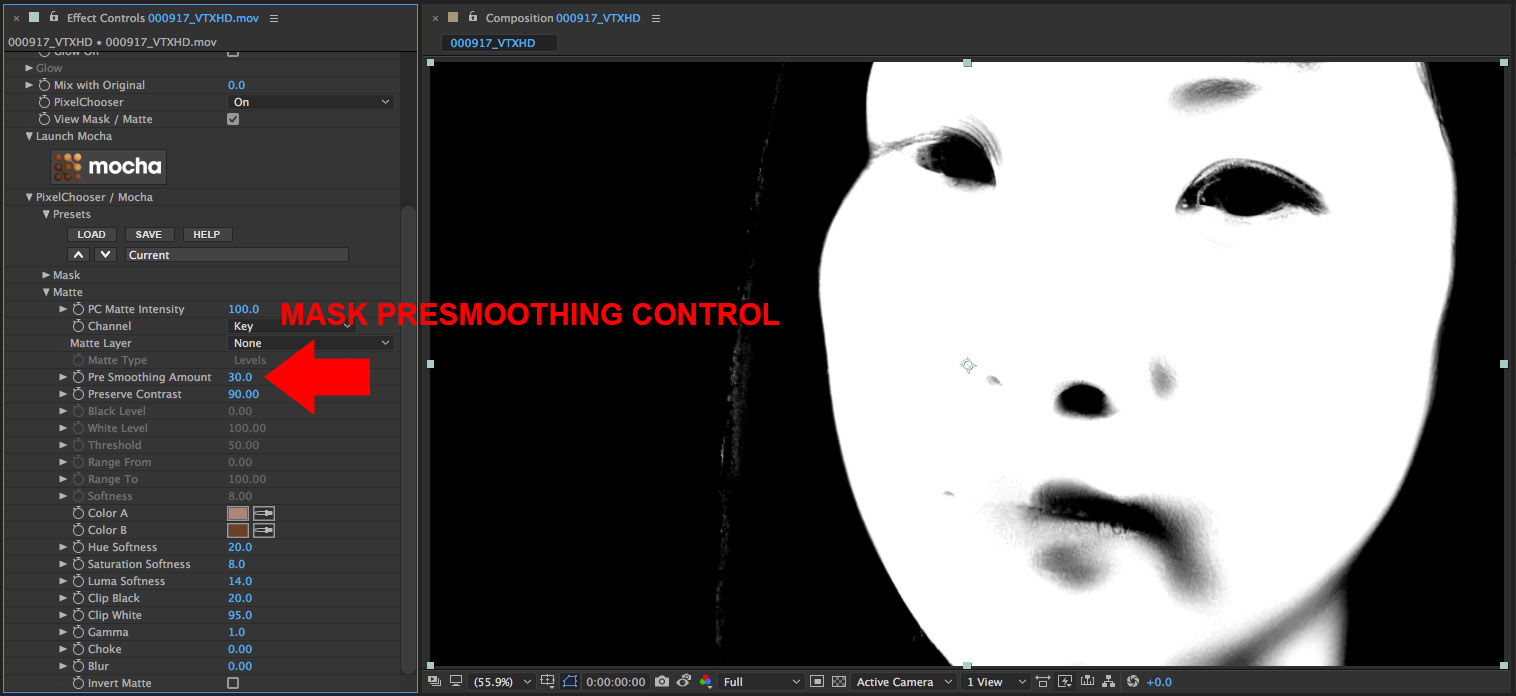
• Pre Smoothing Amount : advanced edge-aware smoothing of the source prior to any modifiers being used. Allows generating smoother masks without softening important image detail.
• Preserve Contrast : use in conjunction with the pre smoothing option to preserve contrast in the matte
• Black Level : use to control the shadow areas of the matte when using levels
• White Level : use to control the highlight areas of the matte when using levels
• Threshold : use to set the threshold for the black/white regions of the matte
• Range From : use to set the start point (highlight) for a range based matte
• Range To : use toast the end point (shadow) for a range based matte
• Softness : use to expand or contract a threshold or range based matte
• Color A : use to set color for keyer
• Color B : use to set color for keyer
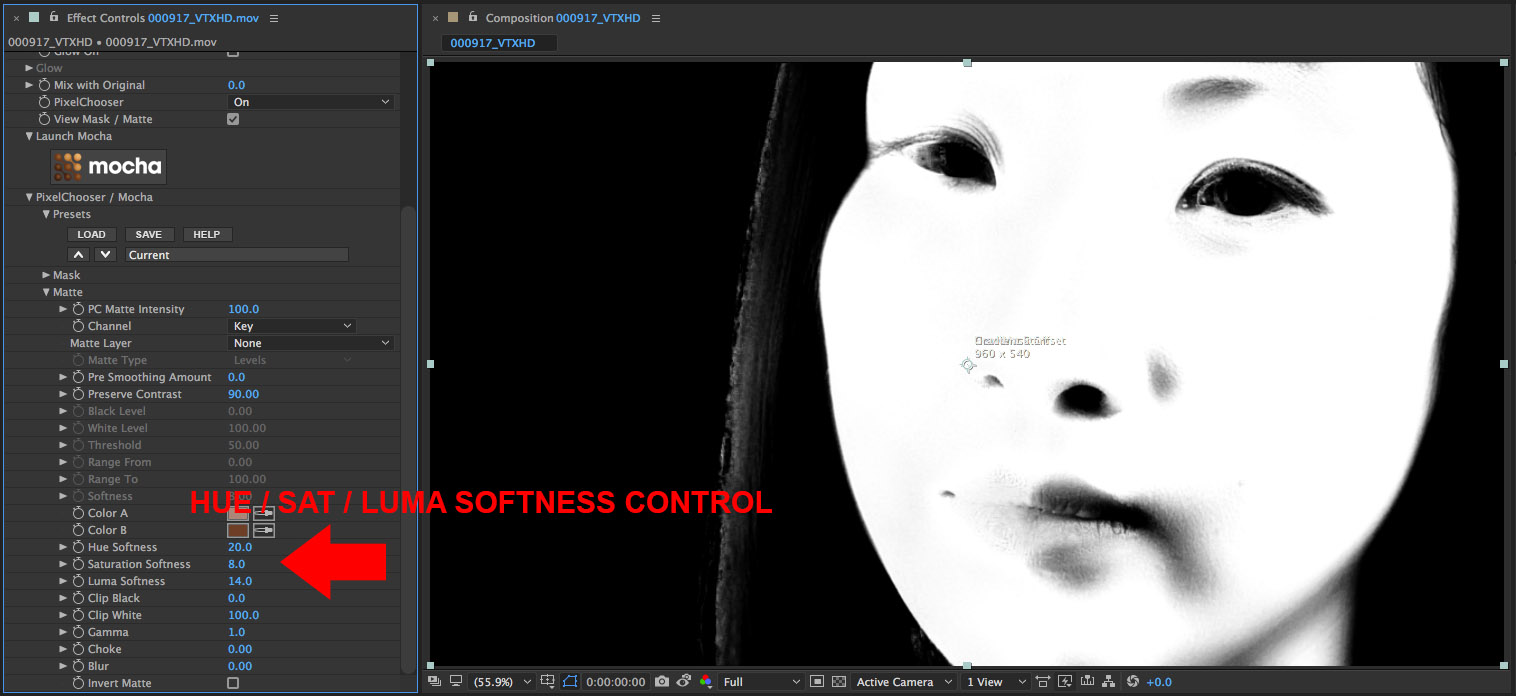
• Hue Softness : use to expand or contract the hue values used by the keyer
• Saturation Softness : use to expand or contract the saturation values used by the keyer
• Luma Softness : use to expand or contract the luma values used by the keyer
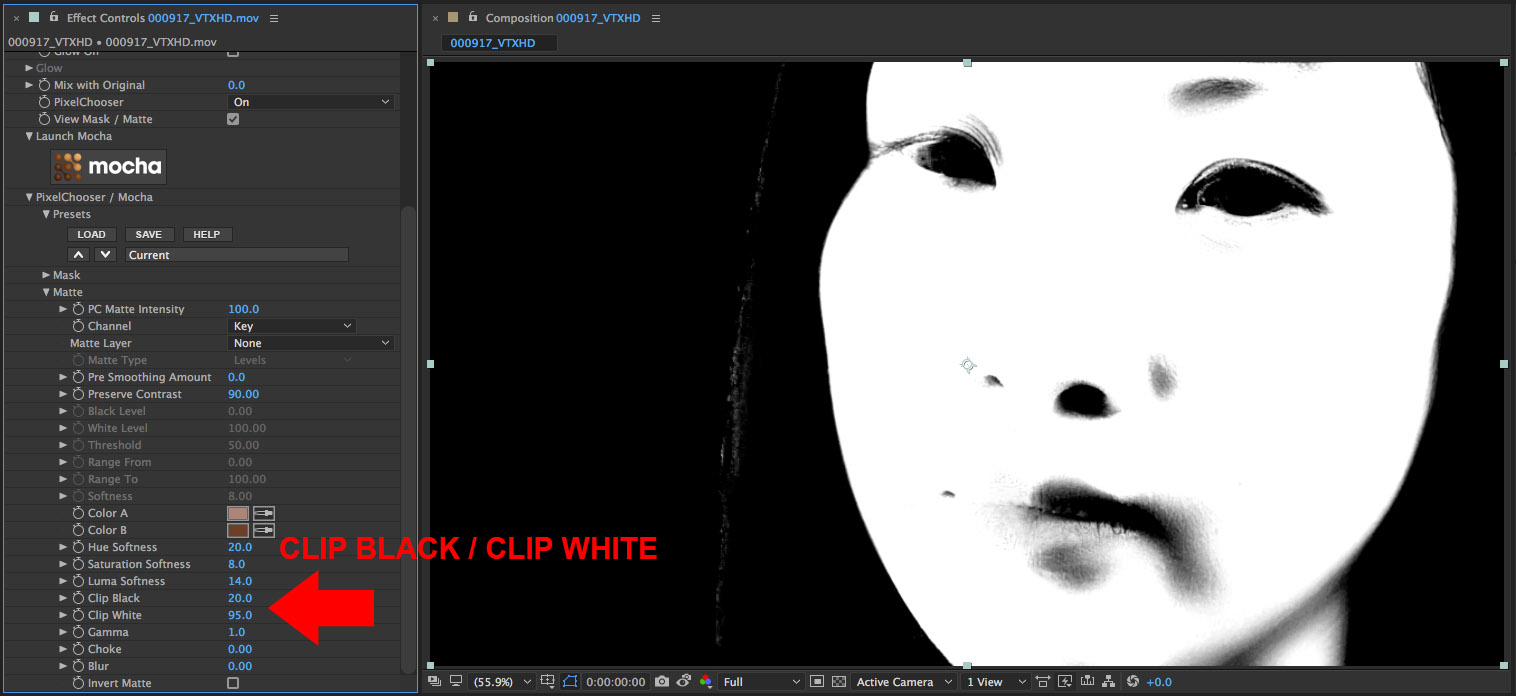
• Clip Black : use to control the shadow region of mattes generated by the keyer
• Clip White : use to control the highlight region of mattes generated by the keyer
• Gamma : use to adjust the gamma of mattes generated by the keyer
• Choke : use to shrink / spread the generated matte
• Blur : use to post-soften or blur the generated matte
• Invert Matte checkbox : inverts the matte when enabled
————————————————————————————————
Usage Examples
————————————————————————————————
Example 1a
Simple Gradient Matte – BCC Fast Film Process – In this example, we’ll describe how to limit the filter effect to just the top of a shot with the linear gradient shape.
• Start by applying the BCC Fast Film Process filter to a source clip
• By default this filter has no effect on the source
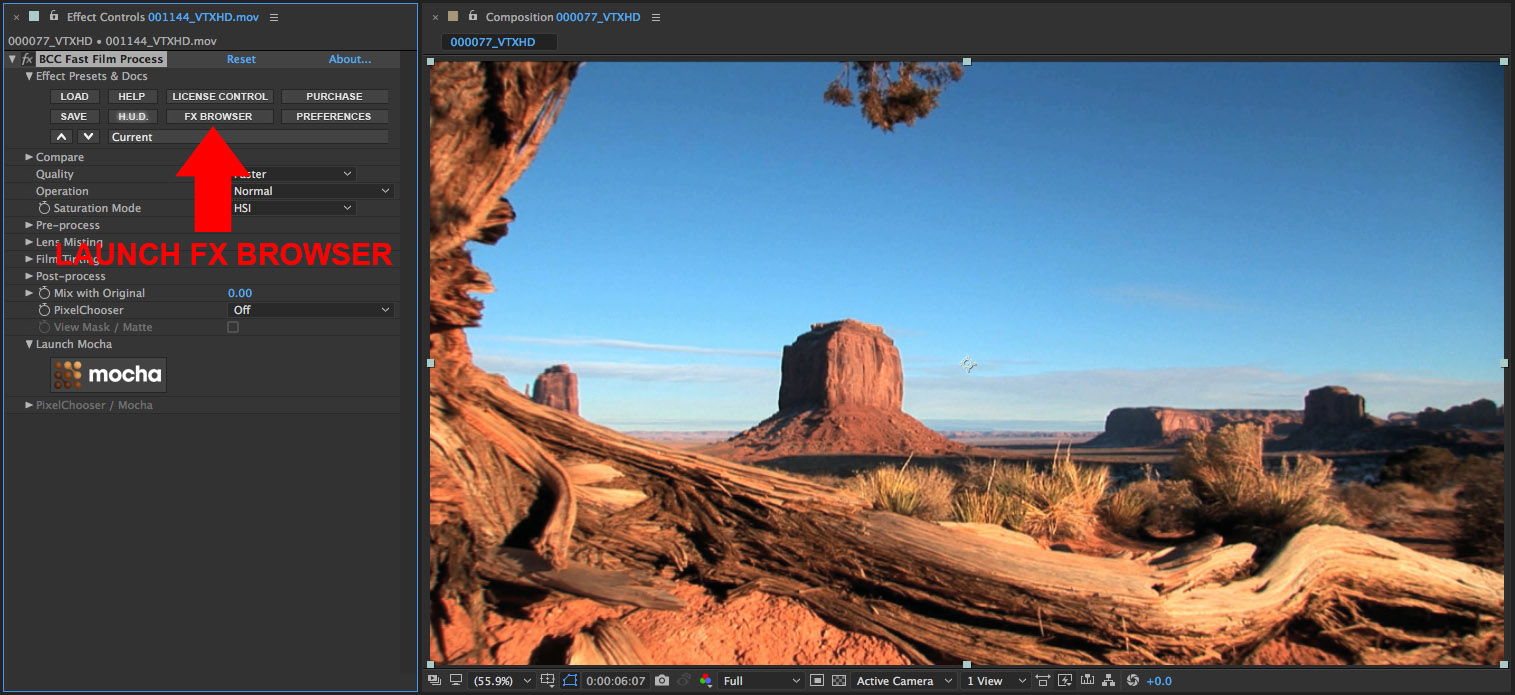
• Click on the FX Browser button at the top of the filter to launch the FX Browser User Interface
• FX Browser UI
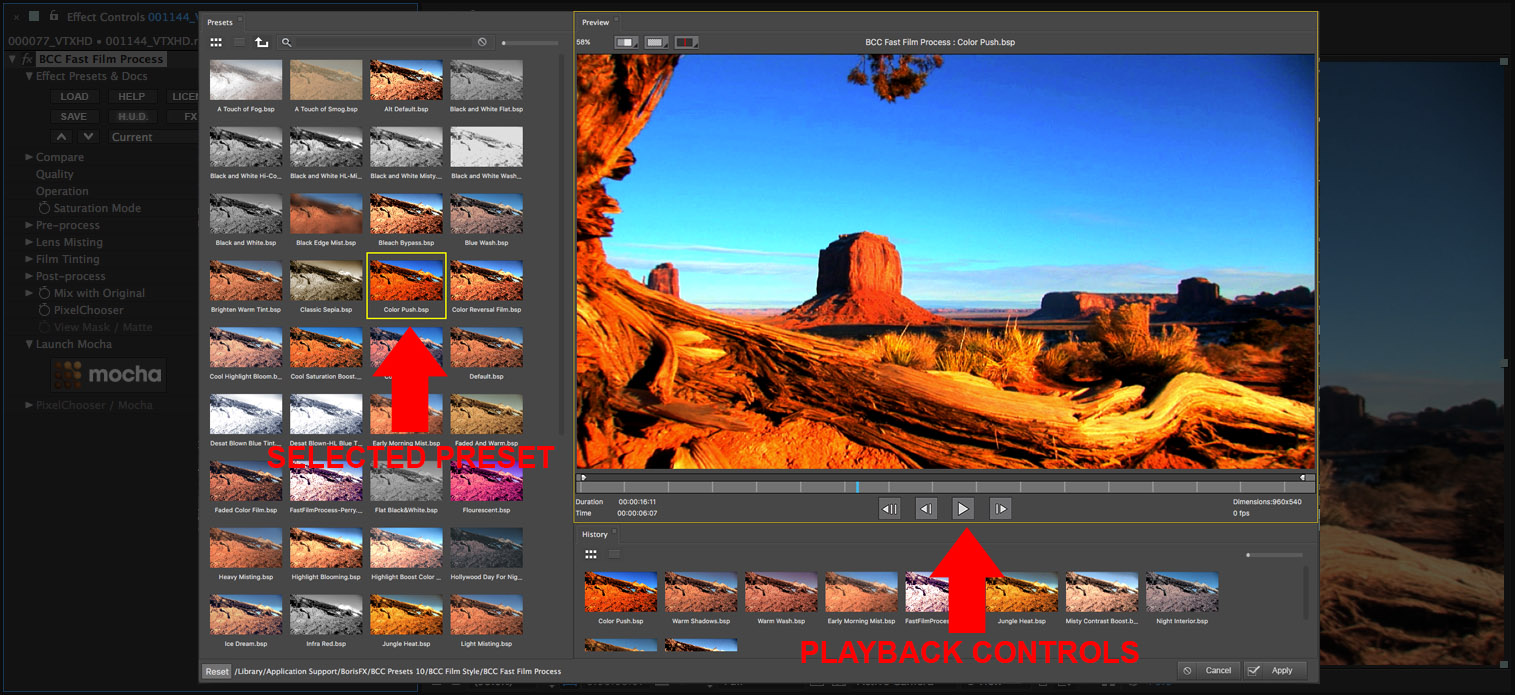
• Select the preset labelled “Color Push”
• Click the Apply button to apply this preset to the source clip and return to the host UI
• Observe the the selected filter effect has been applied over the entire source clip
• Set the PixelChooser pop-up to On
• Enable the View Mask/Matte option by clicking the checkbox
• Observe that the source image has been replaced with solid white. This is because the mask/matte has not been set up
• Twirl open the PixelChooser group to reveal the Mask and Matte options
• Twirl open the Mask group
• Click on the Shape pop-up to view the Mask options
• Select Gradient – Linear from the list that appears
• Observe that the image in the viewer is now a horizontal black – white gradient. The area that is black will serve as a hold-back mask for the filter, meaning that these areas will be protected. The area that is white is the pass-through for the mask and this is where the filter will have an effect on the source clip. The gradient will ramp the filter effect from 0 (black) through to 100 (white). Now we’ll adjust the mask.
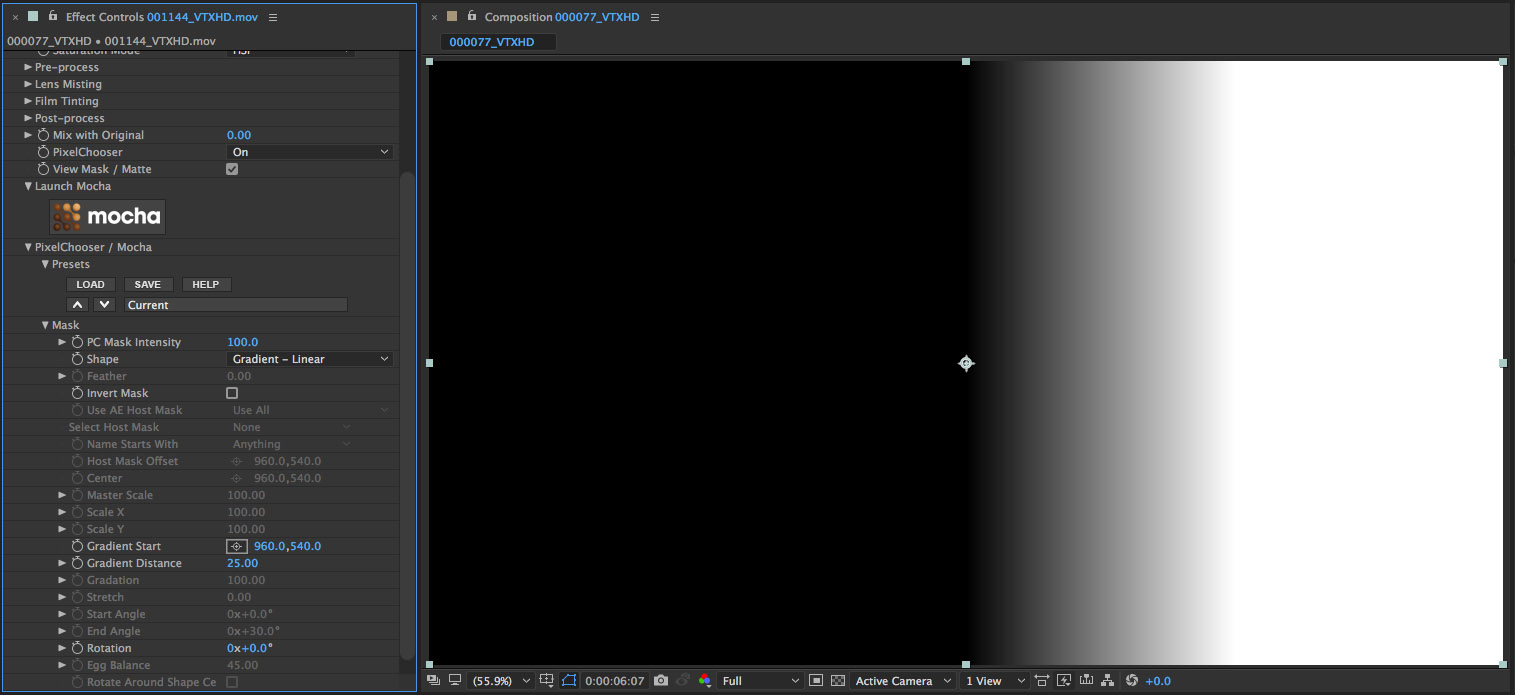
• Set the Rotation parameter to a value of minus 90
• Set the Gradient Start to 700 (default is 540), which will shorten the masked area so that more of the upper portion of the clip is affected by the filter
• Set the Gradient Distance parameter to a value of 30 which will smooth the transition between the filtered and non filtered regions in the clip

• Now that we have the mask set up, let’s disable the View Mask/Matte option by clicking on the checkbox so that we can see the filtered result.
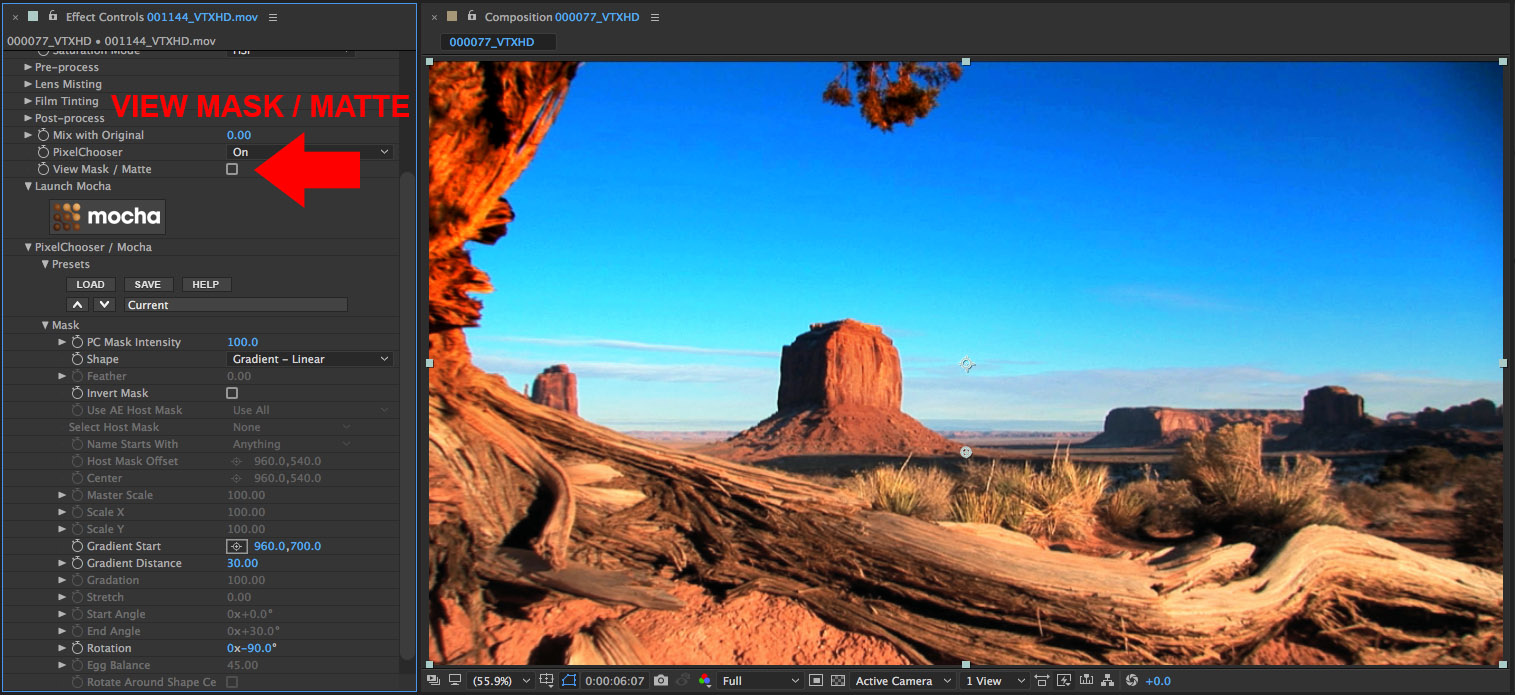
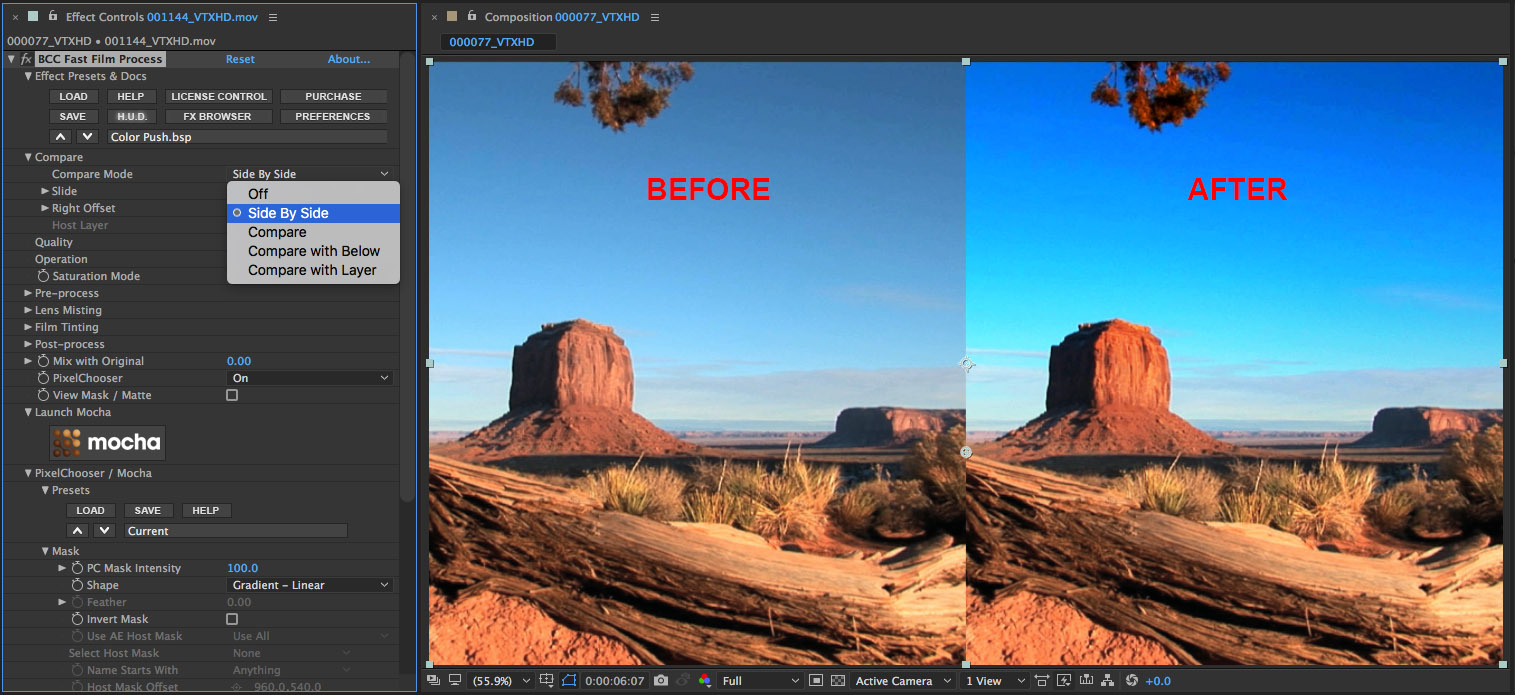
• Note that at the top of each BCC filter is a group of parameters labelled Compare Mode, which provides the ability to display a side-by-side comparison of the unfiltered and filtered source. This is a very handy way to preview the filtered result against the unfiltered source clip before moving to the next shot.
————————————————————————————————
Example 1b
– Combining a mask shape with a matte – BCC Fast Film Process – In this example, we continue to refine the mask that we created in example 1 by adding a pixel based matte to the gradient mask.
• Enable the View Mask/Matte option so that we can see the mask that we’re creating
• Twirl up the Mask group to hide these controls
• Twirl open the Matte group
• Click on the Channel pop-up to view the channel options
• Select the Blue channel from the list
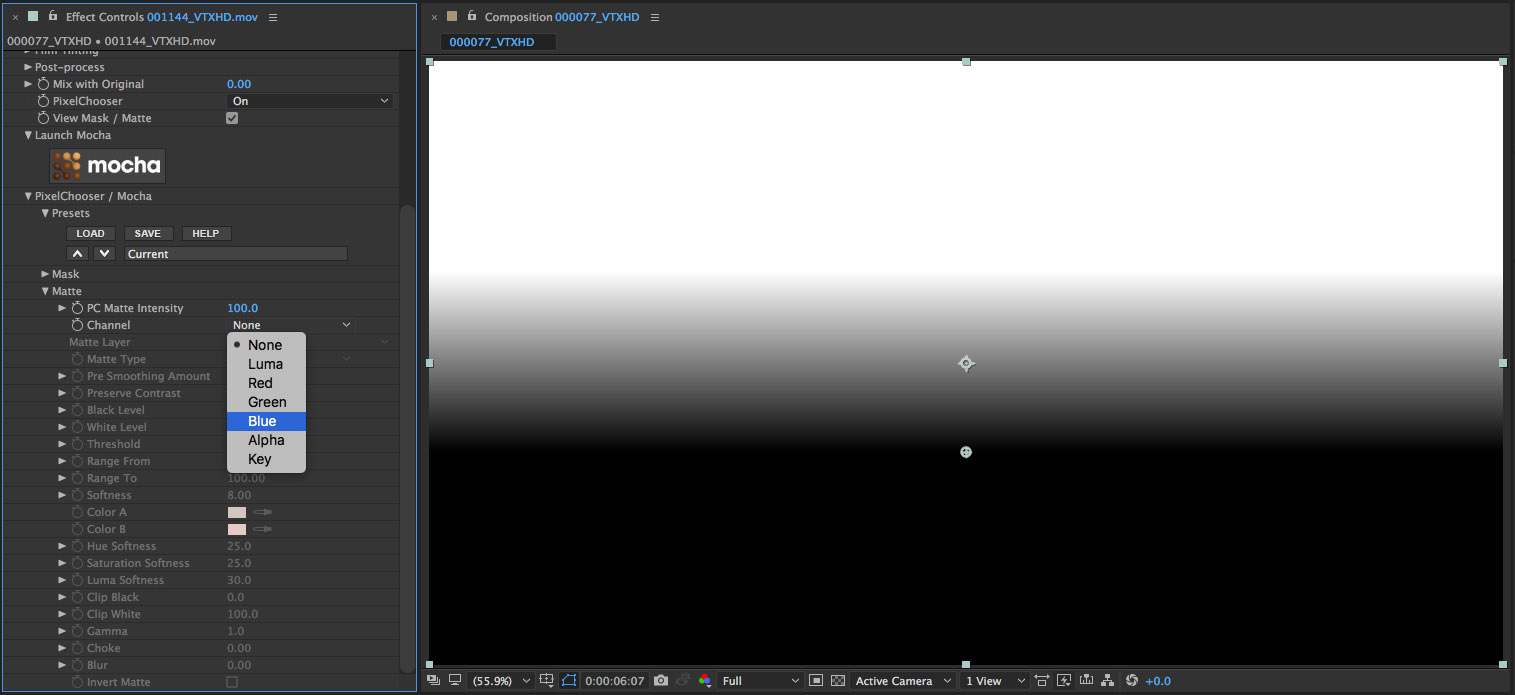
• Observe the change in the mask. Now we’re seeing pixels from the image that are included with the mask shape.
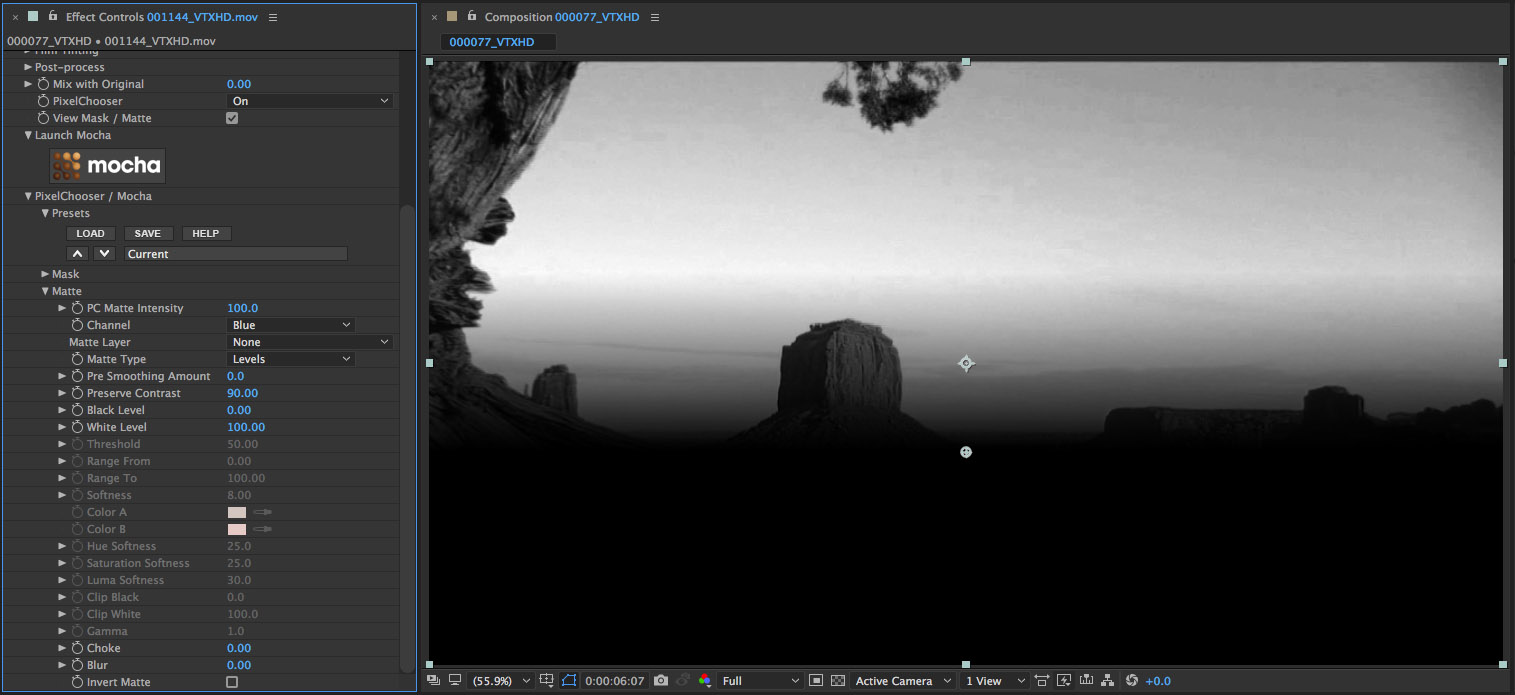
Next we’ll use some of the parameters in the Matte group to refine our selection
• Set the Black Level parameter to 40
• Observe how the dark area of the matte is now clipped
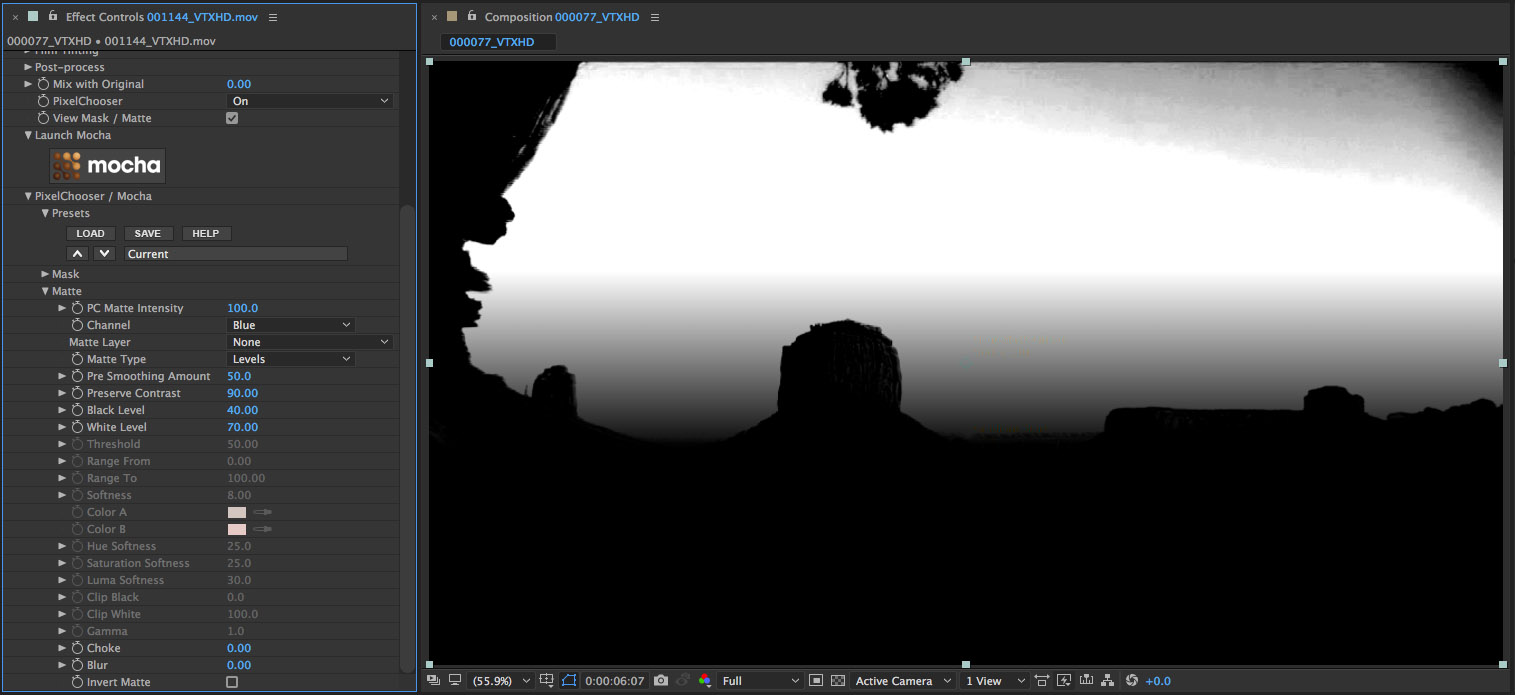
• Set the White Level parameter to 70
• Observe that the White area of the matte has expanded and is cleaner
• Set the Pre Smoothing parameter to 50
• Observe that the matte is now slightly softer as the pixels from the image source are smoothed with an advanced edge-preserving blur before being isolated and fed into the matte result
• Now let’s disable the View Mask/Matte option by clicking on the checkbox so that we can see the filtered result, which is that we’ve isolated the filter to operate only on the masked out portion of the image but again, we’ll enable the Compare Mode and select the Side-by-Side option to compare the unfiltered source with the filtered result
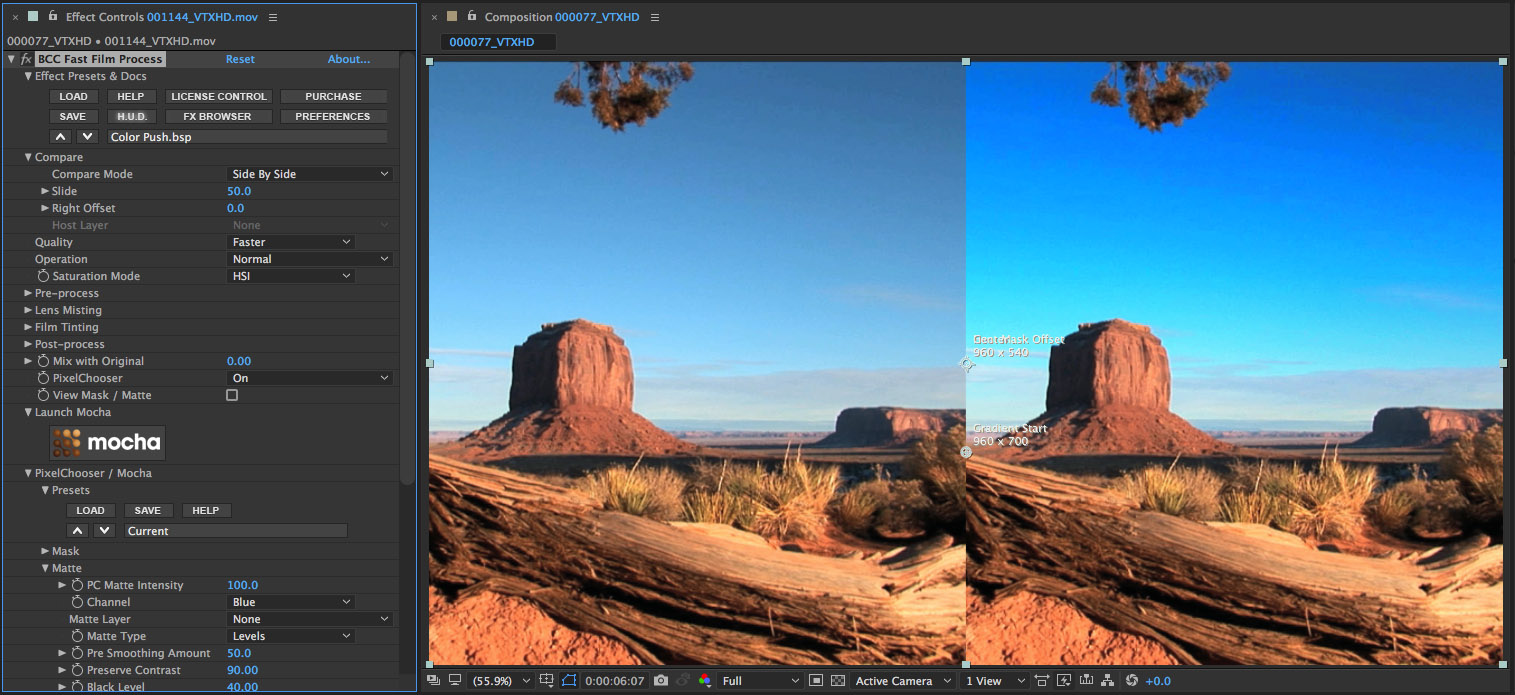
• And here’s the final result – a selectively filtered image

————————————————————————————————
Example 2a
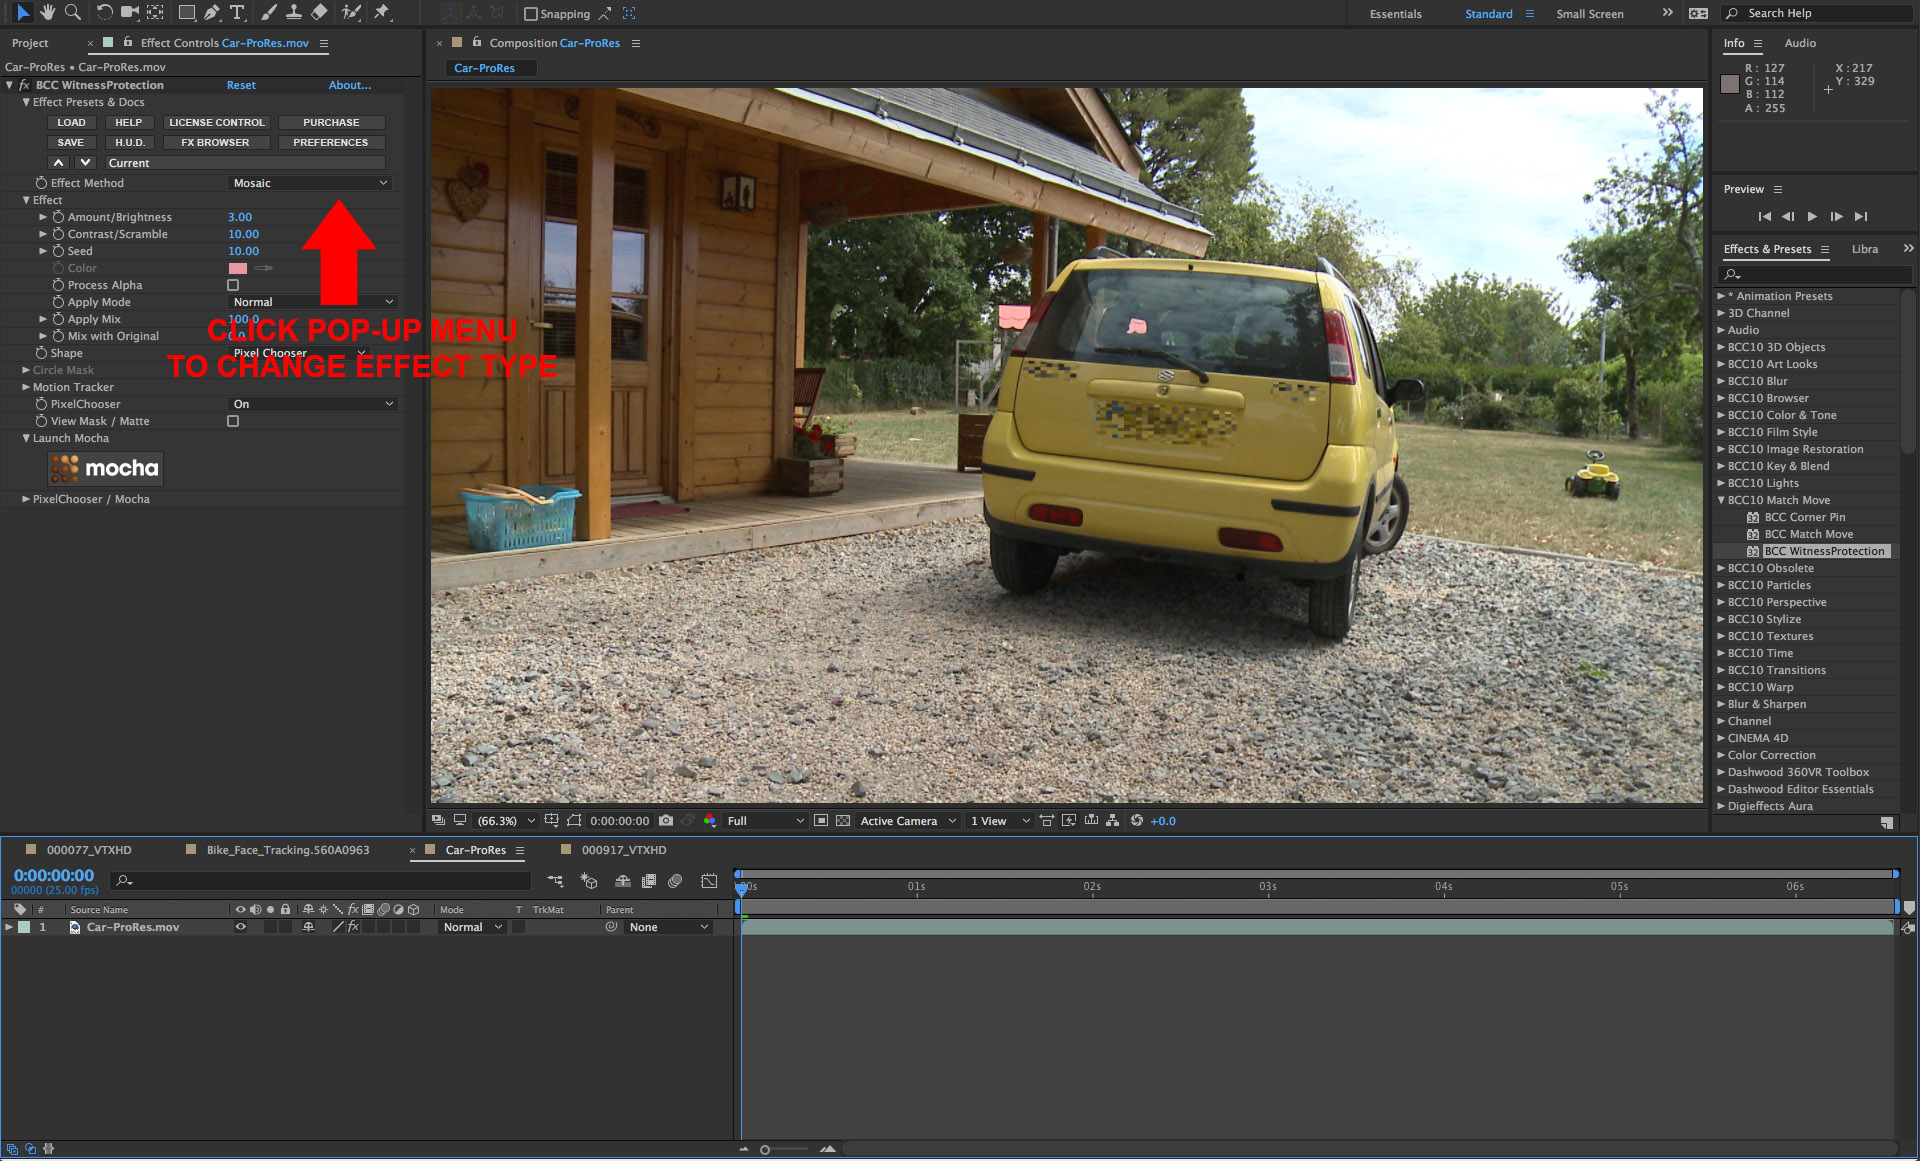
Using mocha to mask and track moving objects in a static scene – BCC Witness Protection
So in example 1a and 1b we’ve seen how we can use the PixelChooser to generate a static mask shape and combine that with a moving matte to isolate an area of the source clip on which the filter can operate. In Example 2, we’re going to use the PixelChooser to isolate multiple moving objects in a shot.
The source clip that we’re going to use for this example has two people riding bicycles down a path toward a locked down (static) camera. The object of this exercise is to isolate the faces of the cyclists and blur them.
• Start by applying the BCC Witness Protection filter to the source clip
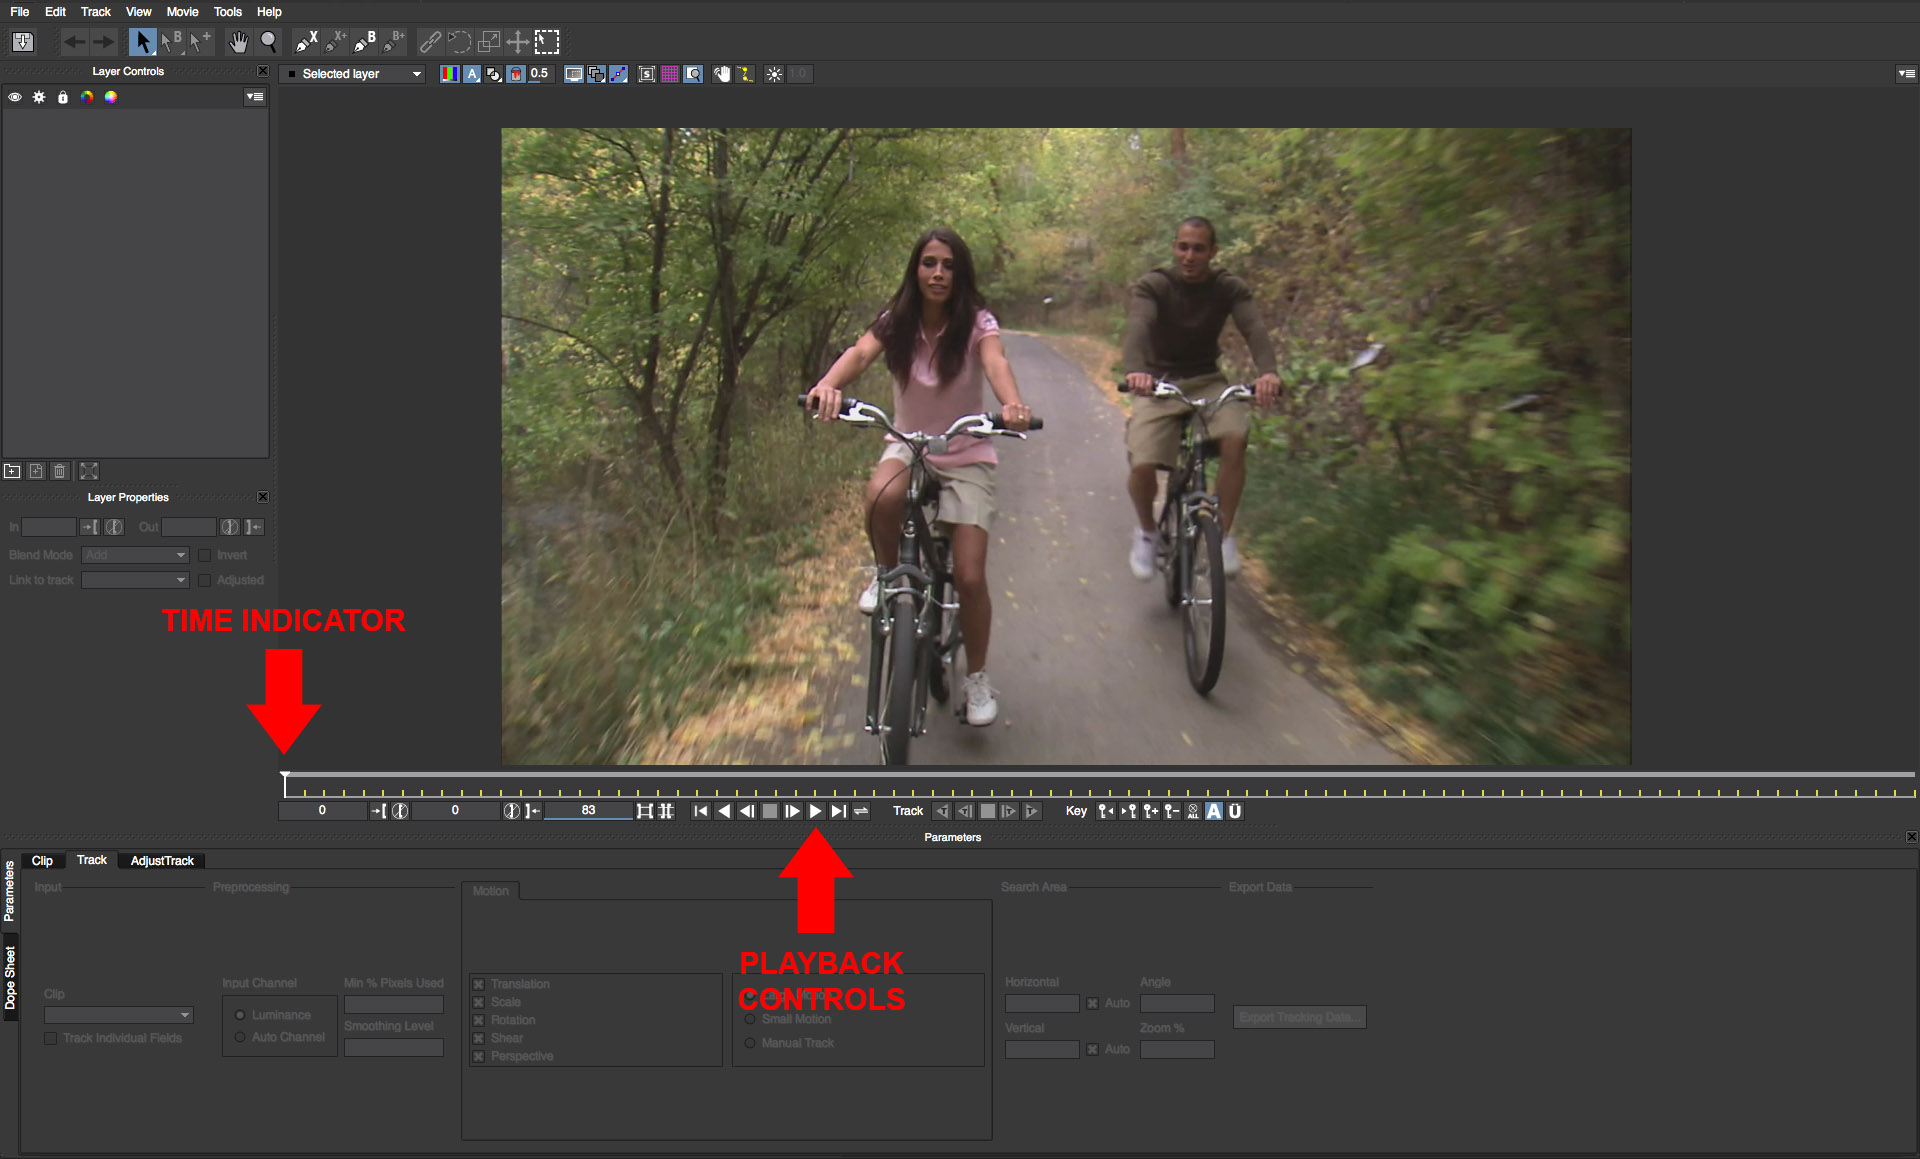
• In the filter control panel, click on the mocha button which will simultaneously enable the PixelChooser and launch the mocha custom user interface
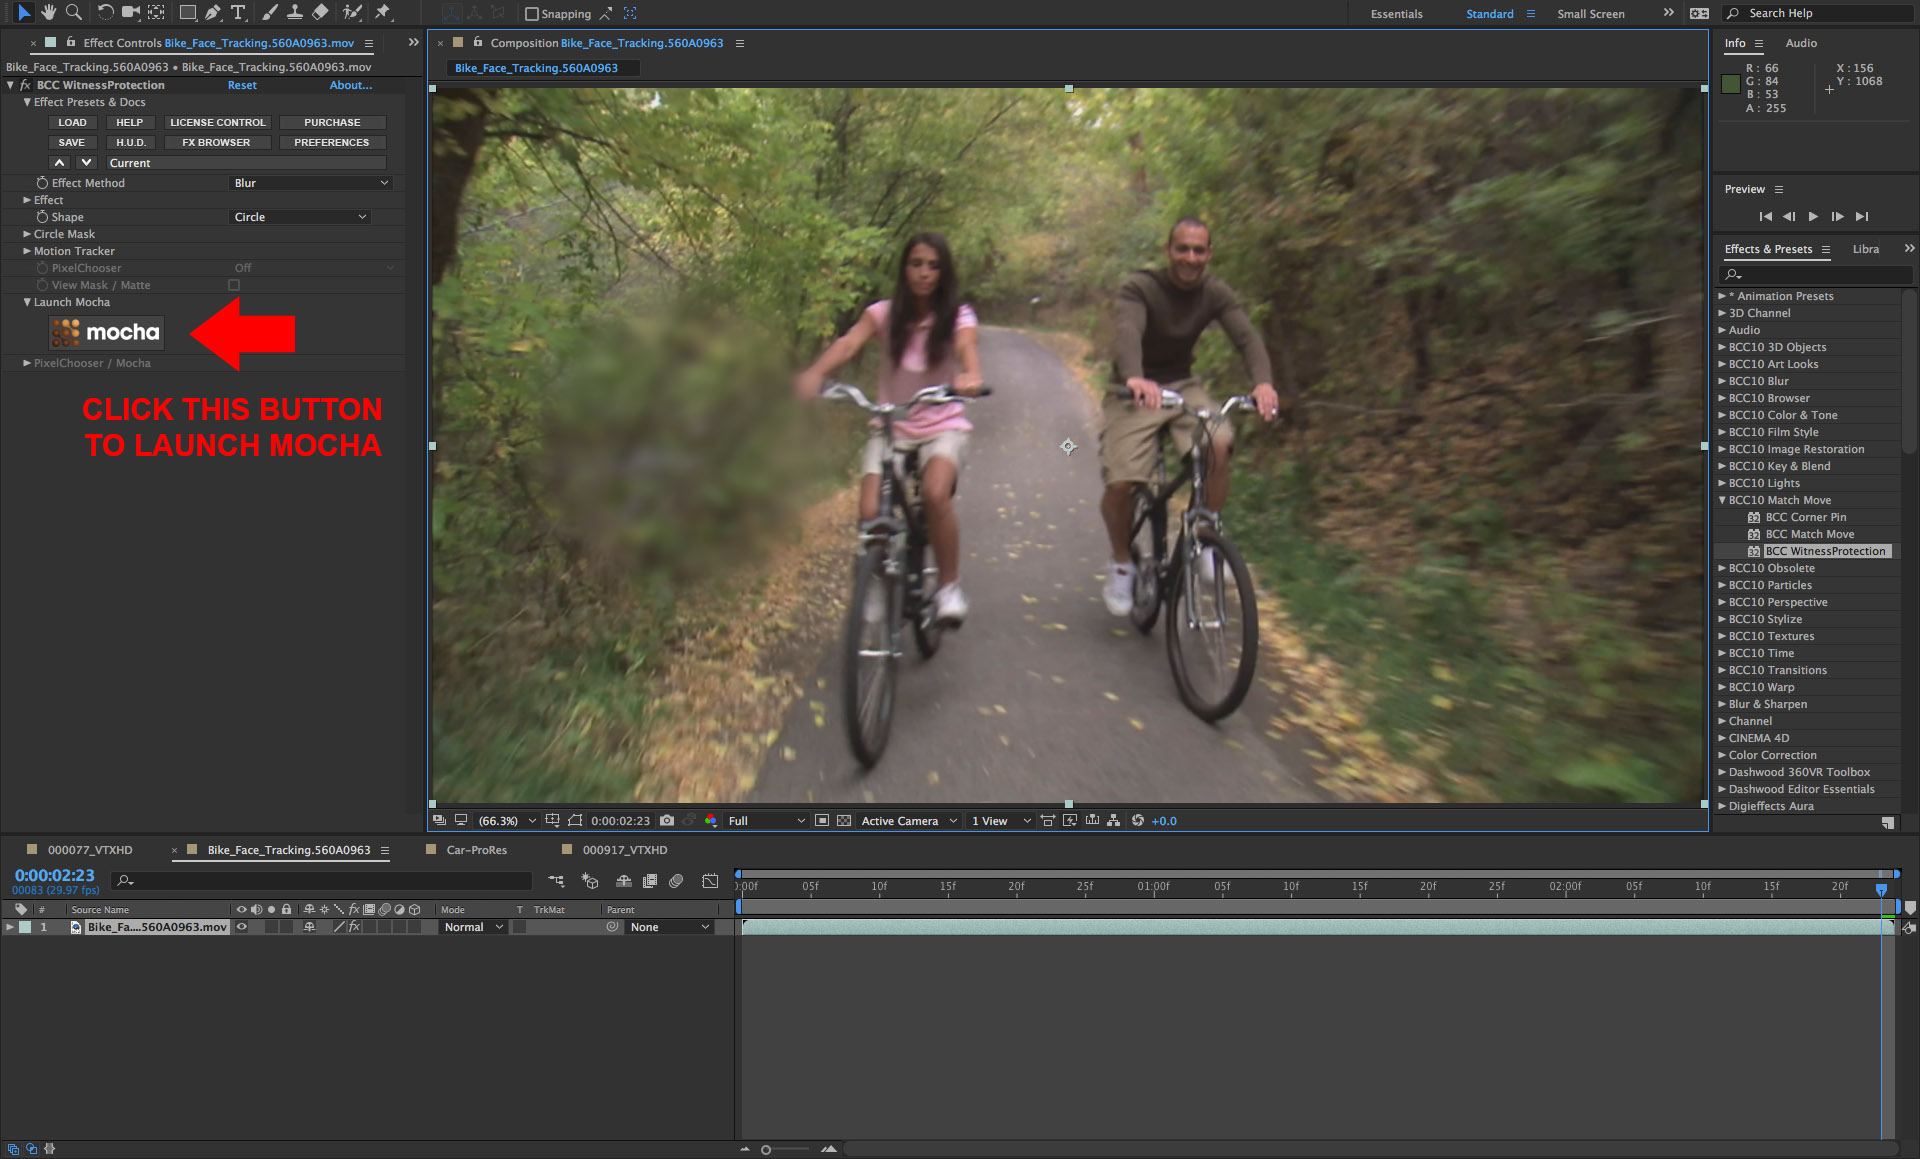
• In the mocha UI, drag the time indicator or press the play button to scrub through the clip to familiarize yourself with the motion of the bicyclists in the scene
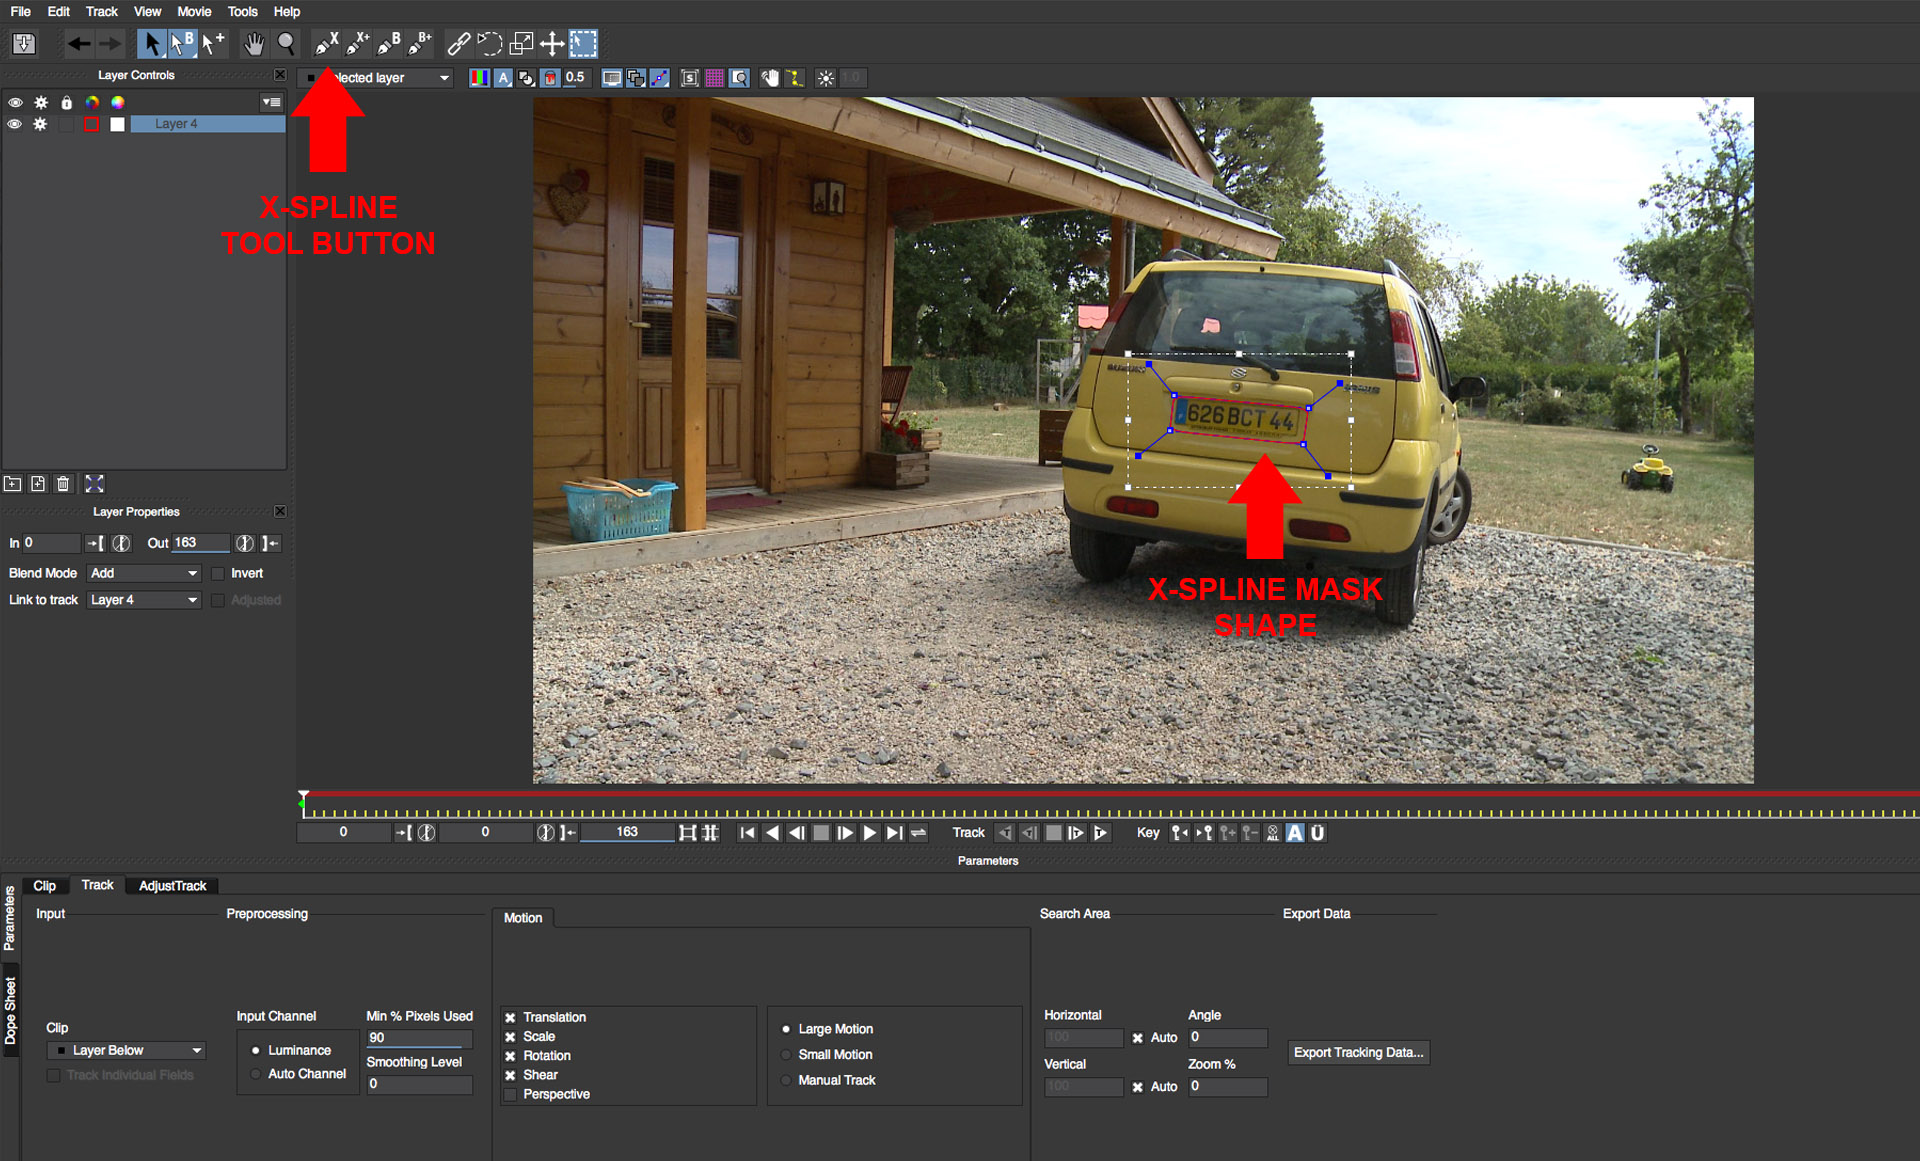
• In the toolbar that spans the top of the mocha UI, there is a button that looks like a magnifying glass. Directly to the right of that, there is a button with a pen nib and an X – this is the tool we use to generate X-Spline shapes.
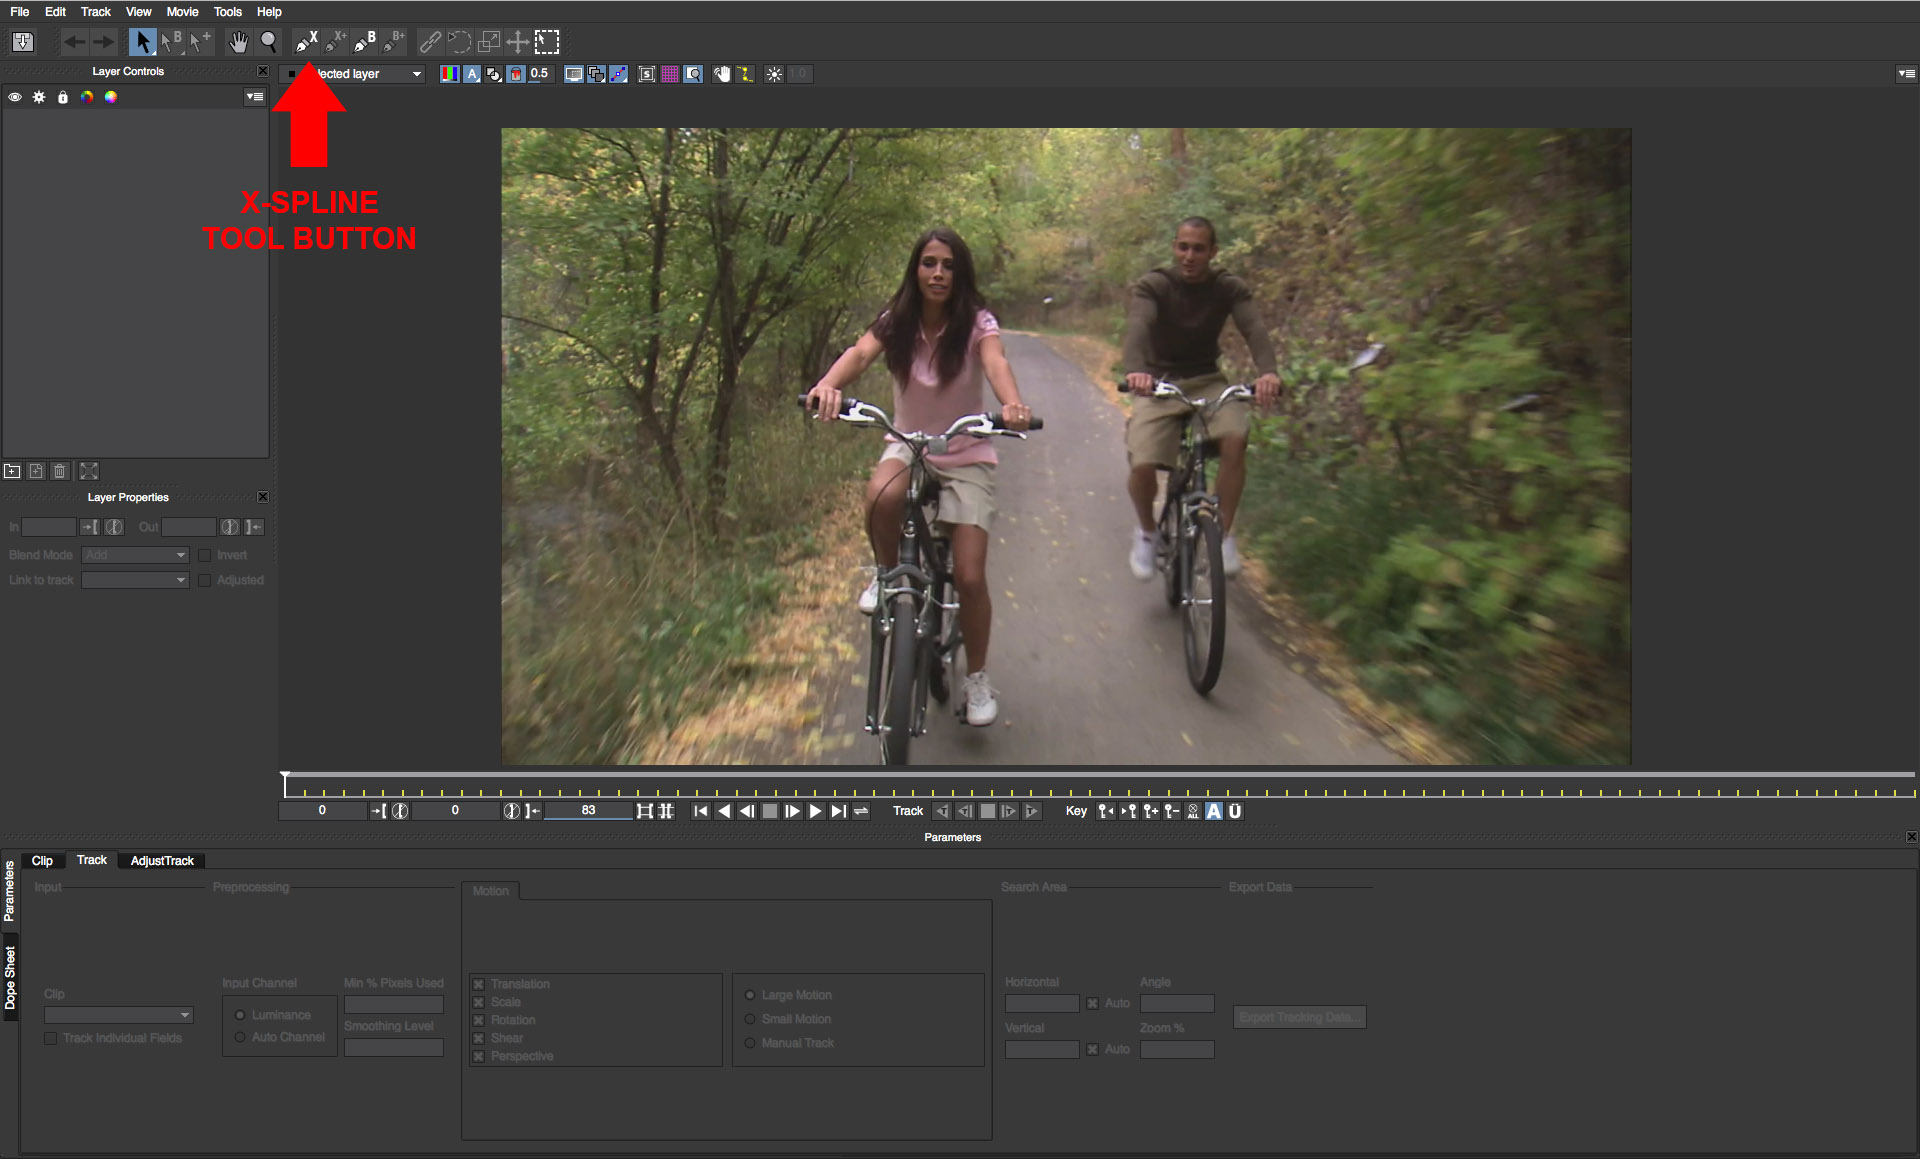
• Click on the X-Spline button to activate the tool
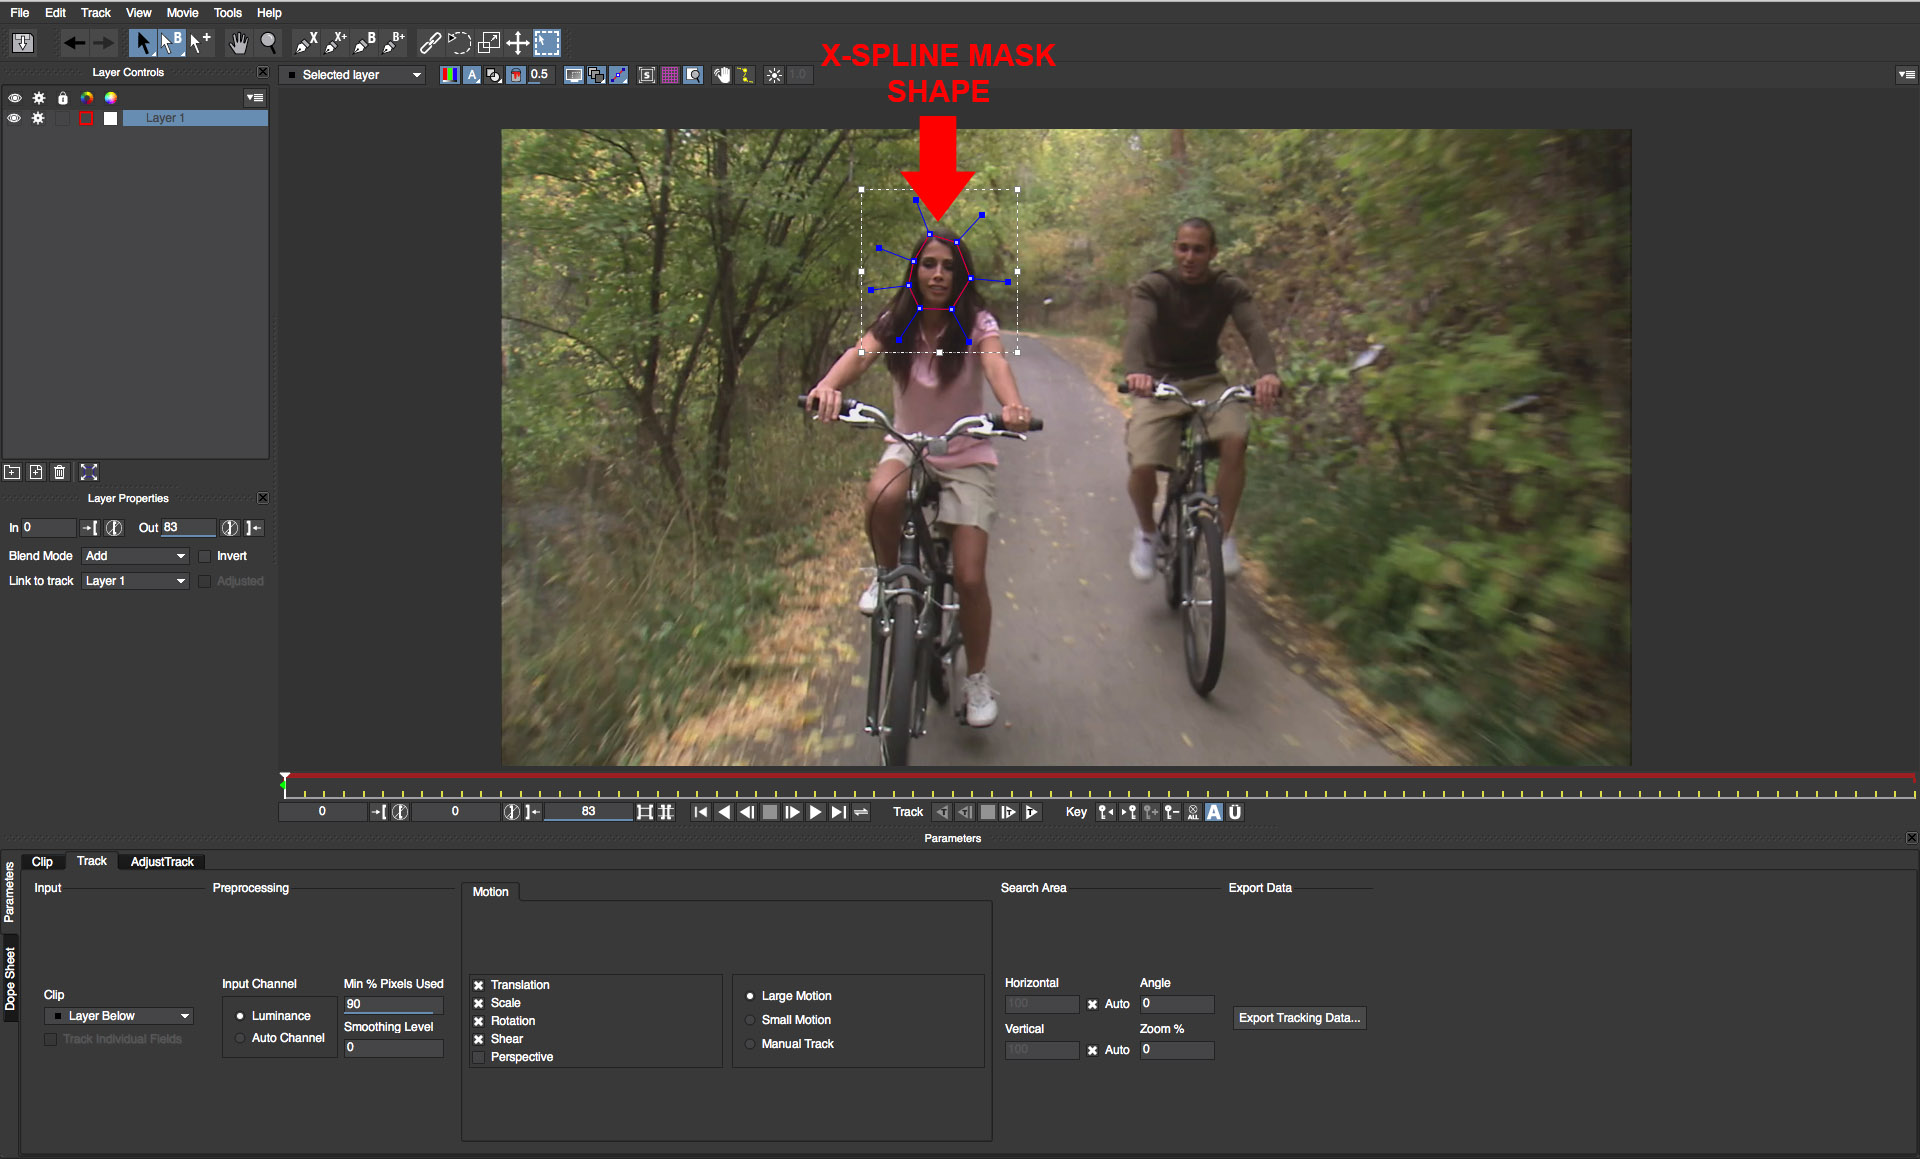
• Create a shape that covers the face of one of the faces. To close a shape use the right mouse button or press the enter key
• Repeat this procedure to generate a shape for the second face
• Now that we have basic shapes created they need to be tracked so that they remain locked onto the target as the cyclists move down the path.
• Select the two shapes either in the viewer panel or the layer controls panel
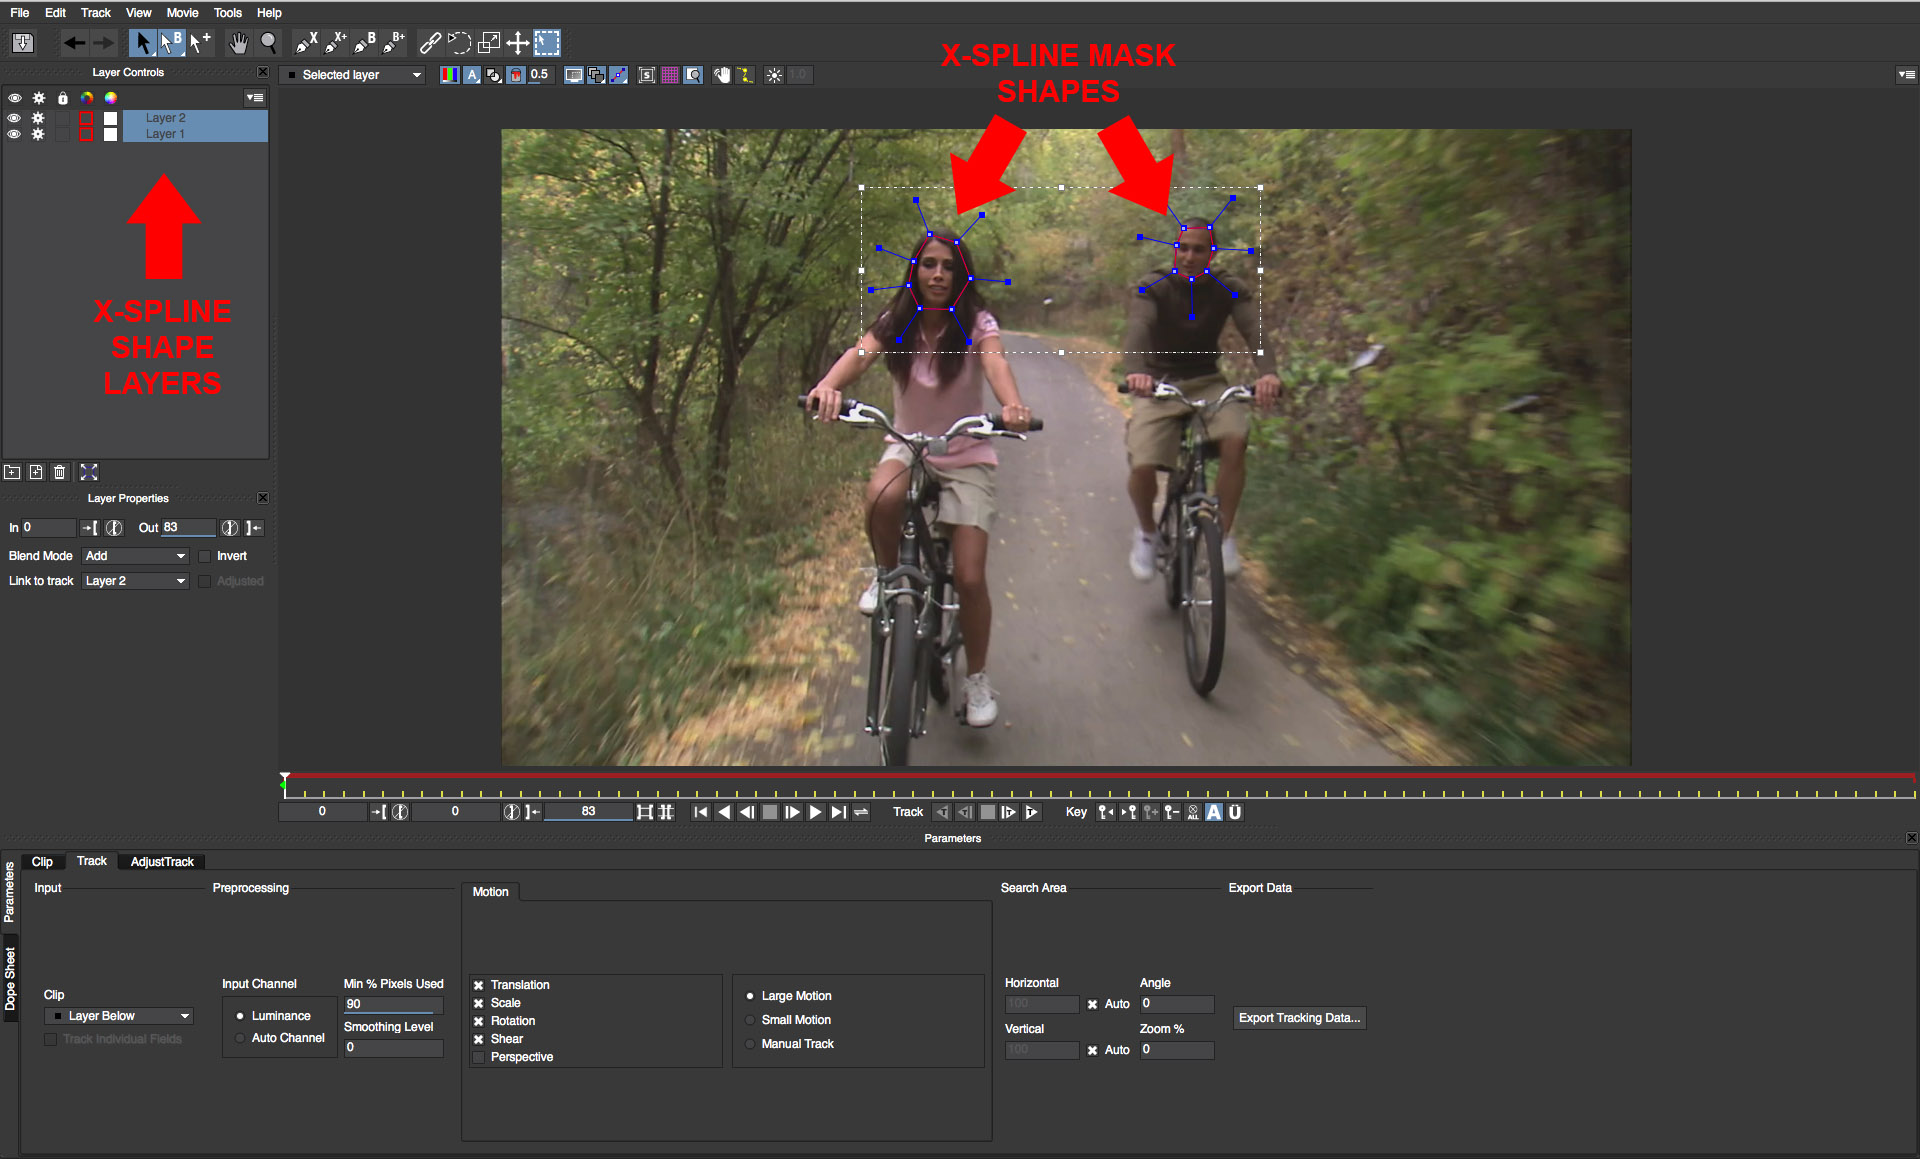
• Beneath the timeline there is a button in the Track group that looks like a play forward button with the letter T over it. Click this button to track the masks into the shot. Note that on some shots you might need to enable the Perspective option to correct for any drift
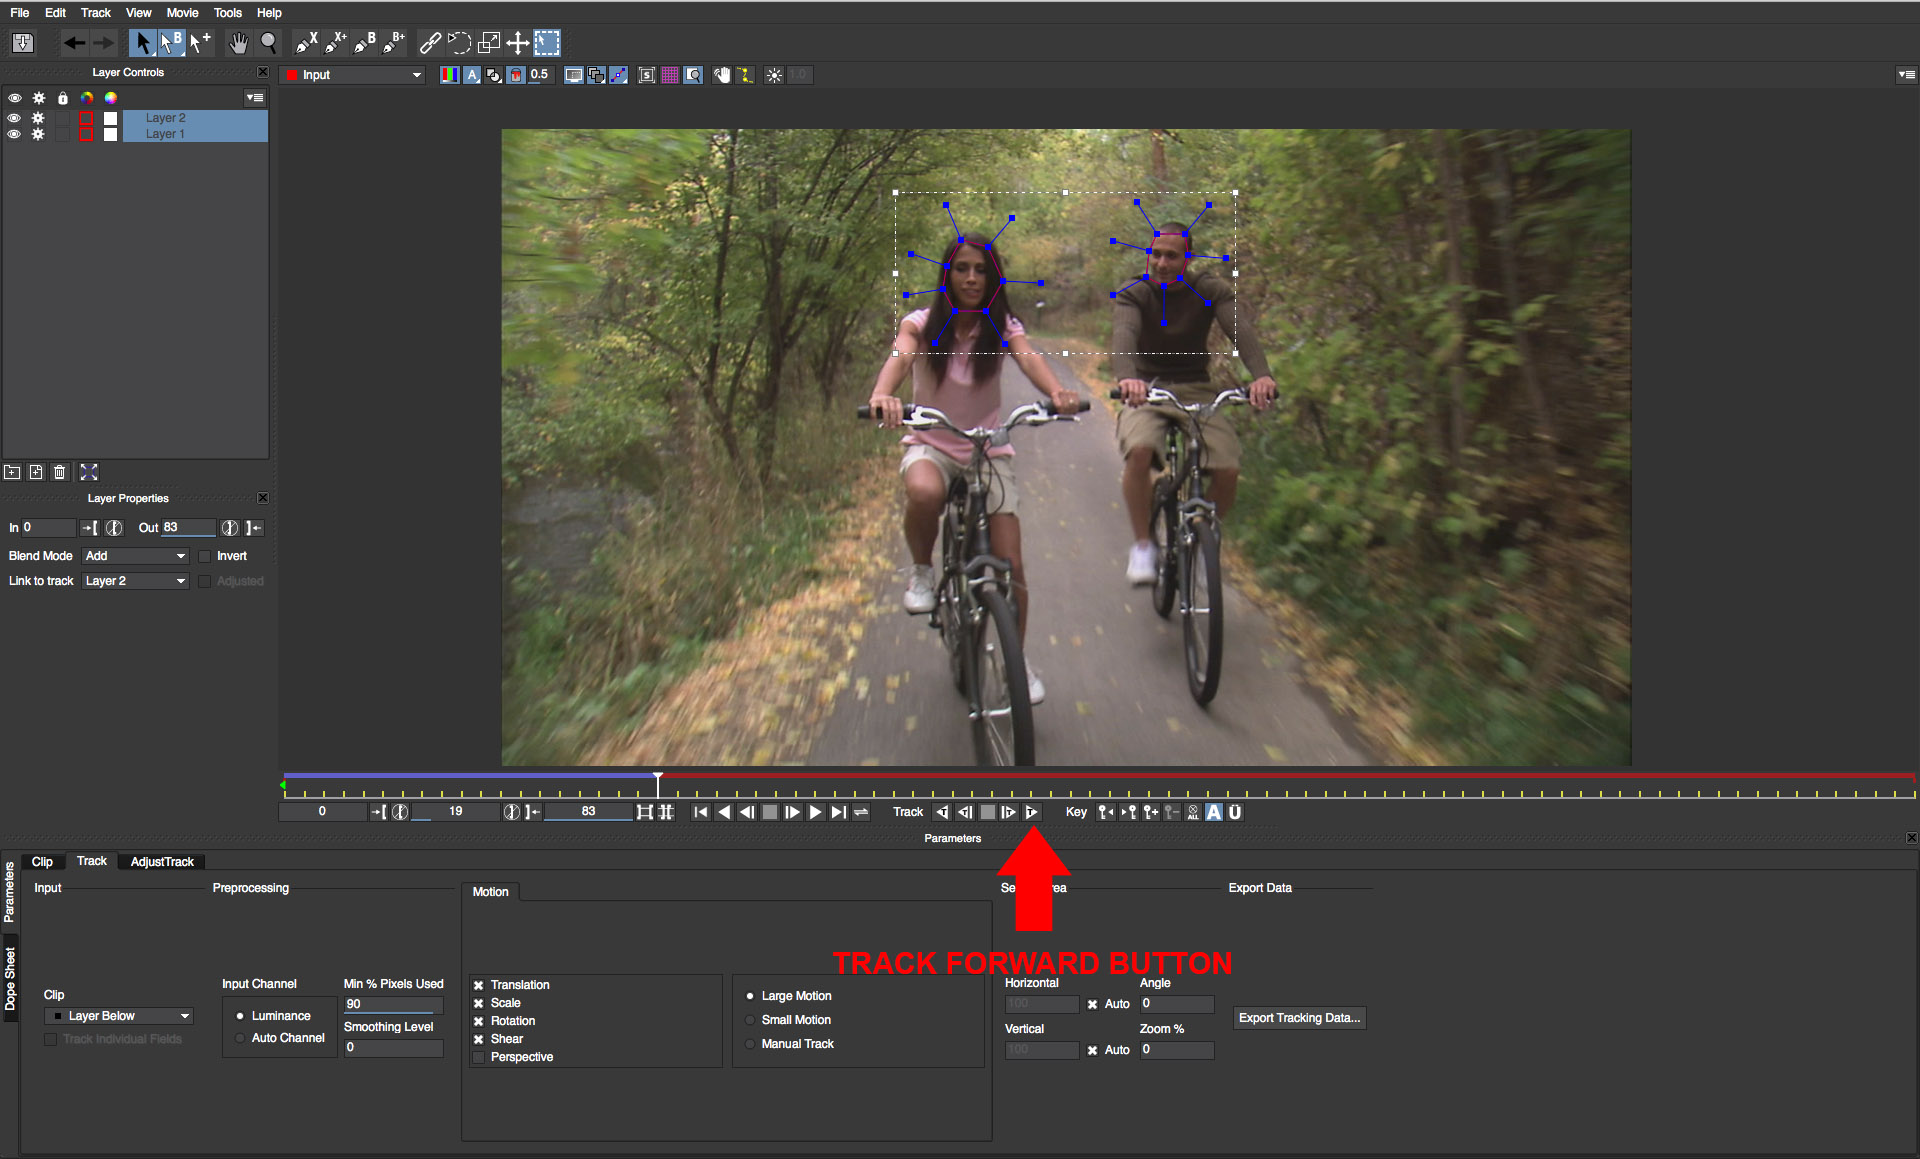
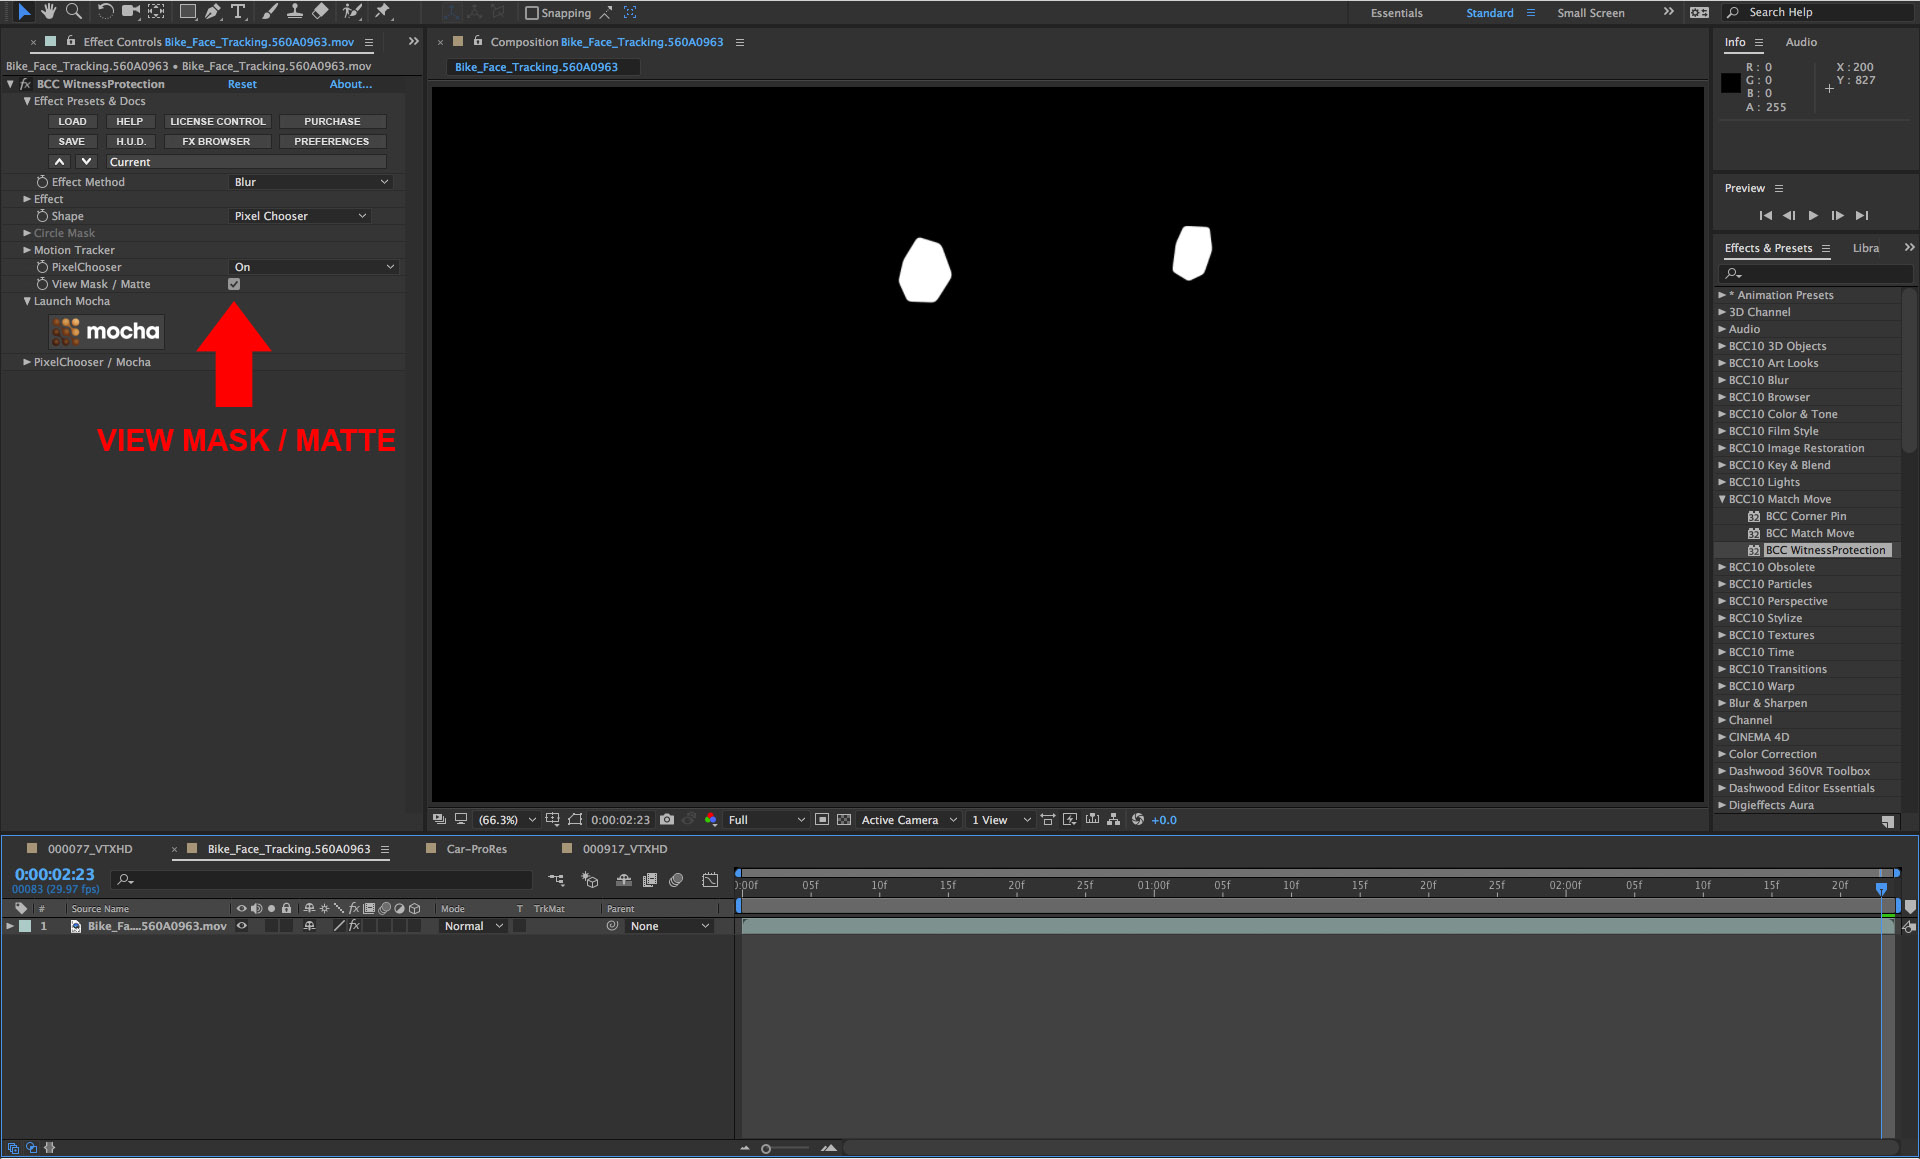
• Once tracking is complete, the movement of the mask shapes should be matched automatically to the movement of the faces in the scene
• In the row of buttons located at the top of the viewer, there is a view matte button that when enabled will display the shapes as semi transparent masks
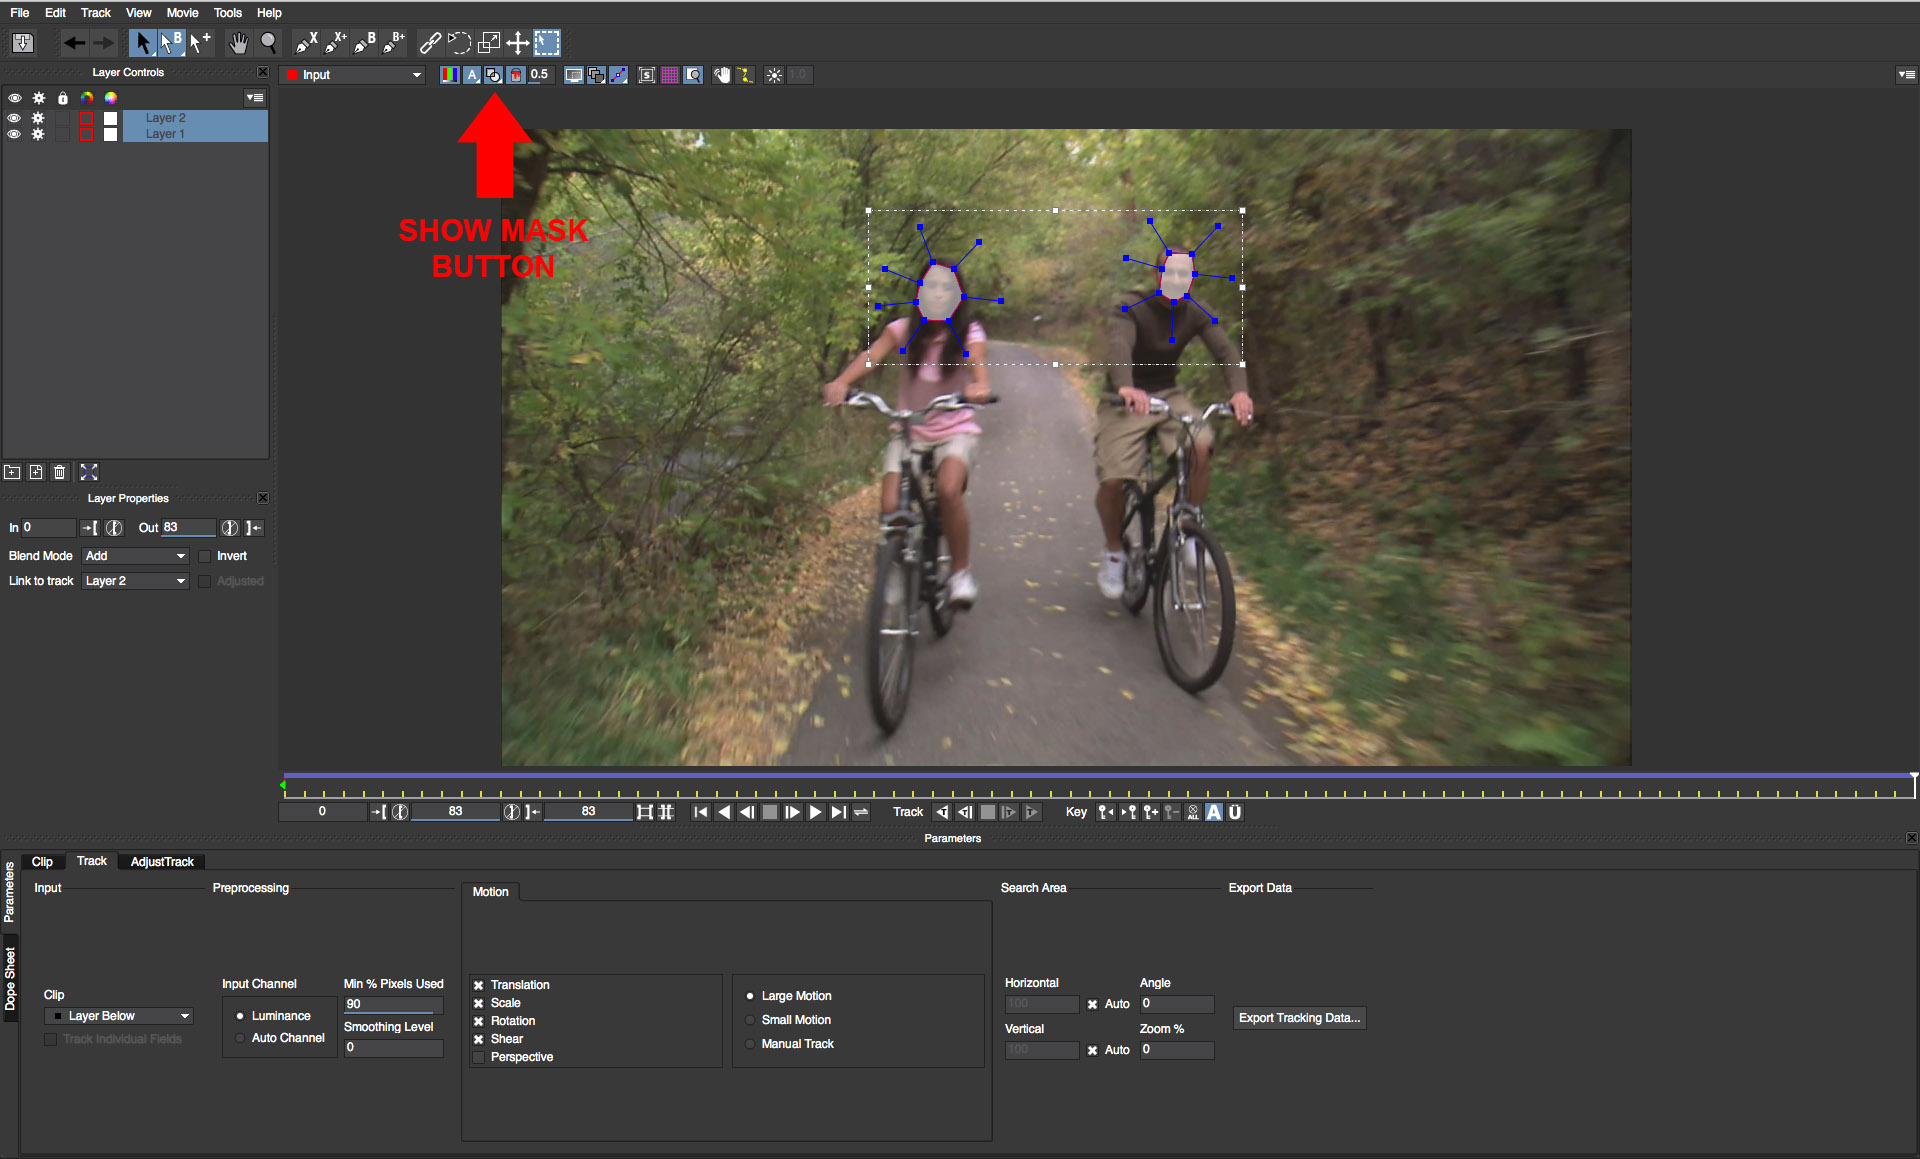
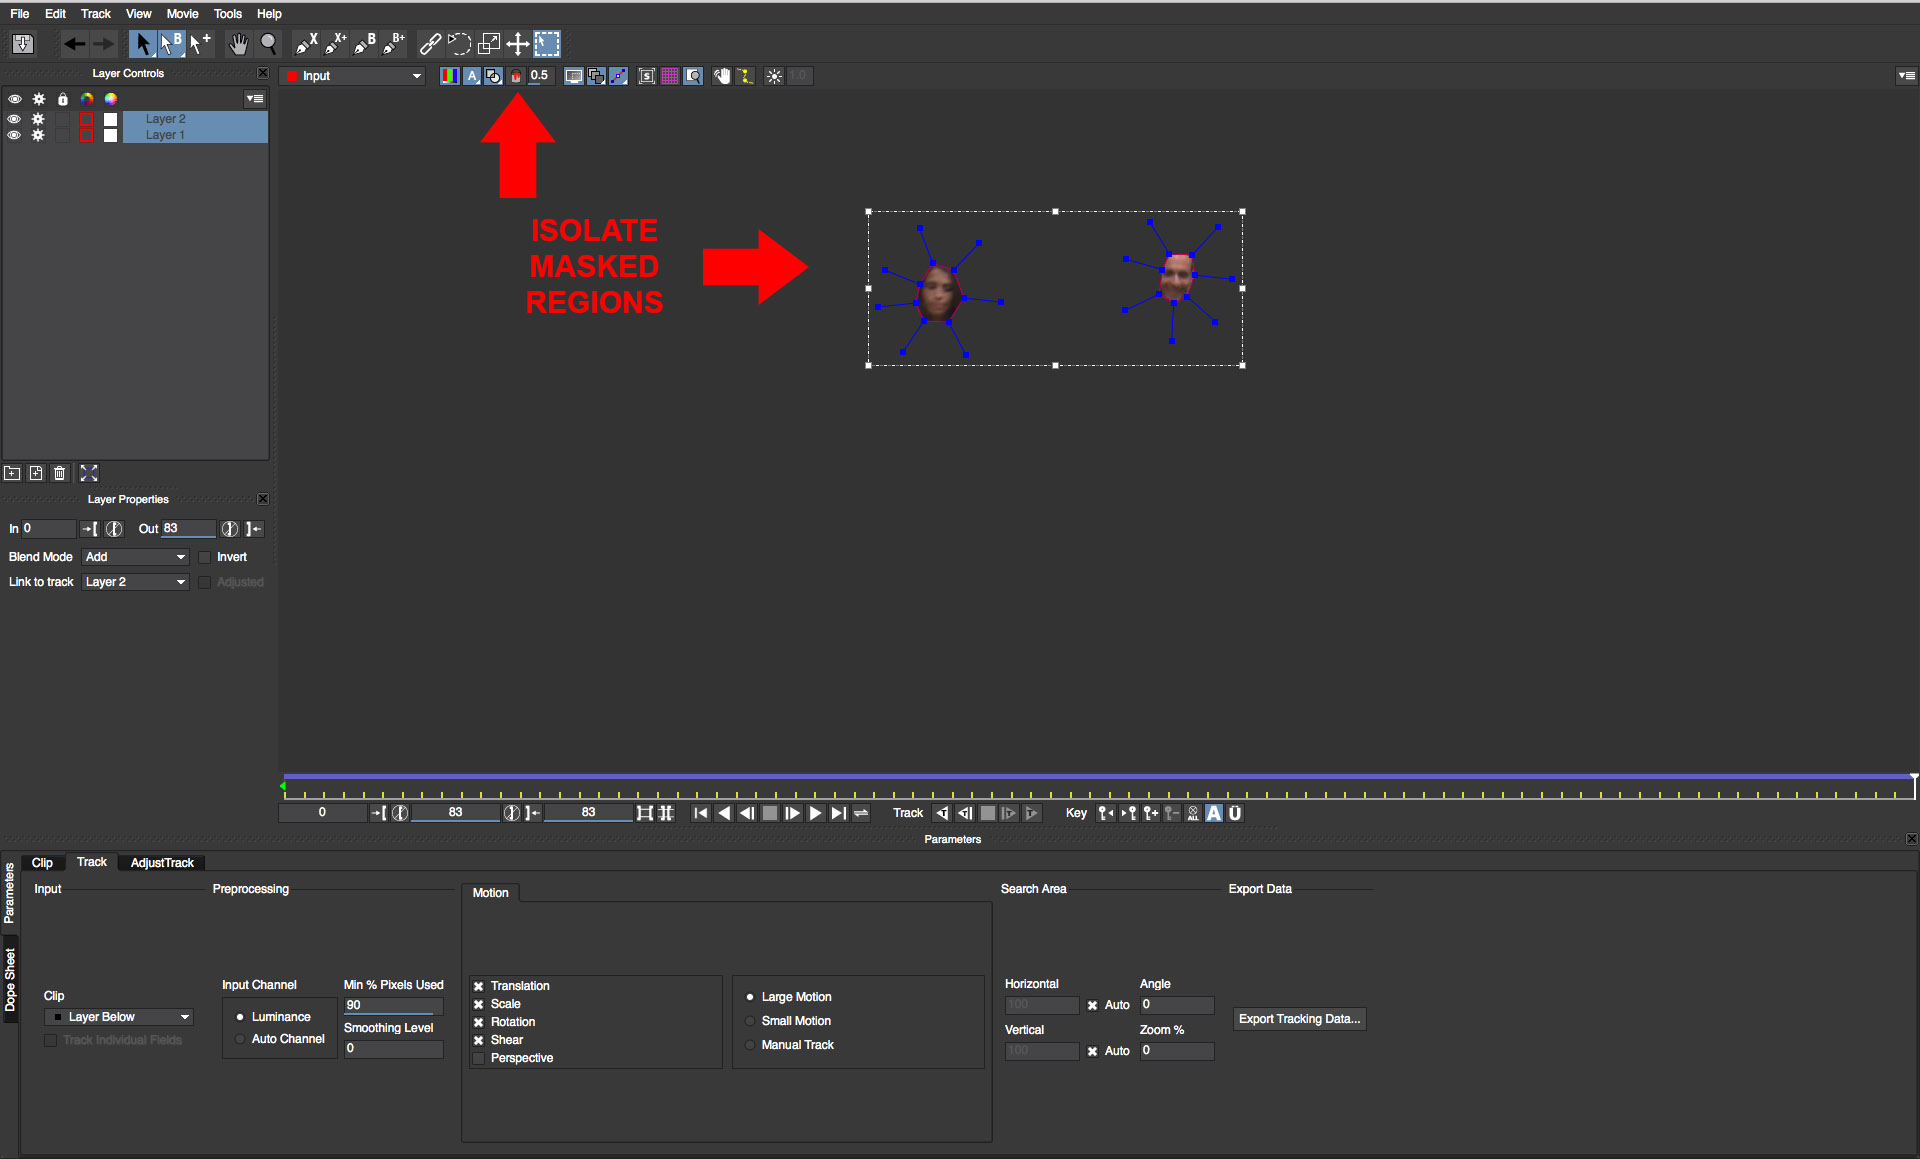
• Right next to the view matte button, there is an icon that looks like a paint bucket. Click this button and you can see the faces isolated in the shapes without the background
• Scrub through the timeline to ensure that tracking is accurate and adjust as necessary. (for more detailed information on using mocha, click on the Help button at the top of the mocha user interface.)
• Note that if you change any shape or point on a shape that mocha will automatically generate a keyframe at that point in the timeline and will automatically “tween” the shape between the keyframes
• Click on the save button at the top left of the mocha ui (this is the icon that looks like a disc with a down arrow. you can also use file>save project with the same result)
• Close the mocha UI window to return to the host timeline
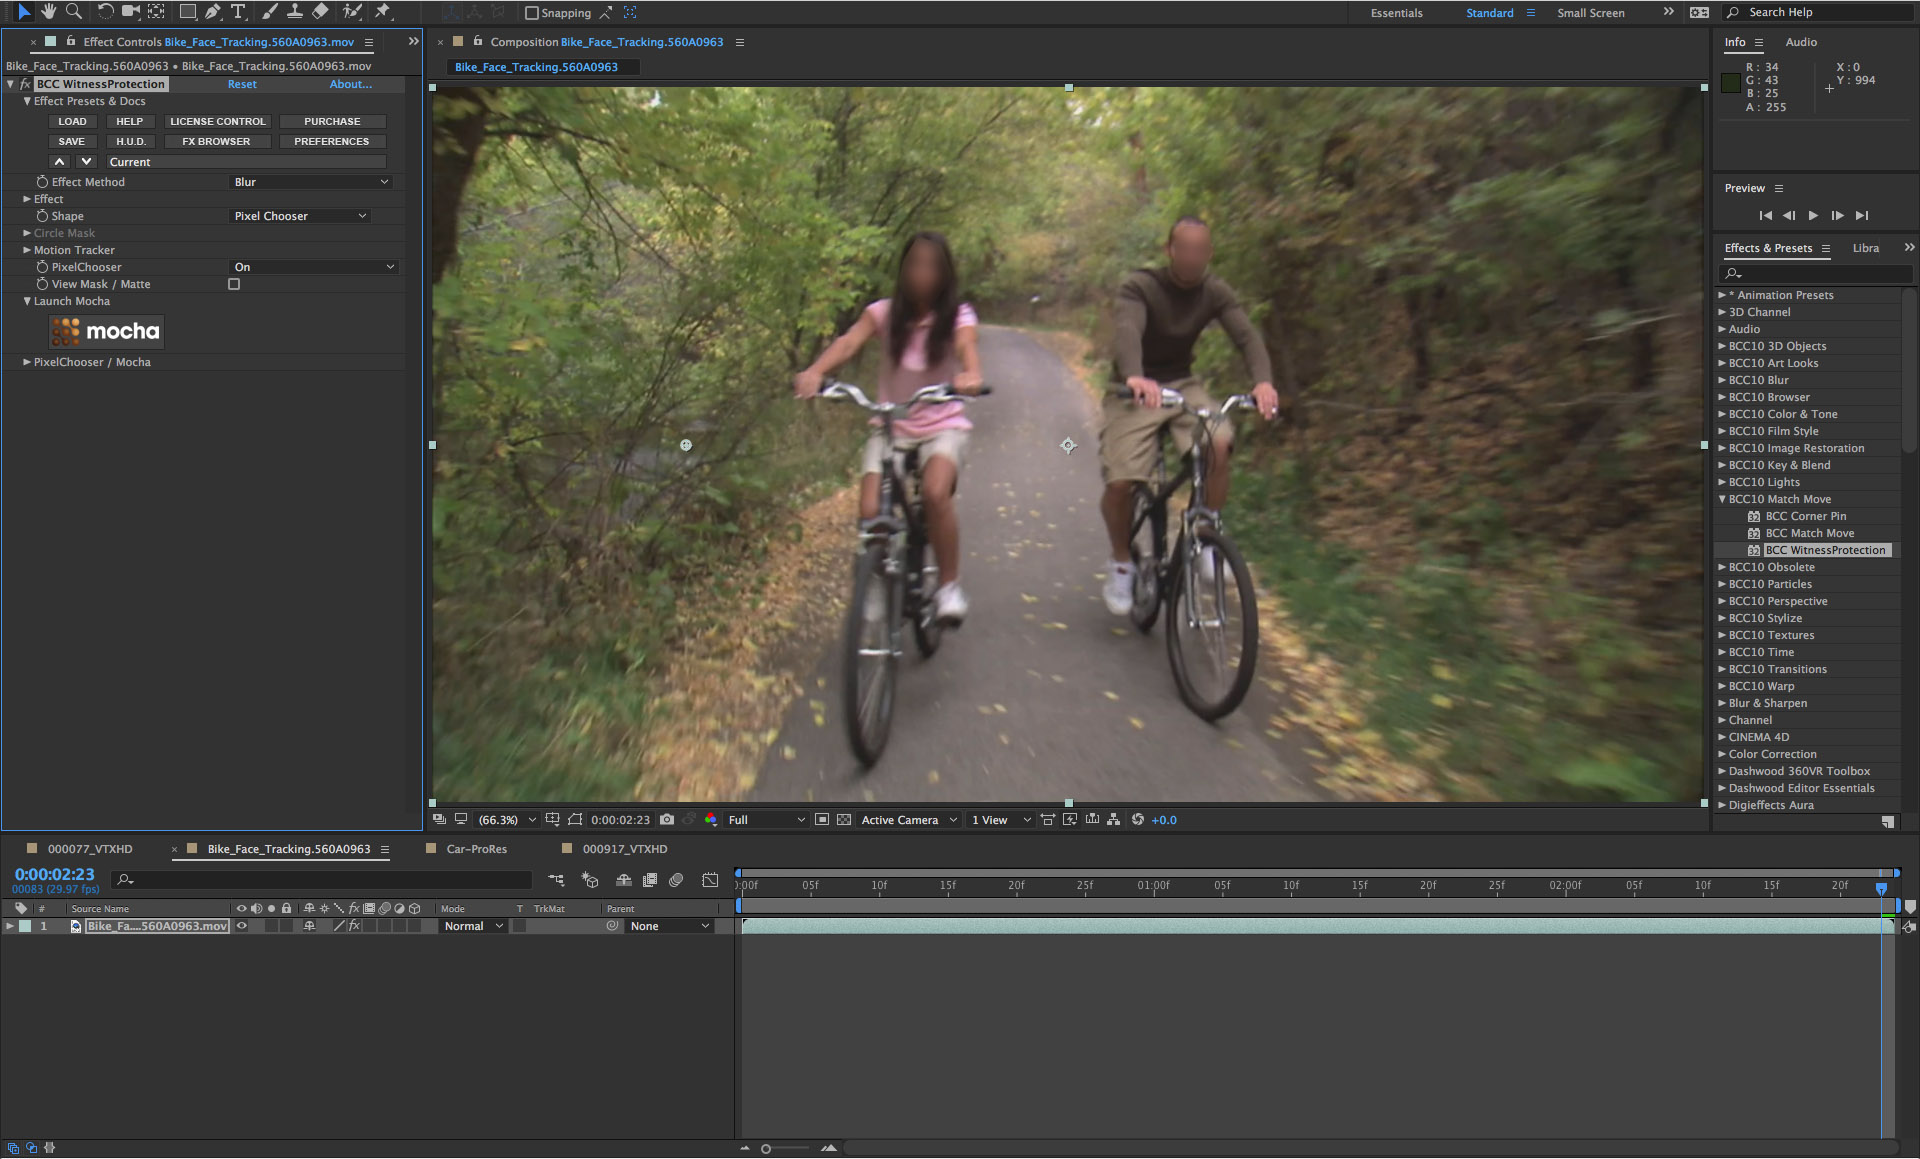
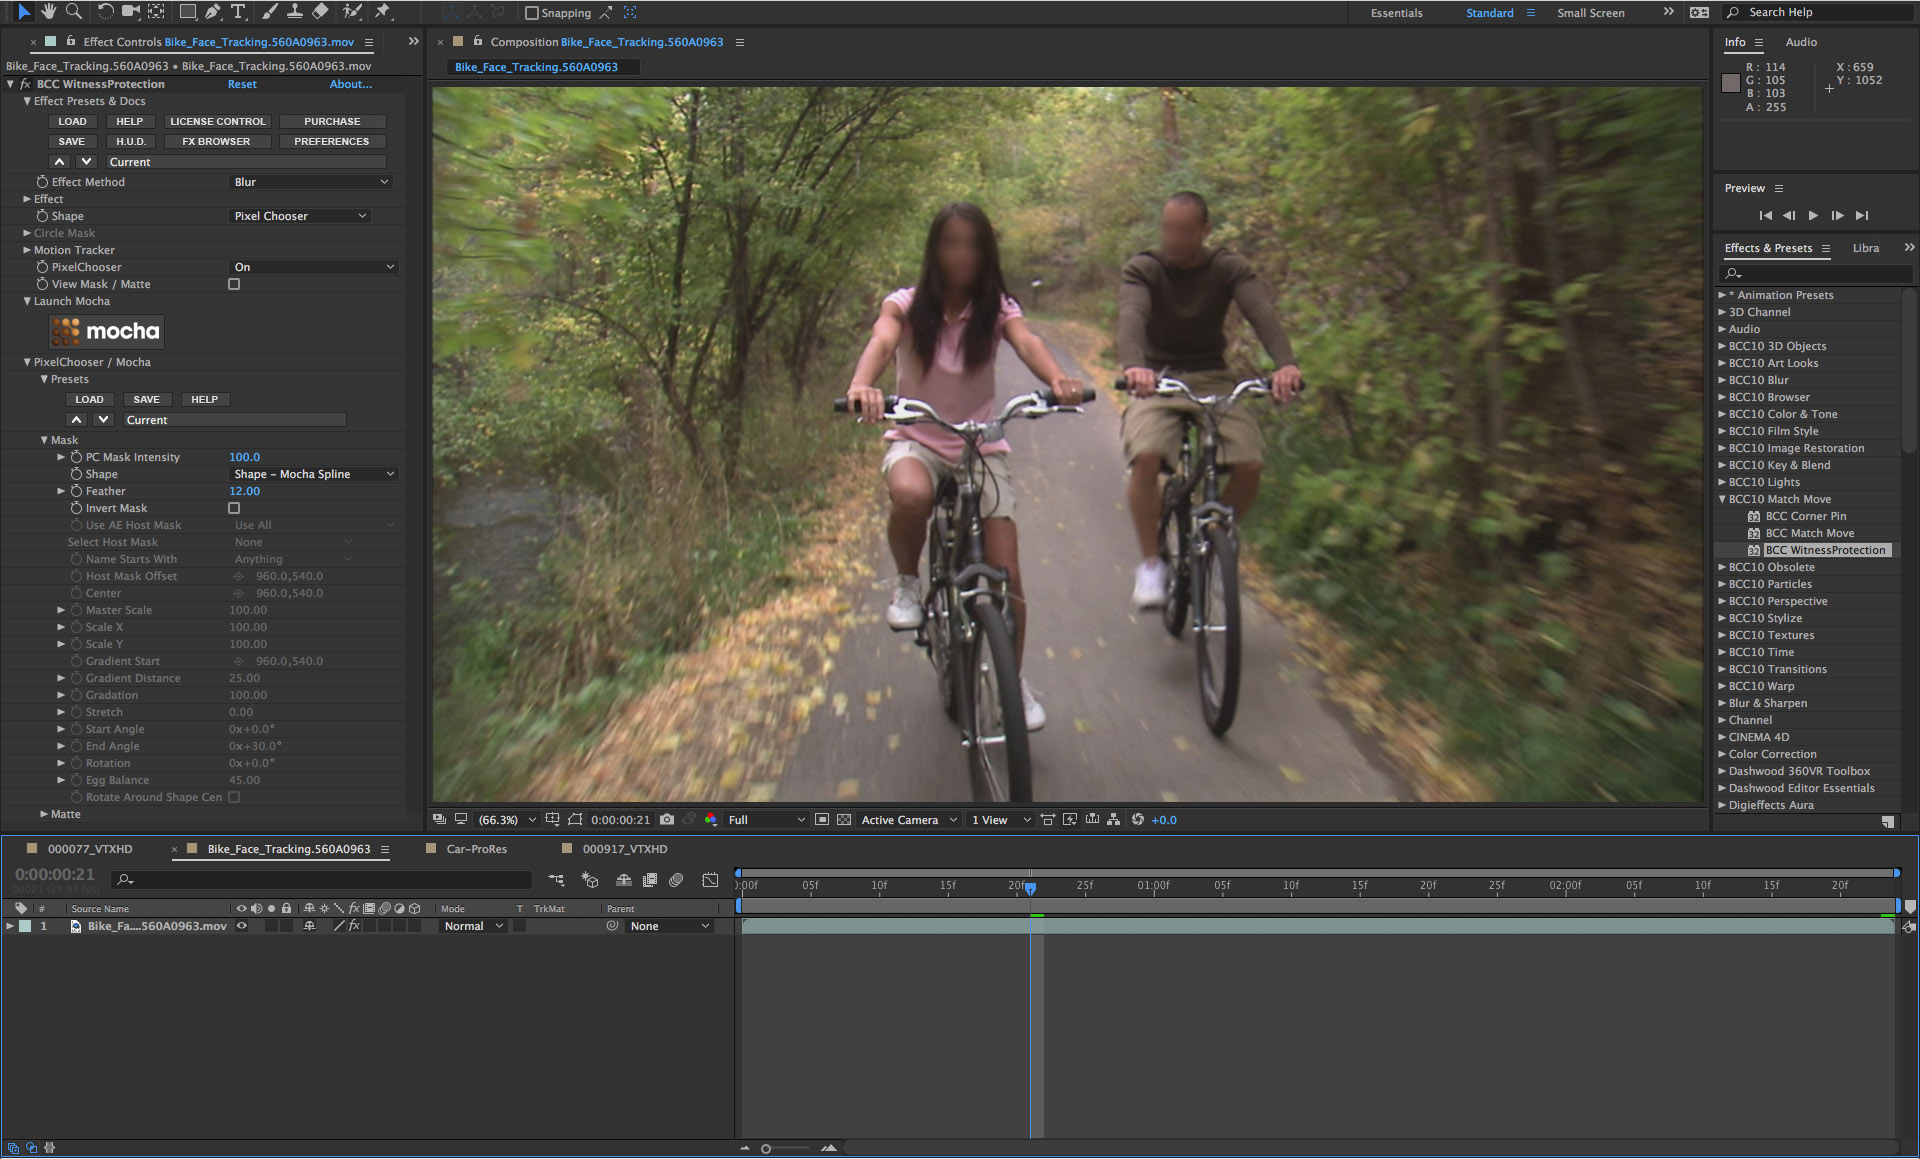
• In the filter control panel, click on the the View Mask/Matte checkbox option to review the mask shapes. The mask shapes have hard edges so we’ll feather them
• Twirl open the Mask group
• Set the Feather parameter to a value of 12
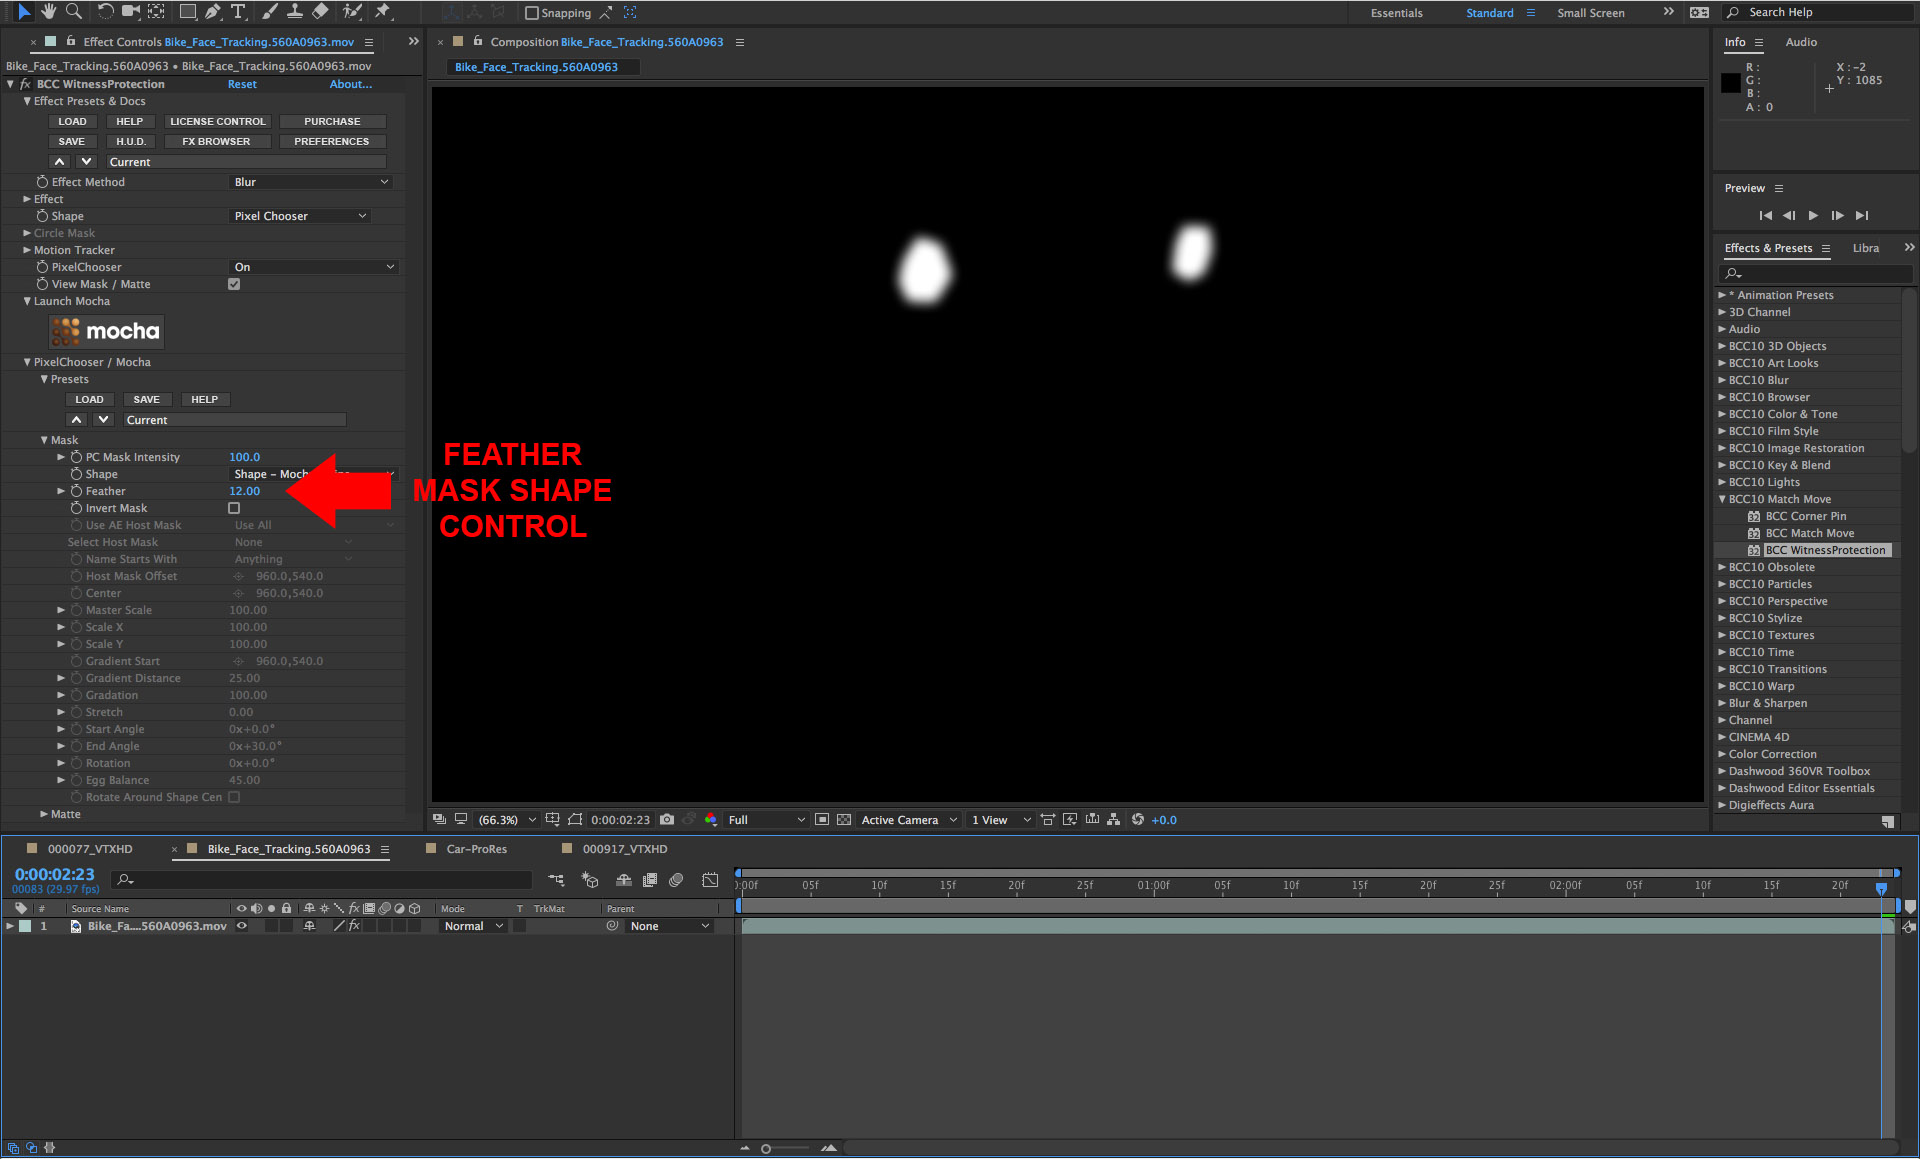
• Disable the View Mask/Matte option
• Scrub through the timeline to review the result
• Should you need to generate additional mask shapes, or alter one of the shapes you created, click again on the mocha button in the effects control panel to reopen the mocha user interface
————————————————————————————————
Example 2b
Using mocha to mask and track static objects in a moving scene – BCC Witness Protection
In Example 2a we learned how to use mocha to generate and track multiple mask shapes to obscure moving objects in a scene which was shot with a locked down tripod mounted camera. In this example, we’ll learn how to use mocha to mask and track multiple objects on static elements in a scene that was shot with a hand held camera.
The source clip that we’re using for this exercise is of a parked car that was shot with a hand-held camera as it is walked through the scene. The object of this exercise is to obscure the license plate, make and model of the car in the scene.
• Start by applying the BCC Witness Protection filter to the source clip
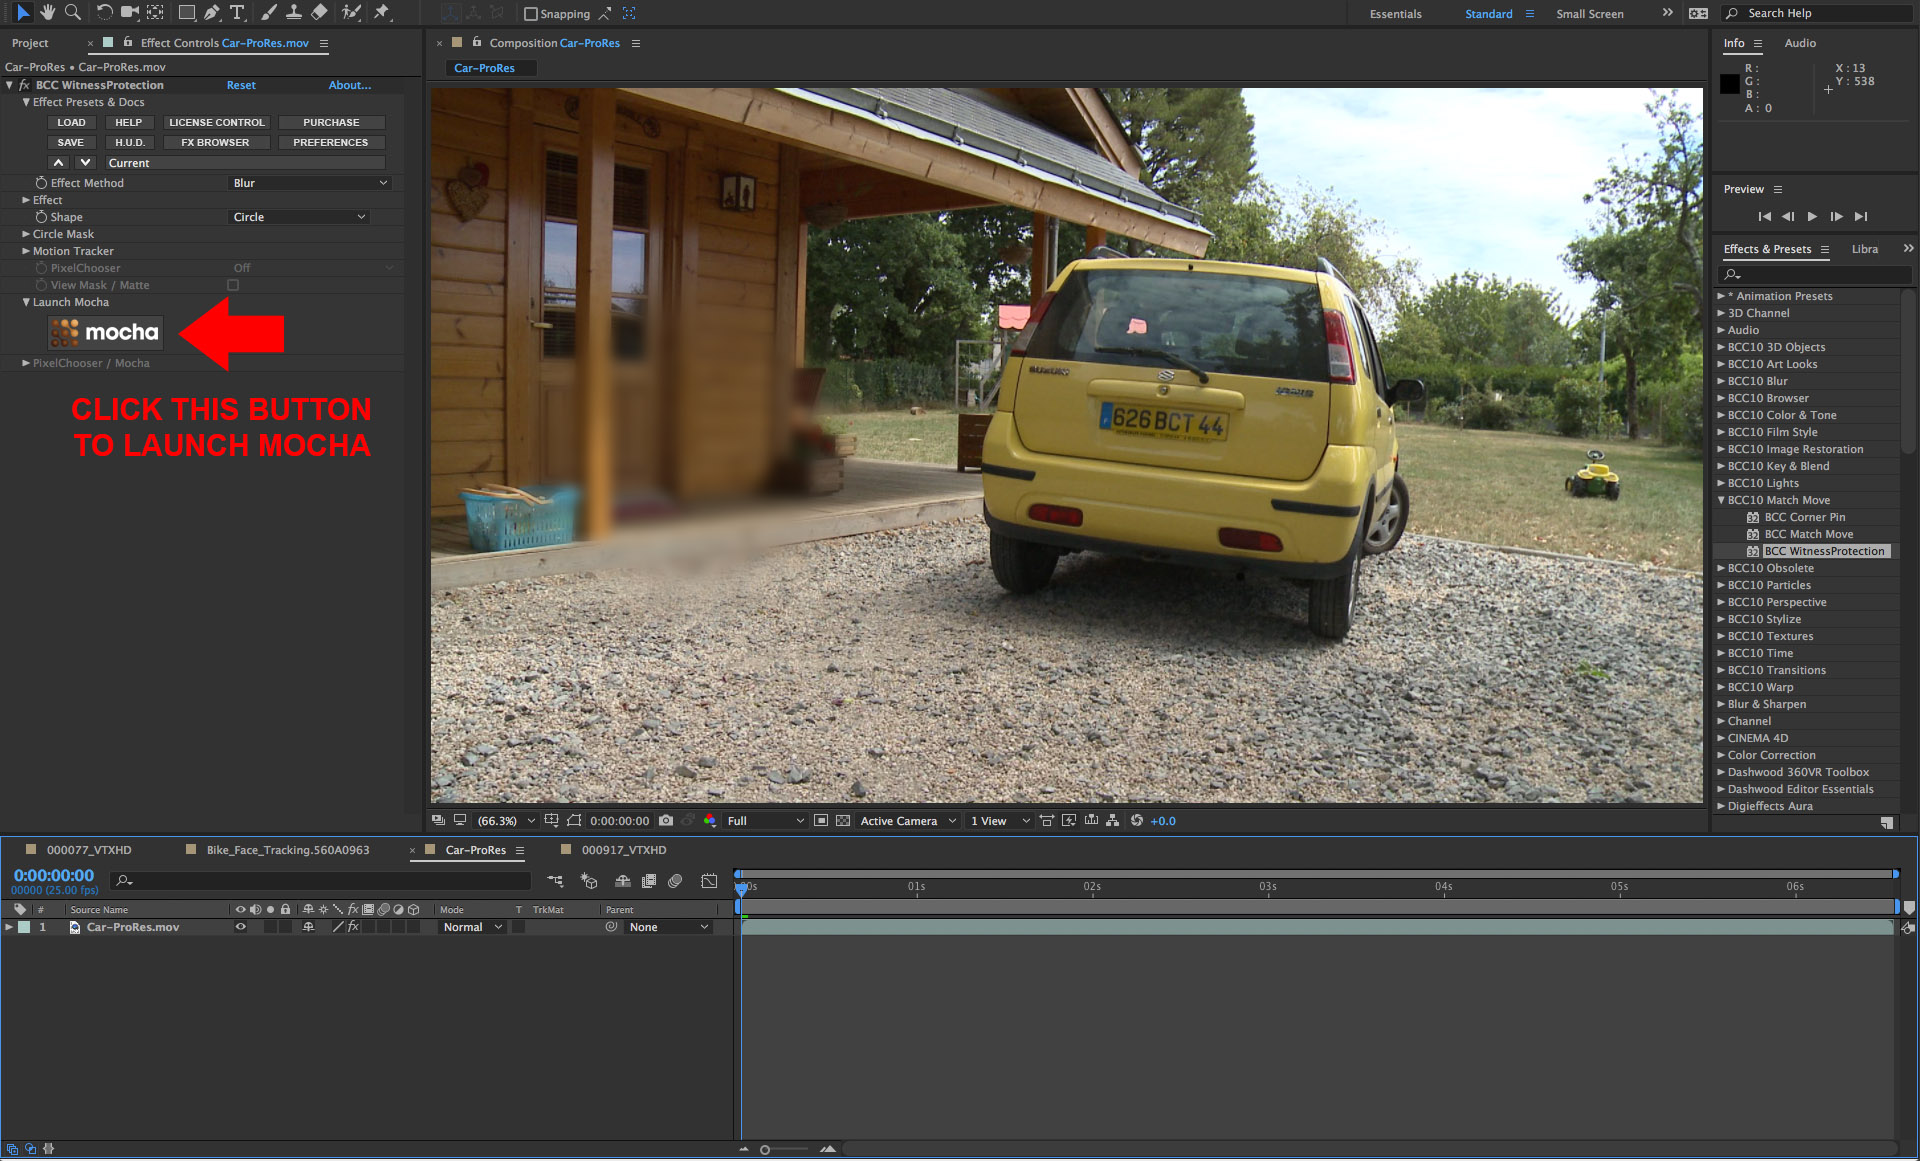
• In the filter control panel, click on the mocha button which will simultaneously enable the PixelChooser and launch the mocha custom user interface
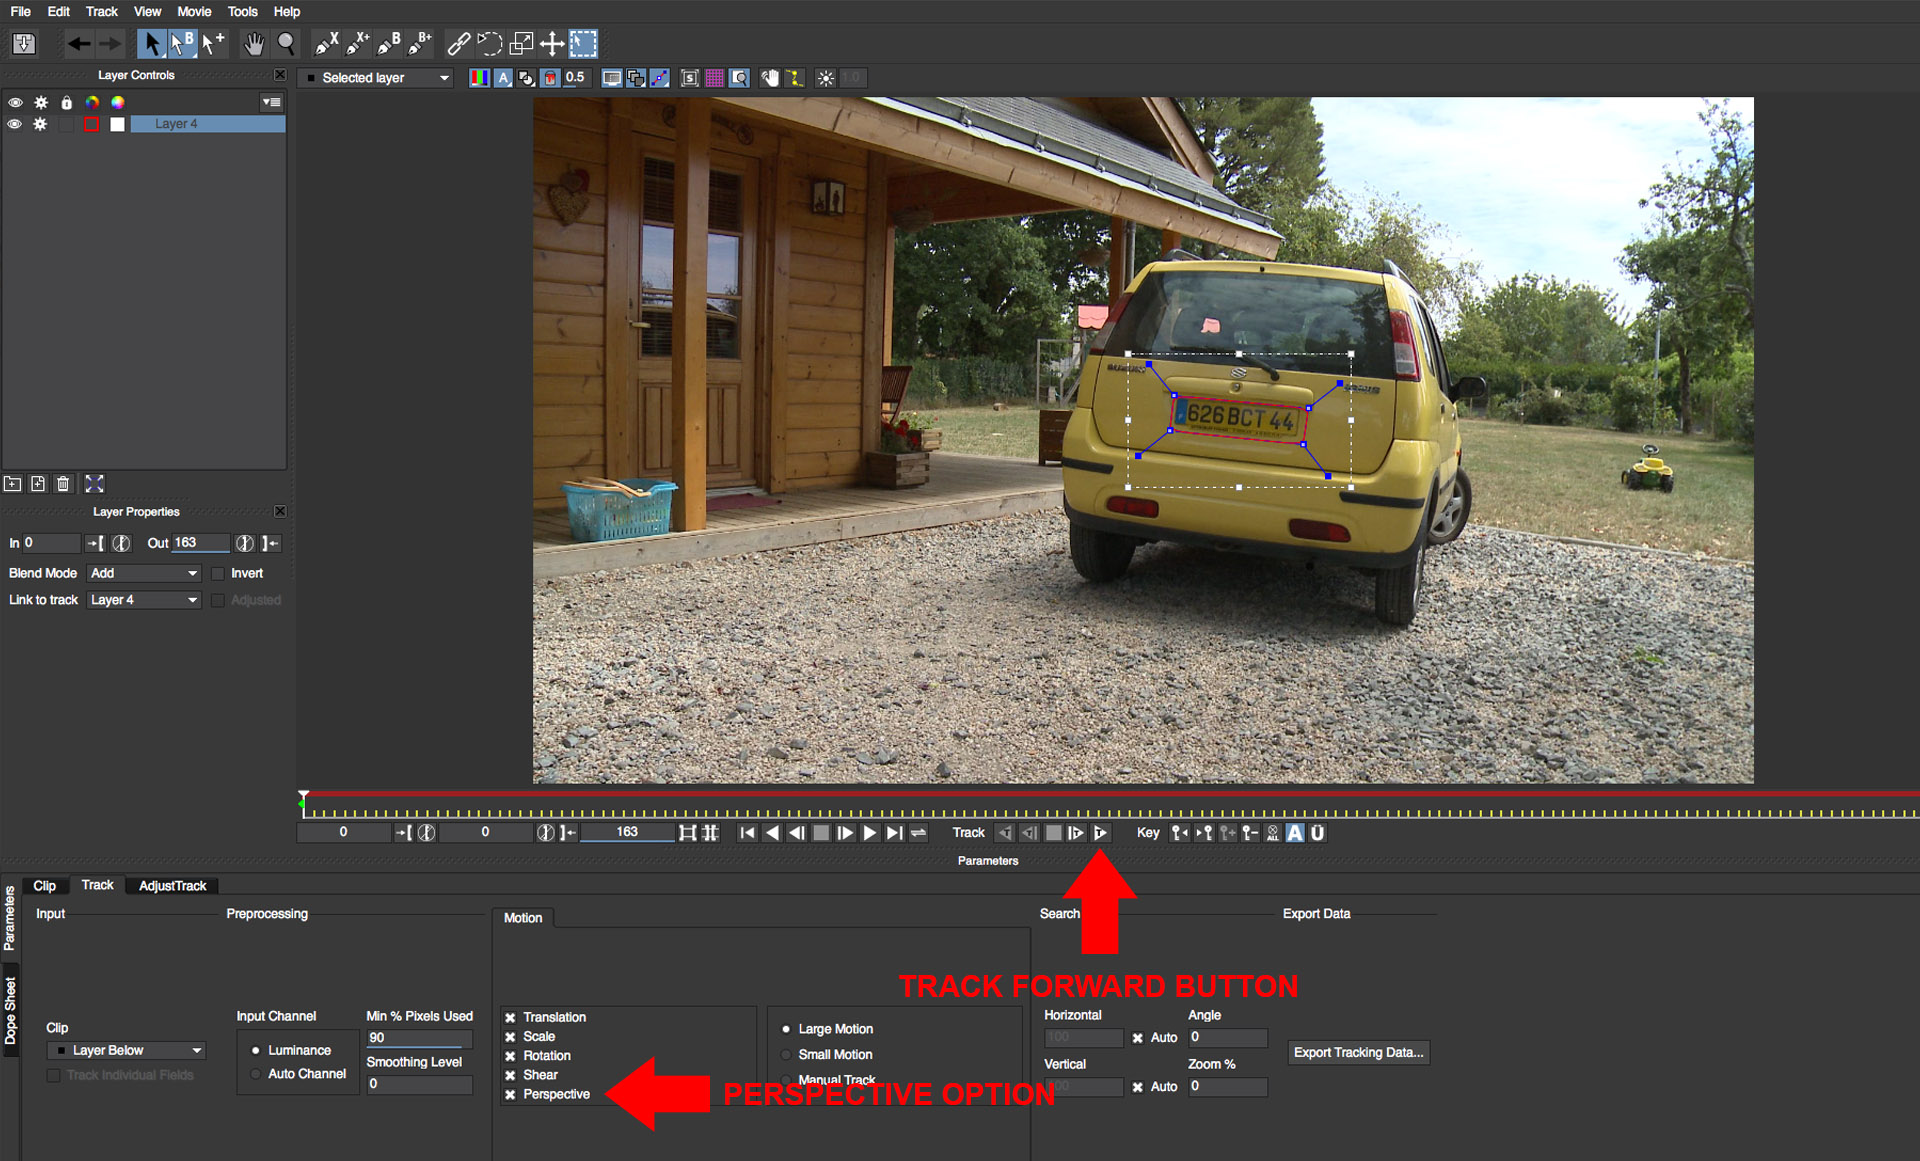
• In the toolbar that spans the top of the mocha UI, there is a button that looks like a magnifying glass. Directly to the right of that, there is a button with a pen nib and an X – this is the tool we use to generate X-Spline shapes.
• Click on the X-Spline button to activate the tool
• Create a shape that covers the license plate on the rear of the car
• Enable the Perspective option to help the tracker maintain a lock on the car as the camera perspective changes over time
• Click on the track forward button to track the mask into the shot
• Should tracking fail to lock the shape onto the target, please consult the mocha help manual for tracking tips by clicking on the Help button at the top of the mocha UI panel
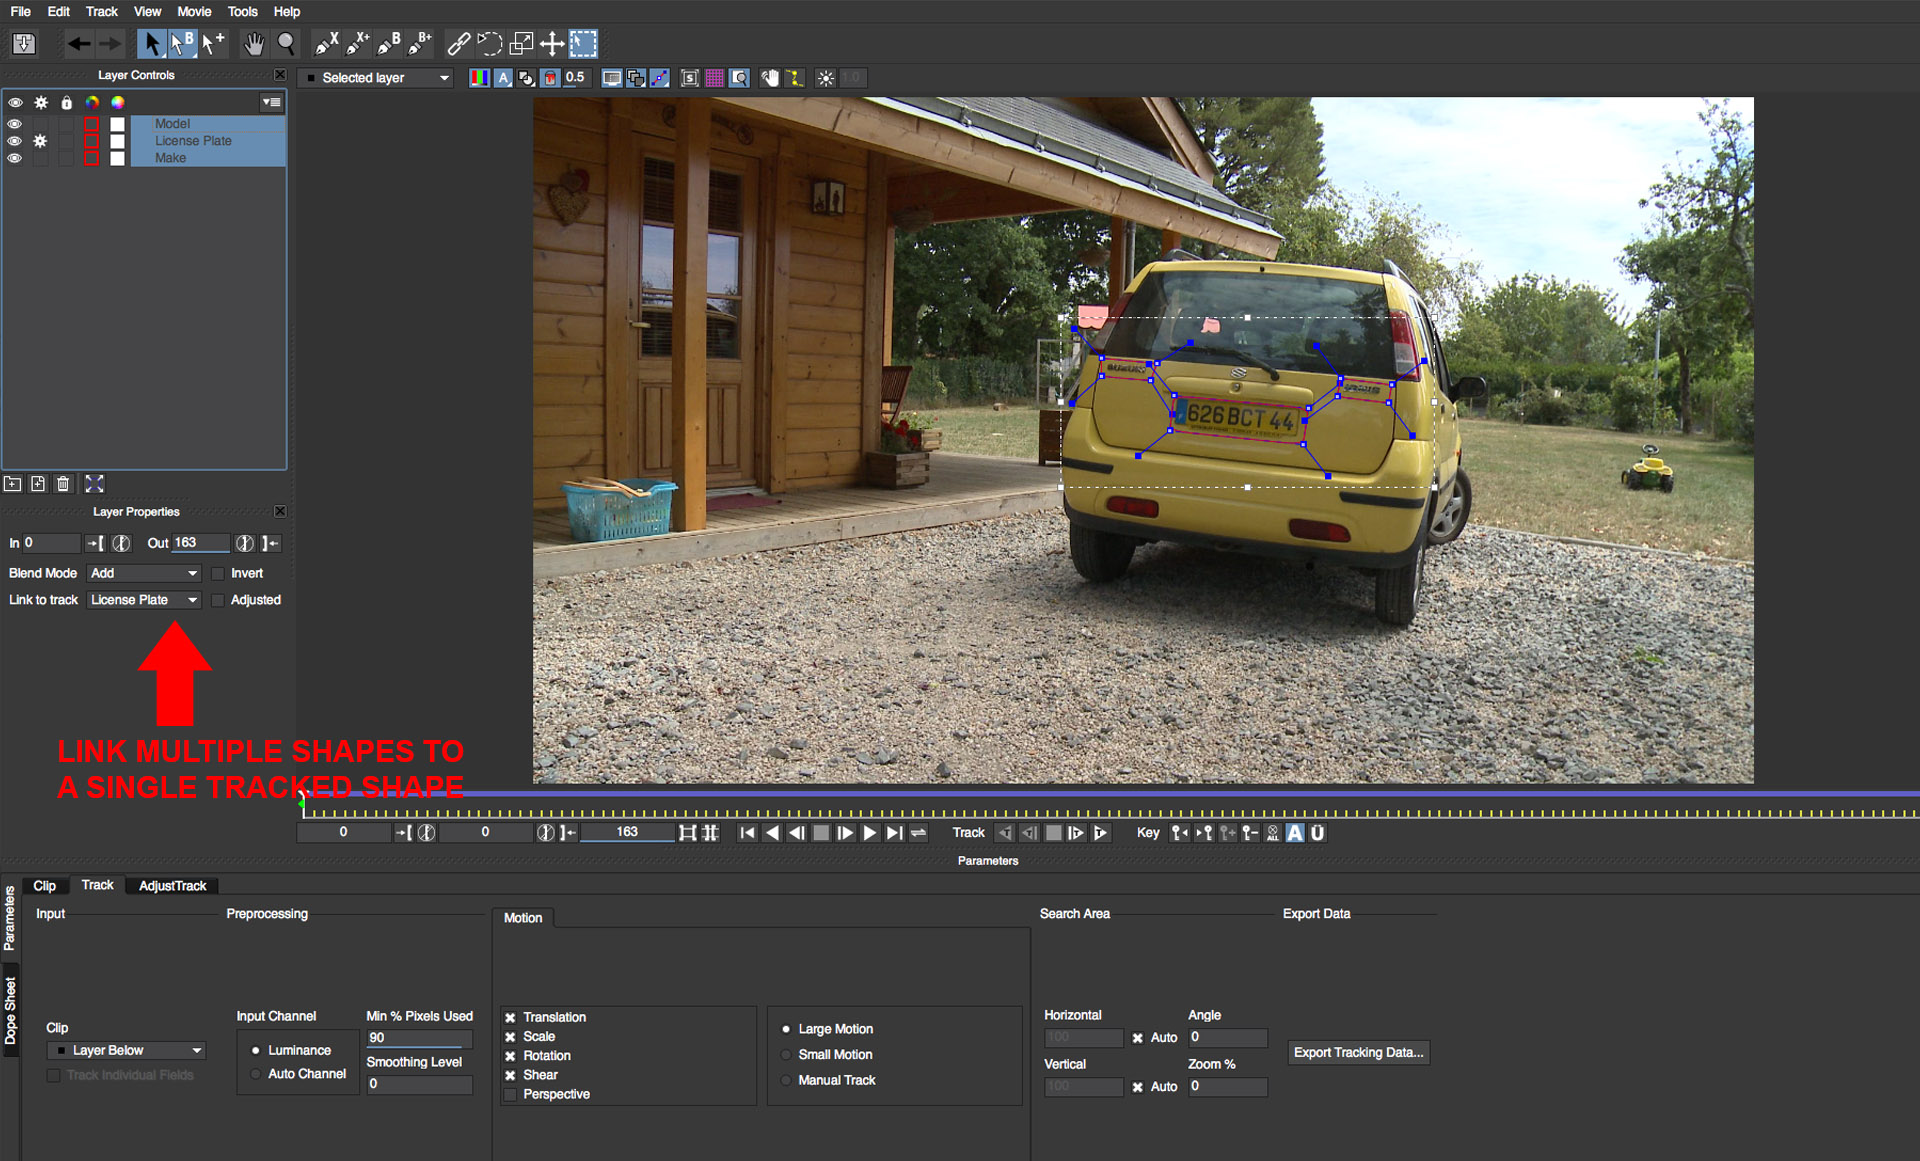
• Once tracking has successfully completed, rename the shape layer to “license plate” by clicking on the layer name in the layer controls panel. We’re going to use the tracker data from this shape to drive the position of two additional shapes so that we can obscure the make and model of the car. We can reuse the tracker data for any shape that we wish to position on the same plane as the license plate

• Use the X Spline tool to create to separate shapes, one each to cover the make and model of the car
• Select one of the newly created shapes to make it the current active selection
• In the Layer Properties panel, click on the Link to track pop-up and select the shape that you already tracked. Repeat this procedure for the second shape
• Scrub through the timeline to ensure that the shapes are now all tracked as expected
• Save the project and close the mocha UI to return to the host UI
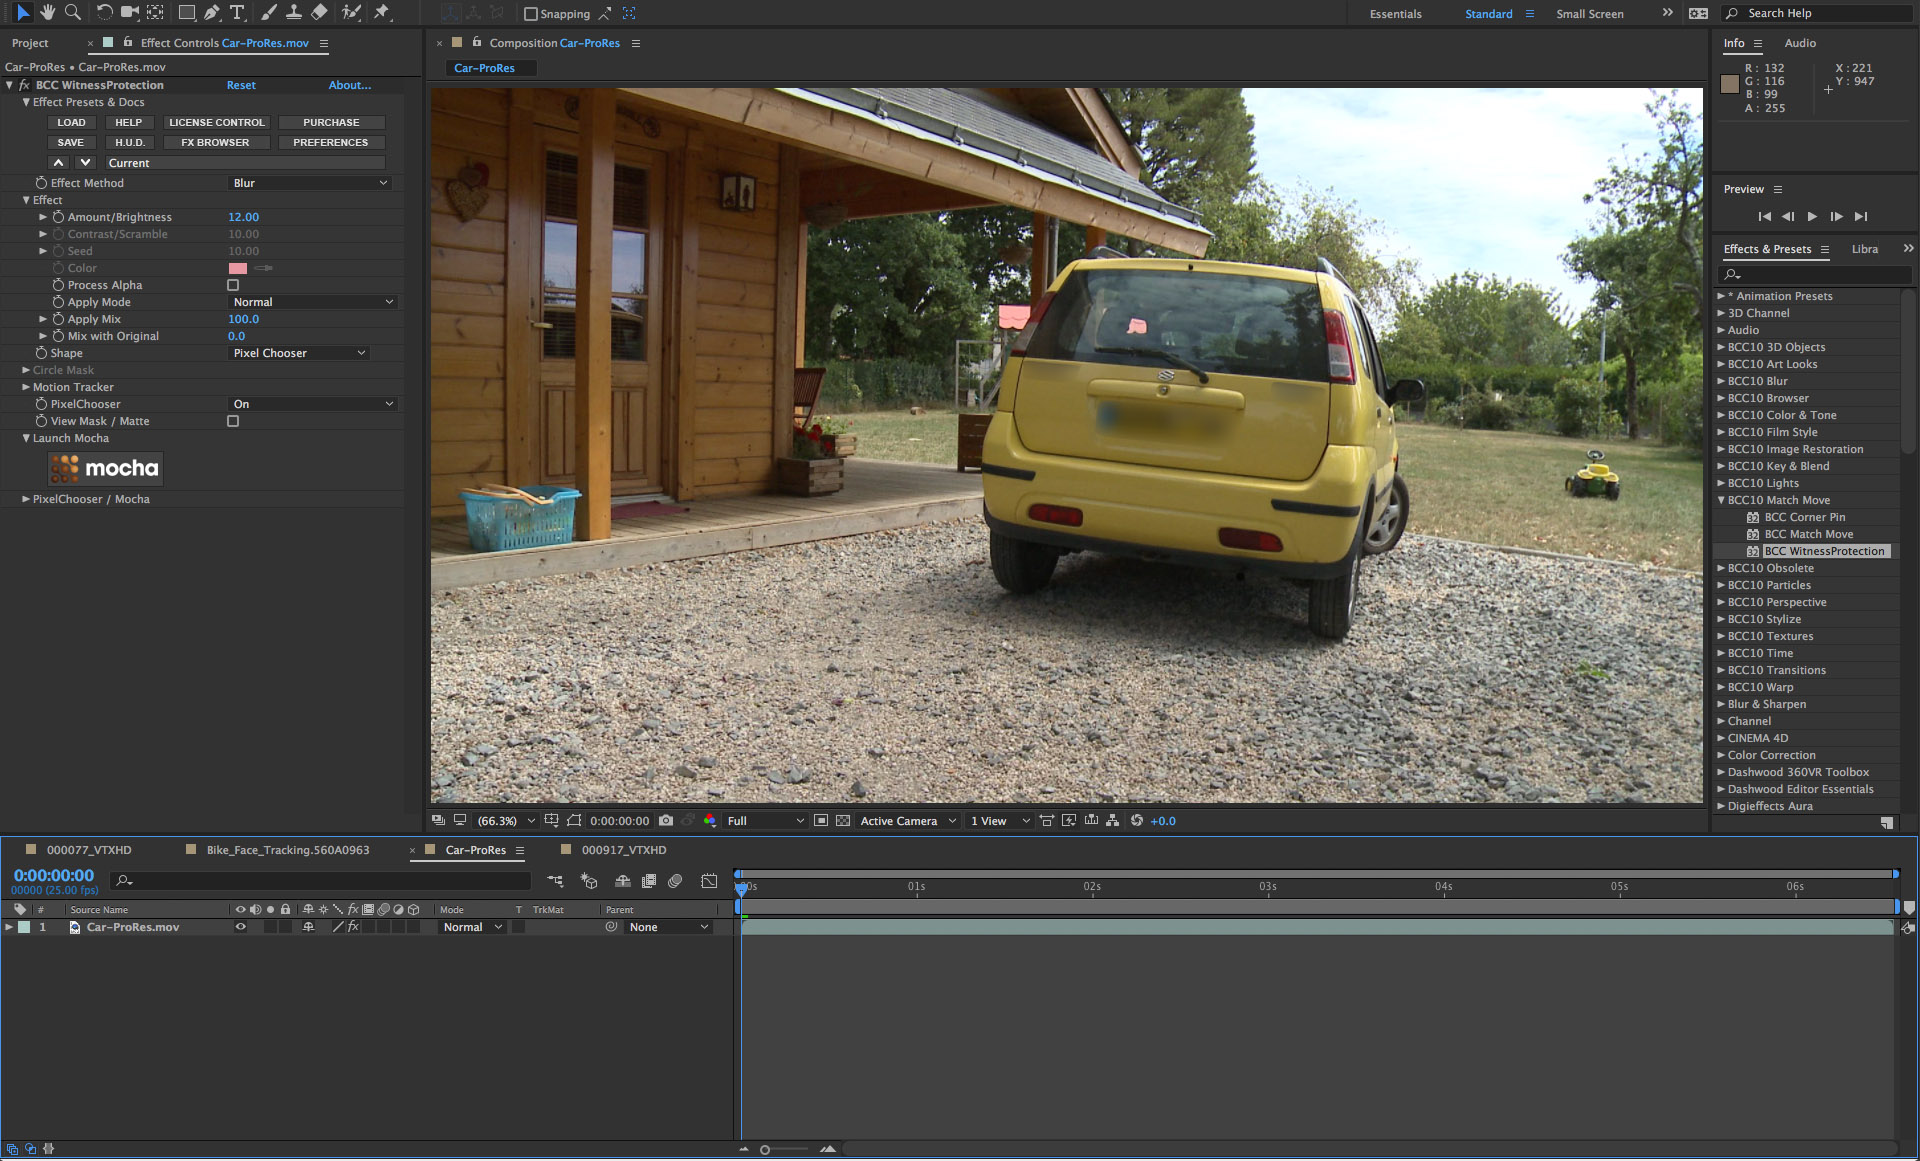
• Now in the filter control panel, you can adjust the effect which is being applied to the image through the mask shapes that you created in mocha. The default is a user adjustable blur but you can elect to use one of the other effect options, such as mosaic, bright-contrast or tint. To customize the effect, twirl open the Effect group and adjust the controls as needed to product the desired result
————————————————————————————————
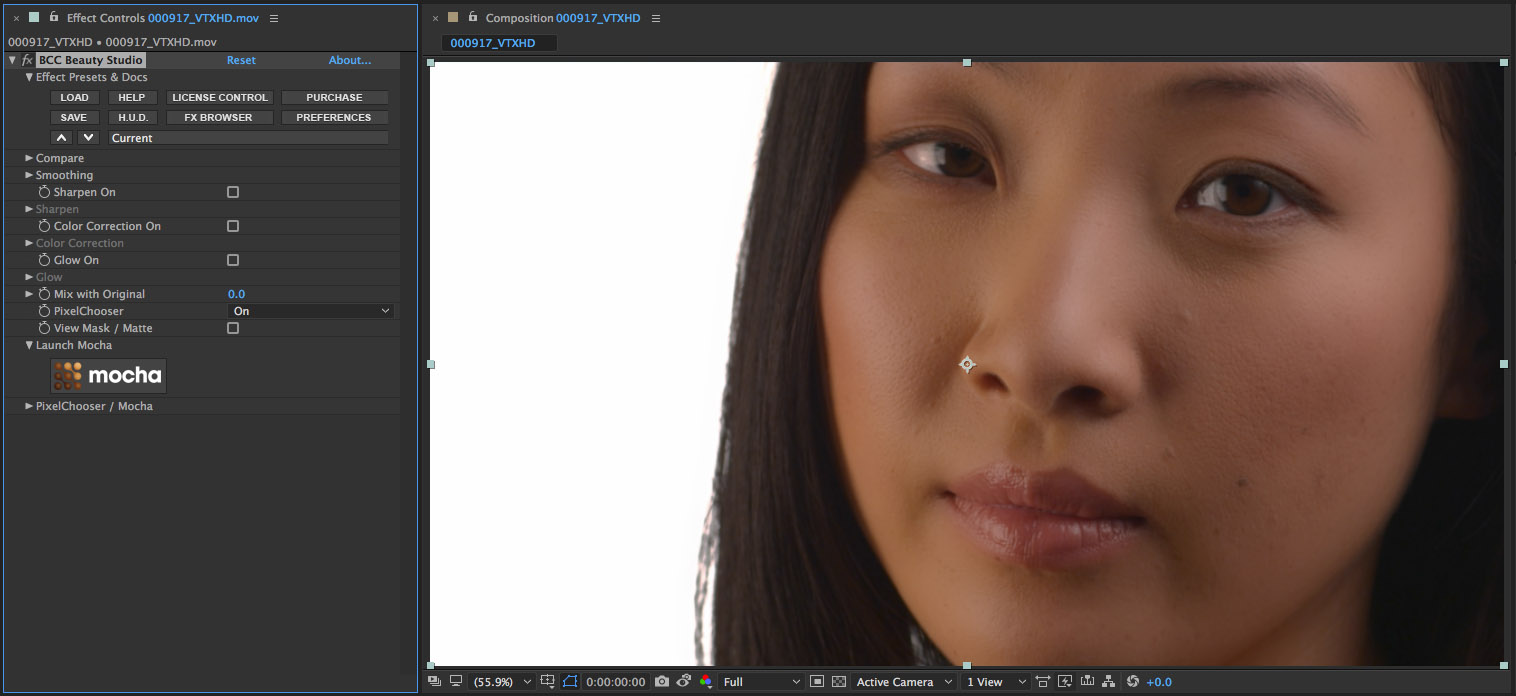
Example 3
Generating a combined two stage key matte and tracked mask – BCC Beauty Studio
In this example, we’ll use a combination of the PixelChooser matte and masking system to instruct the Beauty Studio filter to operate only on the skin tone of the subject that we’re working with
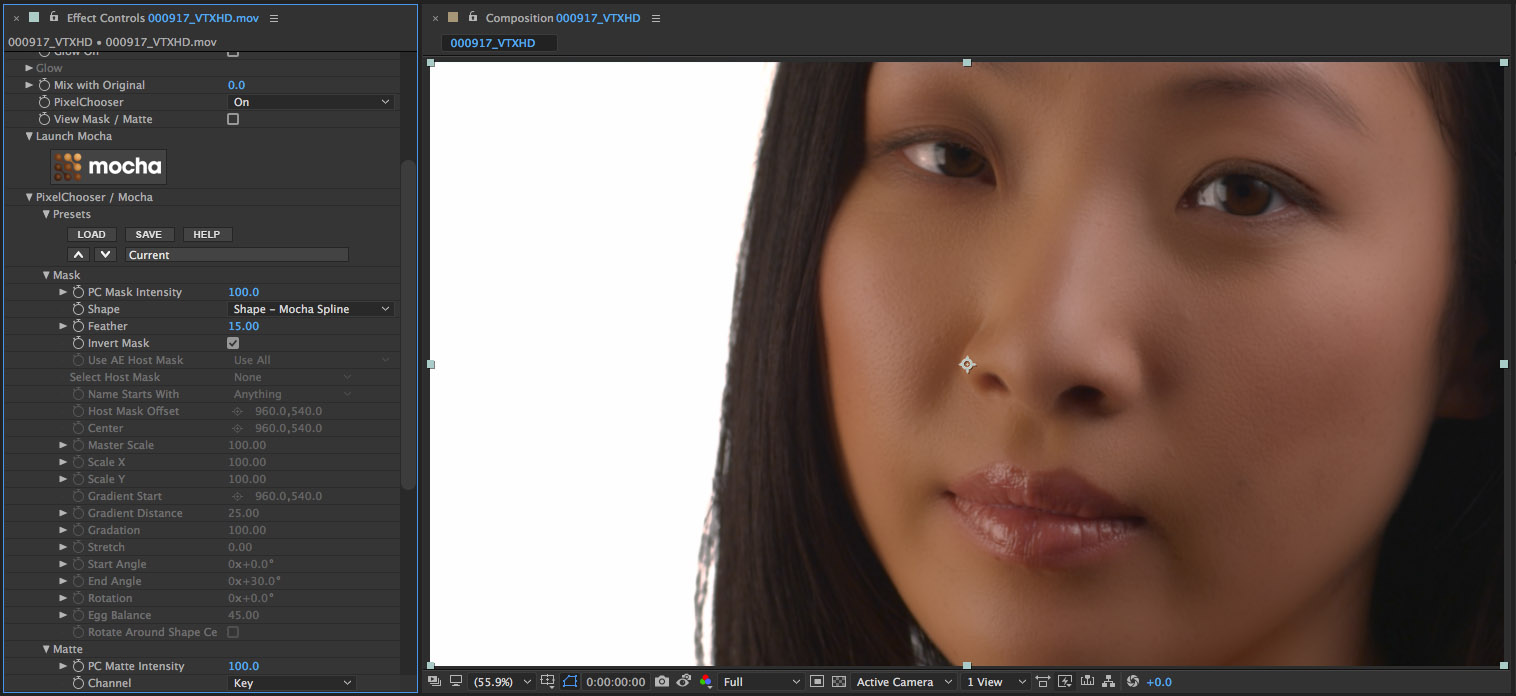
The source clip that we’re using for this exercise is a close up shot of a woman’s face.

We’re going to smooth her skin while maintaining detail in the eyes, hair and lips of the original image. Her skintone will be mostly isolated with the key matte but her lips will need a tracked mocha mask to protect them from the smoothing pass as the color of her lips is not different enough from the color of her skin for the keyer to isolate with the matte.
• Start by applying the BCC Beauty Studio filter to the source clip
• Notice that the entire image is affected immediately by the filter. Everything is a little smoother
• Twirl open the PixelChooser and then the Matte group to access the keying controls
• Use the Color A and Color B chips to select a range of light and dark color skin
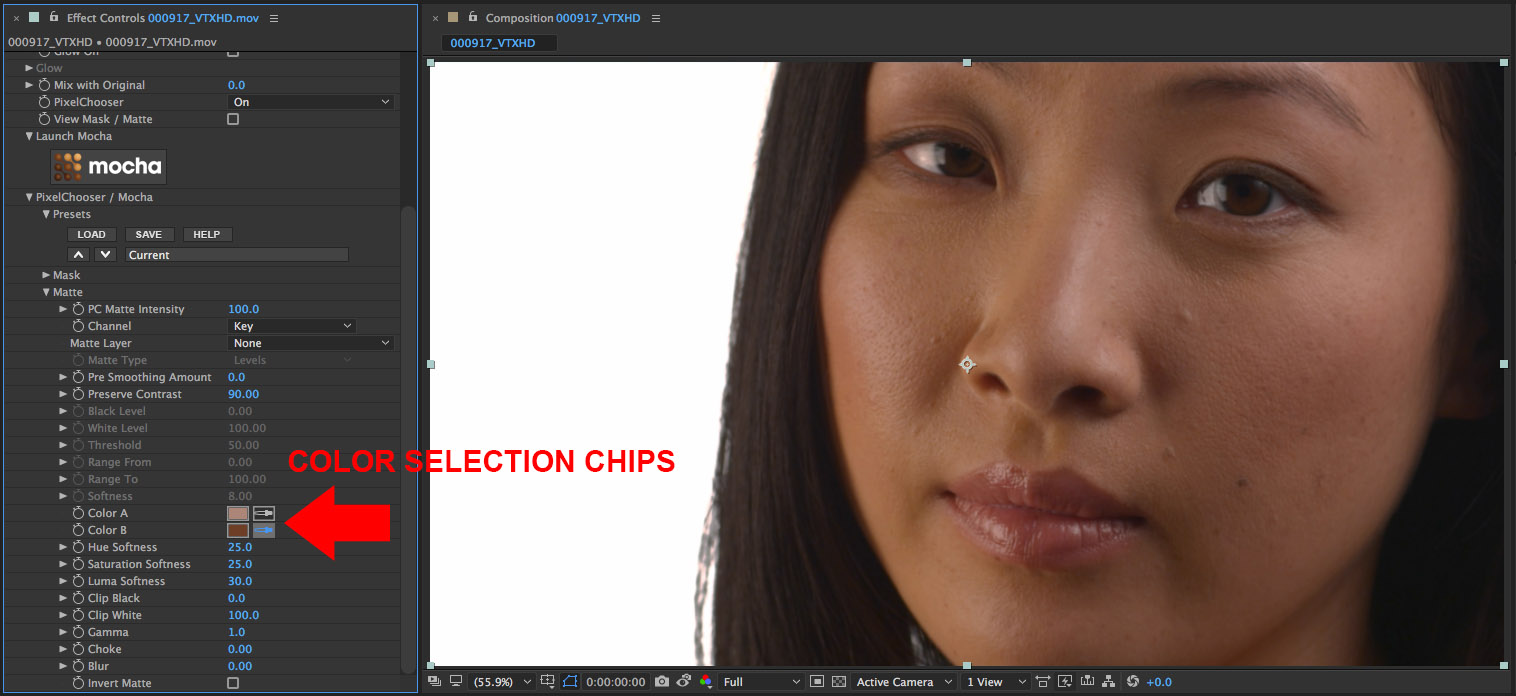
• Enable the View Mask/Matte checkbox so that we can preview the result while we refine the matte
• Adjust the Hue, Saturation, Luma Softness parameter values to isolate as much of the skin as possible
• Further refinement of the matte is done by adjusting the Clip White and Black parameter values
• To complete the matte generation, set the Pre Smoothing Amount to 30
• Now that the Matte is generated we’ll isolate the lips using a tracked mocha mask
• Click the Launch Mocha button to open the mocha user interface
• Click on the X-Spline tool and create a mask shape that surrounds the lips

• Click on the Track Forward button to instruct mocha to track the mask shape
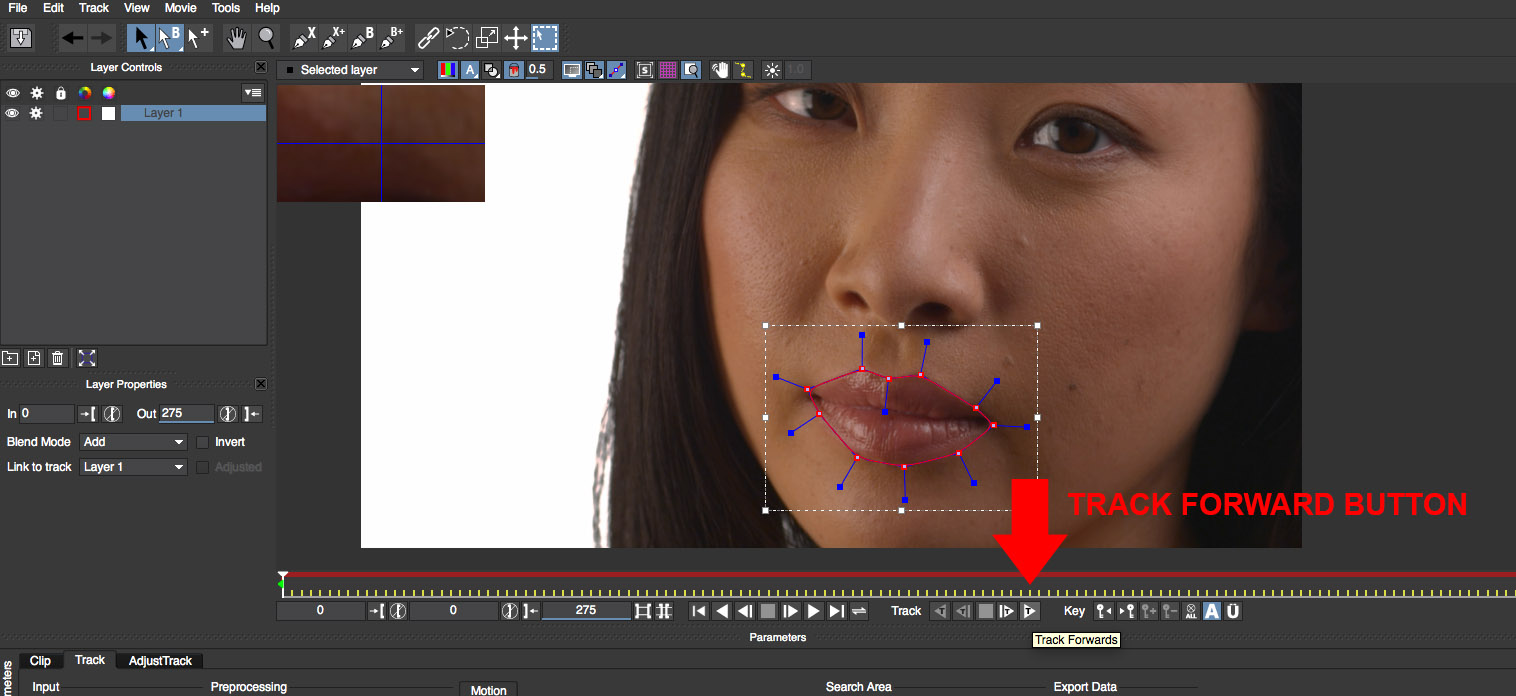
• Make any adjustments to the mask that are needed to compensate for drift
• Sometimes it helps to enable the view mask option in the mocha UI to see the shape filled with a semi-transparent color
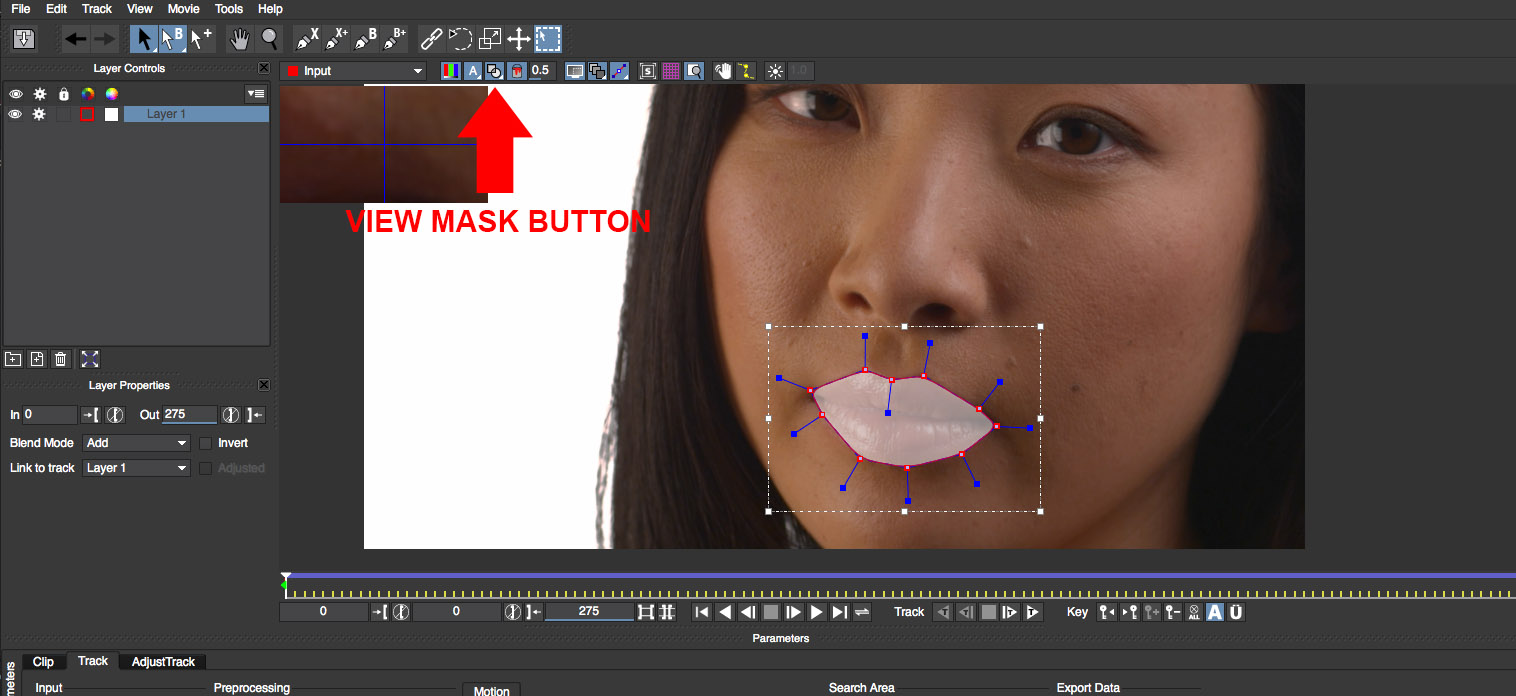
• Close the mocha UI to return to the host timeline
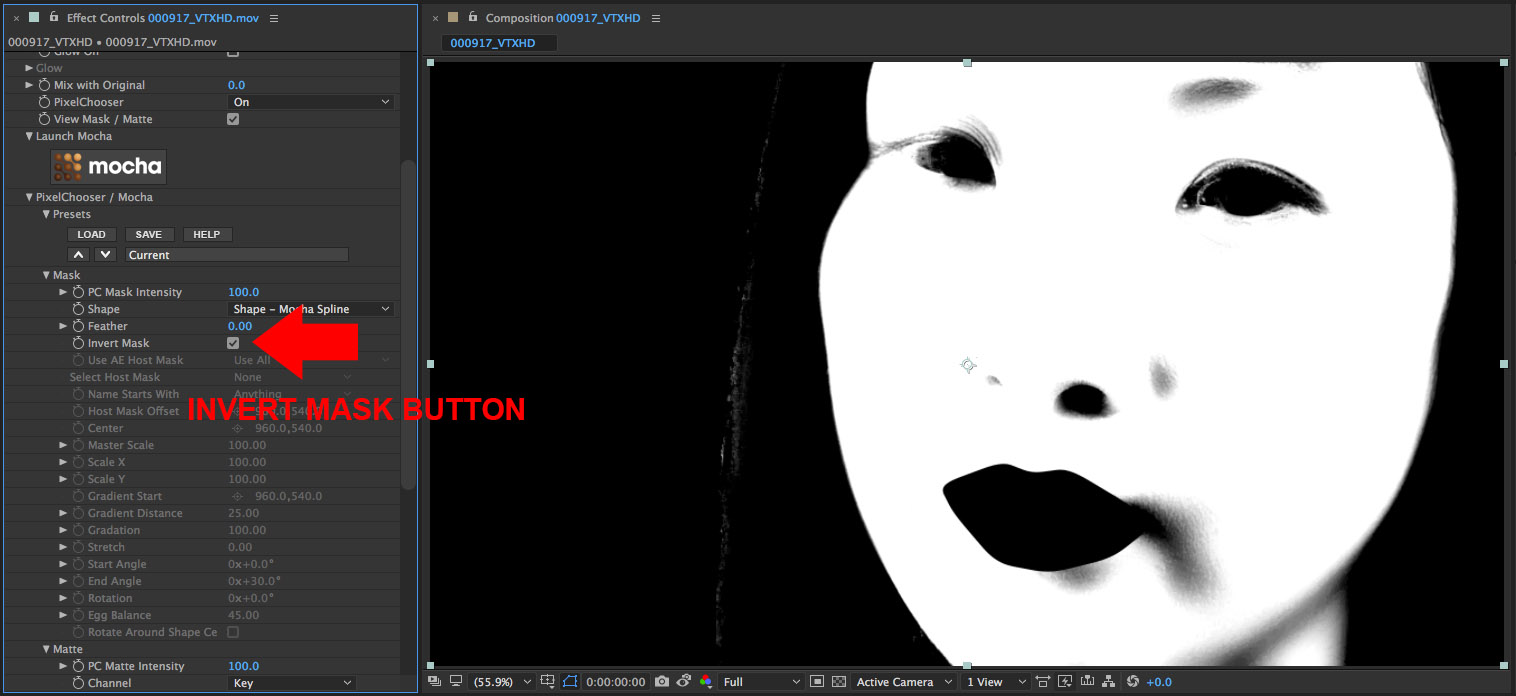
• Observe that the mask is showing the lips – this is the opposite of what we need
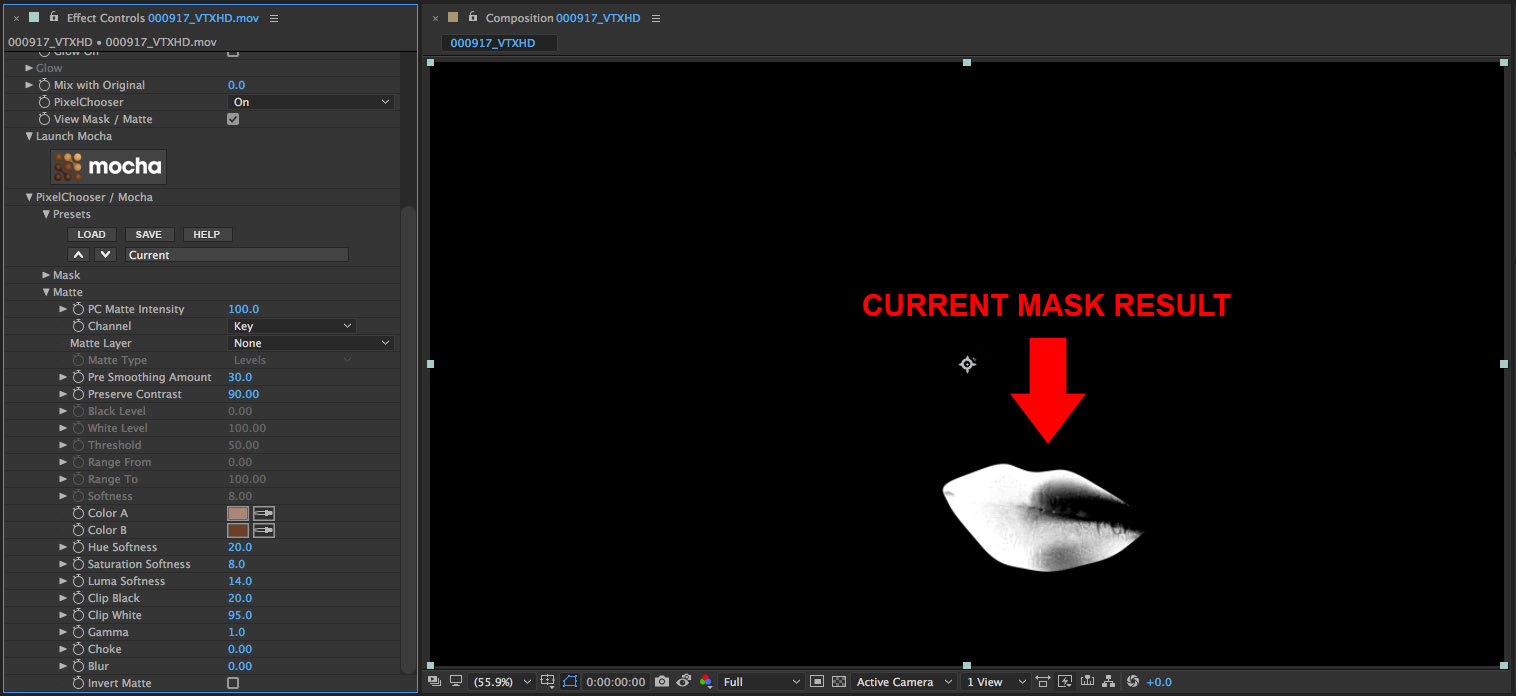
• Twirl open the Mask group
• Click on the Invert Mask button – now the mask looks correct
• The edge of the lips are too hard and need to be feathered
• Set the Feather parameter value to 15
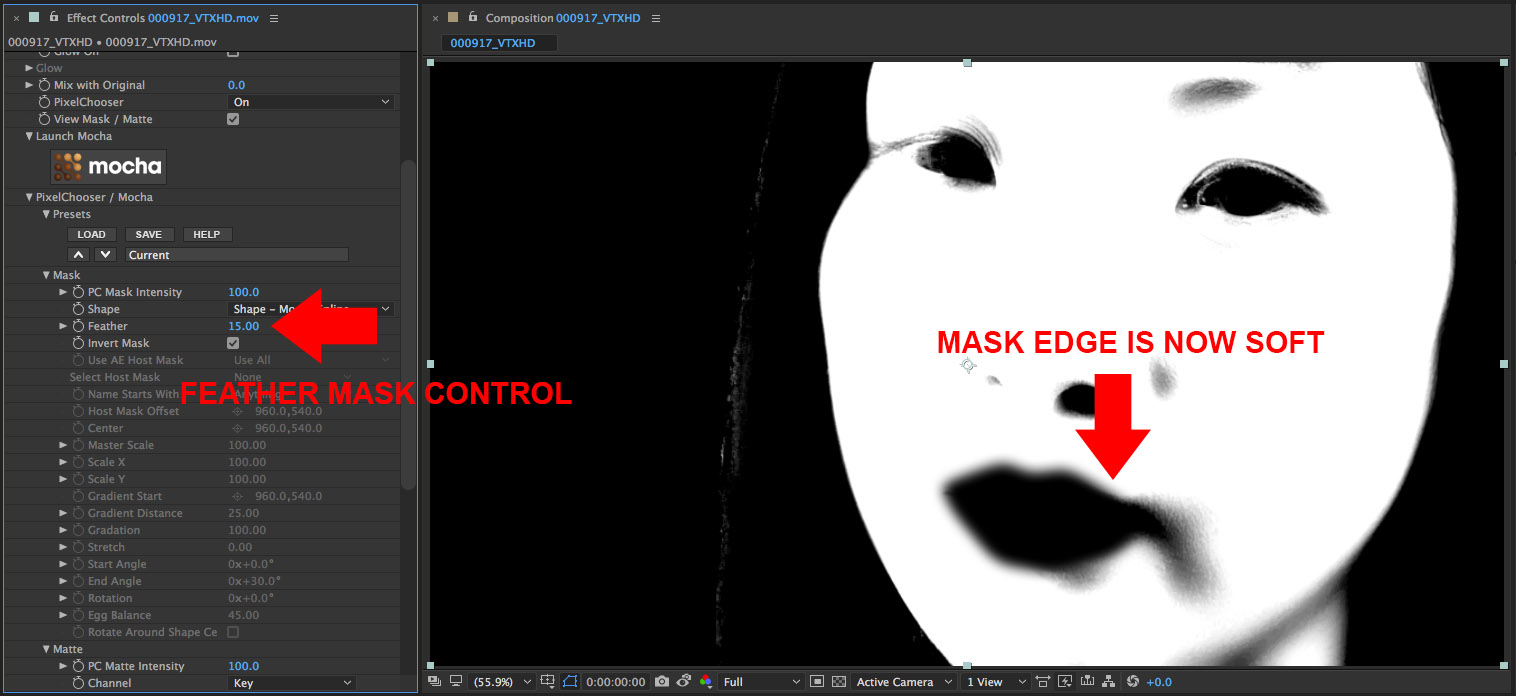
• Disable the View Mask/Matte checkbox to see the filtered result
• Now you can tweak the main parameters in the filter to achieve the desired result.
The Depth Map ML Group
Enable: Used to enable/disable the Depth Map ML effect.
Model: Used to select the desired depth map model.
- Better: a slower but more precise depth map model
- Faster: a faster but less precise depth map model
Mapping Mode:
- Scaled: Provides the user with a single Scale control for tuning the returned depth map result. Low values in the corresponding Scale parameter will generate more transparency, while high values in the Scale parameter will introduce more opacity to the result.
- Min/Max: Automatically defines the depth map using pre defined values
- Guided: Generates a depth map based on user defined start and end points in the image. A pair of position points, Guide Near and Guide Far, are placed over regions that are nearest to and farthest from the camera, which provides a start and end point for the depth map generation.
Scale: Available when Scaled mode is selected and used to tune the white the returned depth map result. Low values in this parameter will introduce more transparency, high values introduce more opacity.
Guide Far X/Y: Available when Guided mode is selected and used to set the far point for the depth map
Guide Near X/Y: Available when Guided mode is selected and used to set the near point for the depth map
Brightness: Used to increase or decrease the brightness in the generated depth map
Contrast: Used to increase or decrease the contrast in the generated depth map
Gamma: Used to increase or decrease the gamma in the generated depth map
Level Far: Used to tune the Far (furthest from the camera) region of the generated depth map
Level Near: Used to tune the Near (closest to the camera) region of the generated depth map
Invert: Used to invert the depth map
Refine Depth Group
This group includes a set of brightness/contrast/gamma controls to refine the output from the depth map model and also offers individual control over the near/mid/far regions with user definable range and position settings for each region.
Far Sub Group: Used to tune the far regions in the depth map (furthest from the camera)
- Position: Used to set the mid-point in the far range
- Range: Used to define the far range
- Brightness: Used to control the brightness in the maps Far region
- Contrast: Used to control the contrast in the maps Far region
- Gamma: Used to control the brightness in the maps Far region
Mid Sub Group: Used to tune the mid regions in the depth map
- Position: Used to set the mid-point in the midtone range
- Range: Used to define the midtone range
- Brightness: Used to control the brightness in the maps midtone region
- Contrast: Used to control the contrast in the maps midtone region
- Gamma: Used to control the brightness in the maps midtone region
Near Sub Group: Used to tune the near regions in the depth map (closest to the camera)
- Position: Used to set the midpoint in the Near range
- Range: Used to define the Near range
- Brightness: Used to control the brightness in the maps Near region
- Contrast: Used to control the contrast in the maps Near region
- Gamma: Used to control the brightness in the maps Near region
Matte Tools Group
This group includes a set of parameters to fine tune the matte that is generated from the Depth Map result.
Enable: Used to enable / disable the refine matte controls
Matte Type: Select one option from the list to fine tune the matte
Levels: Uses Level Near and Level Far sliders found in the main control group
- Threshold: Exposes Threshold and Softness control sliders
- Range: Exposes Range From and Range To matte control sliders
- Slice: Exposes Slice Center, Slice Width and Softness matte control sliders
Threshold: Used to set the center point for pixels that are either black or white
Range From: Used to set the starting range (brights) of pixels to be included in the matte
Range To: Used to set the end range (darks) of pixels to be included in the matte
Slice Center: Used to set the end range (darks) of pixels to be included in the matte
Slice Width: Used to set the end range (darks) of pixels to be included in the matte
Softness: Used to soften the result of the threshold and range mattes
Choke: Used to choke or spread the matte
Blur: Used to blur the matte
Invert Matte: Used to invert the depth map
Quick Start Guide for Mask Assist ML inside of Continuum Pixel Chooser
Inside of Mocha Pixel Chooser, Mask Assist ML and Matte Assist ML use advanced machine learning to automatically generate a matte over time based on single or multiple keyframed roto shapes or input mattes
If using the standalone Pixel Chooser filter, apply the BCC+ Pixel Chooser to a clip in any supported host. A black and white b/w matte is generated by default, but we’ll disable that for this use of the pixel chooser.
- Twirl open the main Pixel Chooser control group and then twirl open the Matte Group.
- Click on the Channel pop-up and select None from the pop-up list.
- Close the Matte group.
If using the integrated Pixel Chooser from within a BCC+ filter, begin by twirling open the Mocha Mask and Track group at the top of the filter effect. Then, click on the Pixel Chooser pop-up and select On from the list that appears.
Once you have set up your version of Pixel Chooser, we can begin by clicking on the Mocha Mask button to launch the Mocha GUI. In the Mocha custom GUI, select the Create New Mask ML layer tool from the top toolbar. We are now ready to begin mask generation
Mask ML Generation
Begin by clicking on the image in the viewer to set a starting point for the mask ml model. A solid colored dot will appear at the click point in the image. You will also see a mask generation progress bar in the top right of the Mocha GUI. Once the progress bar is complete, you will see the resulting mask shape preview.
- To add more regions to this mask, just click on other areas in the image.
- To remove regions from this mask, hold the option / alt and click on other areas in the image. Alternatively you can use right-click to remove regions.
Once satisfied with the mask shape preview, select the solid black arrow to convert the mask preview to an editable Mocha spline mask shape, and if desired you can further tweak the mask shape before propagating/tracking. Because the default spline shape type is X Spline, you will see a blue tension bar on each point in the spline mask that can be used to tighten or relax the spline corner points for a perfect fit to the image. We are now ready to propagate the mask over consecutive frames in time.
To do this, begin by clicking on the Mask tab in the panel on the left of the Mocha GUI. From there, click on the Render Forwards and Backwards button to commence the mask propagation.
- Immediately upon clicking the render button, you will see that the spline mask will convert to a yellow spline shape that will move frame to frame with the selected object
- You should also see a progress bar at the top right of the Mocha GUI as the mask is propagated over all frames in the shot
Once tracking has completed, the mask shape outline will be displayed as a dashed yellow outline under a solid red outline.
If the tracked mask result is satisfactory, save and exit the Mocha GUI to return to the host.
The Pixel Chooser is set to generate a B/W Matte by default. To use the Pixel Chooser to generate an alpha channel for the filtered source, click on the Output pop-up and set it to Alpha Channel.
Important Notes:
- Should you need to modify the animated Mocha mask, you can either return to the Mocha custom GUI or you can use the parameters in the filters control panel from within the host.
- To modify the alpha matte generated by Mocha, twirl open the Mask group in the Pixel Chooser UI and we can use some of the included tools.
- The Dilation control parameter and it’s associated quality pop-up enables global contraction and expansion of the mask shape.
- The Feather control parameter enables softening of the edge of the mask shape.
- The Invert option will invert the mask.