Shadows in photos can look good and give your images a time and place or add a mysterious and aesthetic feel. However, when shadows appear in photos for products, real estate, and for a website or cover, they can ruin the project if you don't get rid of them or at least make them less visible.
In today’s tutorial, you’ll learn to remove shadows in Photoshop using various methods for different types of shadows and images.
Let’s dive in!
Remove Shadow from Picture in Photoshop

In the first part of this tutorial, we’re going to remove shadows using Photoshop tools. I’ll show you five tools that can remove shadows in various environments, allowing you to choose the best tool for the type of shadow.
-
Method 1: Content-Aware Fill
Let's start with a simple method for removing shadows. This approach works well when the shadow isn't in complicated areas that impact texture, but you can also use it for hard shadows if you're willing to invest some time. (However, you might get better results with other Photoshop tools.)
-
Step 1: Open Photo
Import the photo with shadows and duplicate the background layer just to keep the original photo safe.
-
Step 2: Select Shadows
Use the lasso tool to draw around the shadows. If the shadows in the image are shapes like silhouettes or have breaks between shapes and lights, you can select and use the content-aware fill for each portion of the image.
-
Step 3: Use Content-Aware Fill
Once you have the selection you want to work with, click “Generative Fill” in the contextual task bar and then click “Generate.” If the contextual task bar is not enabled, go to Window in the top menu bar and click “Contextual Menu Bar” to activate the floating bar.
After clicking “Generate” in the bar, the content-aware feature will create various versions of the image. Select one to use. Next, you can use the lasso tool again to select a new part of the shadows and repeat the process. If needed, clean the image with the patch tool or other Photoshop correction tools.
-
-
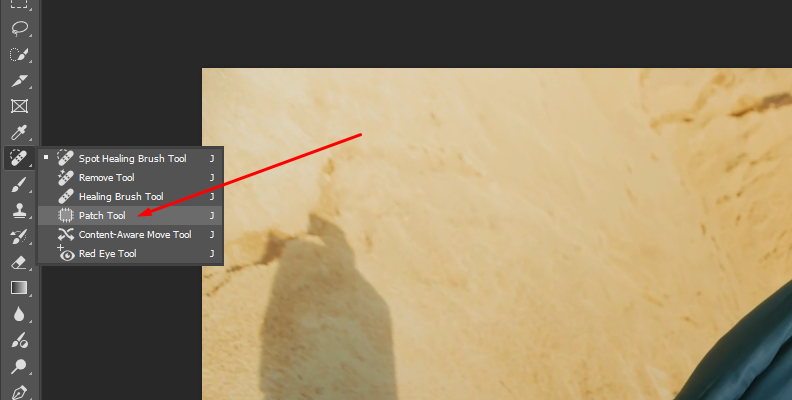
Method 2: Patch Tool
This is another easy shadow removal process that uses the patch tool to manually remove shadows from the photo. This tool works better when shadows are in areas with similar textures.
-
Step 1: Initial Set Up
Import the photo into a Photoshop document and press CTRL/CMD + J to duplicate the original layer and protect the original file from unwanted changes.
-
Step 2: Use the Patch Tool
Go to the toolbar and select the patch tool. You can use the Normal or the Content-Aware patch mode. I recommend using Content-Aware first. It will fill the shadow area with non-shadow areas and blend them seamlessly.
-
Step 3: Erase Shadows
Next is getting rid of those pesky shadows affecting the image. Use the patch tool to select the shadows and then drag the selection to a shadowless area. The content-aware function will blend the pixels to make a smooth patch.
There are times when the patch will work great, but other times, you may need to correct details in the photo. Use the normal patch mode or the dodge tool to manually adjust and fix the image.
-
-
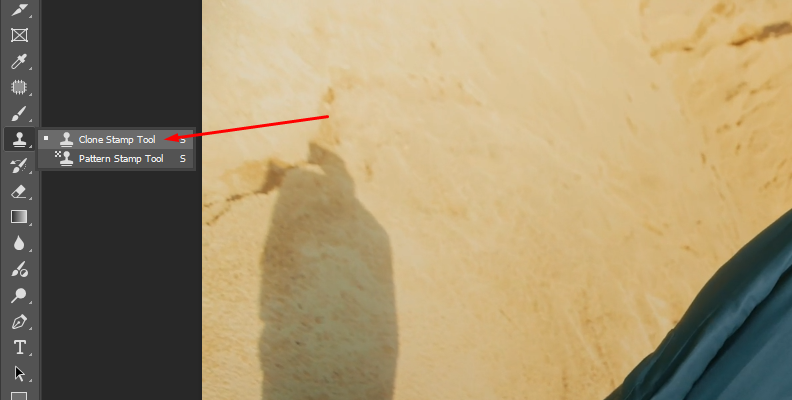
Method 3: Clone Stamp Tool
Similar to the patch tool, the clone stamp tool will help you clone a shadowless part of the image to a shadowed area. Then you can clean up the image to hide any remaining shadows. You can use this as a standalone method or as a tool for clean up after using the content-aware method.
-
Step 1: Set Up Image
Bring the photo into a Photoshop document and create a duplicate layer (use the shortcut CTRL/CMD + J). Next, select the Clone Stamp tool from the toolbar.
-
Step 2: Sample and Clone
Find an area of the image without shadows to sample. Adjust the size of the clone brush and reduce the opacity if you don’t want to erase the shadow completely. I will usually set it at 100% or 80% depending on the shadow and the sample area. You will have to figure out what works for you.
To sample an area, hold ALT (on Windows) or Option (Mac) and click over the image. This sets the starting point from which the tool will clone. Now move over the shadows and click to start painting over the shadows by copying pixels from the sample.
Be careful where you move the cursor, because sometimes you’ll sample from an unwanted area. If this occurs, just set a new sample zone and continue painting over the shadows.
-
-
Method 4: Dodge Tool
The Dodge tool helps you lighten or darken parts of the image. In your case, it can help lighten the shadows to make them less visible.
-
Step 1: Open Photo with Shadows
After importing your photo with shadows into Photoshop, remember to duplicate layer to avoid any unwanted changes to the original image.
-
Step 2: Set Up The Dodge Tool
Pick the Dodge tool and adjust the brush size in the options bar.
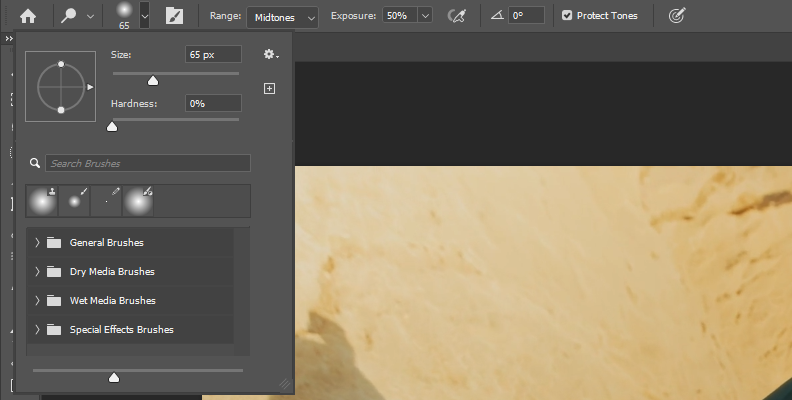
Then, go to "Range" and select Shadows, and set the exposure as needed. You can start with 50% and then change as you paint.
-
Step 3: Paint Shadows
Use the brush to paint over the shadows in the photo. Use Zoom in small areas and adjust the brush's size to paint the shadows. Keep painting until all shadows are reduced. Change the exposure and opacity to achieve different results.
-
-
Method 5: Adjustment Layers
The adjustment layers method is perfect when you don’t want to remove shadows entirely. Instead, you want to keep a bit of the shadows in your image to maintain realism in the photo.
-
Step 1: Identify Shadows
Import the photo and use the magic wand tool or any other selection tool to select the shadows in the image.

-
Step 2: Create a New Layer
With the shadows selected, press CTRL/CMD + J to create a new layer with only the shadows selection.
-
Step 3: Brighten the Image
Create a new curve adjustment layer by clicking the New Adjustment Layer icon at the bottom of the layers panel and selecting the Curves adjustment layer.
When the Curves properties appear, adjust the curve in the grid to increase brightness. You can also add a Brightness/Contrast adjustment layer and play with the brightness and contrast settings.
-
Remove Shadow from Picture in Photoshop with Optics
For the second part of this tutorial, you'll use Boris FX Optics as a plug-in inside of Adobe Photoshop. Optics is a professional photo editing software and plug-in for Photoshop and Lightroom, which unlocks hundreds of filters and tools to enhance your photos.
-
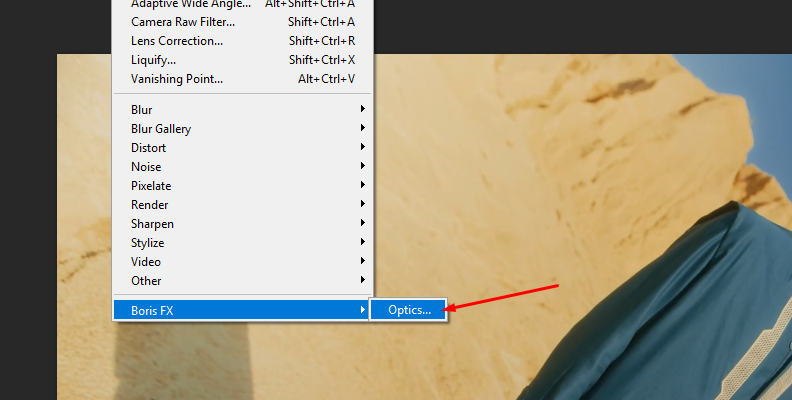
Step 1: Add Optics as a Filter
Open your photo in Photoshop and duplicate the layer.
Right-click the duplicate layer and click "Convert to Smart Object."
Then, go to Filters, find the Boris FX category, and click Optics to apply Optics to the smart object layer. Wait for the Optics interface to launch.
-
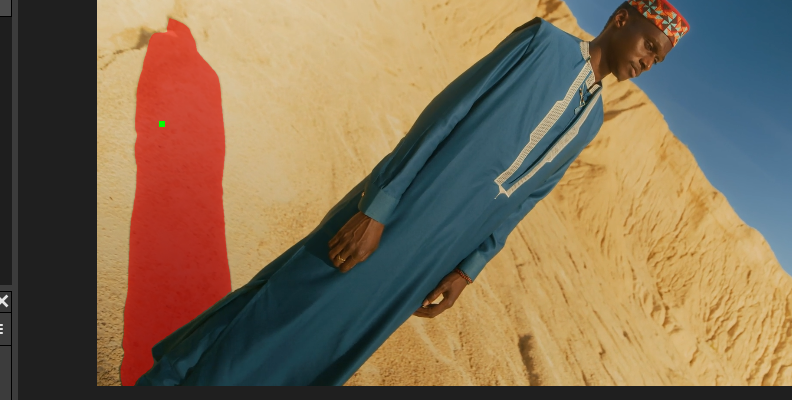
Step 2: Create a Mask
Let's start by isolating the shadows in the photo. Press the Add Mask button at the top of the layers panel and choose one of the mask types.
The EZ Mask and Mask ML are the fastest ways to create a mask from an object in the image.

However, if the shadows are too complex, you can manually paint the mask using the Paint Mask.
In this example, we used Mask ML
-
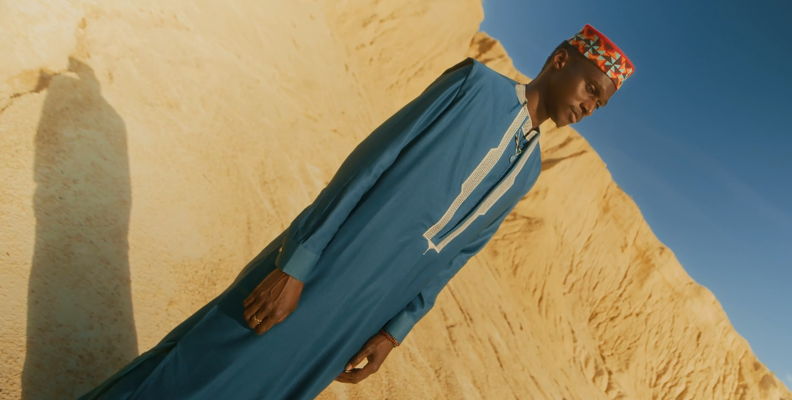
Step 3: Remove Shadows with Filters
The first filter to apply is Shadows/Highlights to brighten the area you isolate with the mask. In the filters library below the viewer, click the Color tab, swipe to find the Shadows/Highlights filter, and click on it to apply it to the layer.
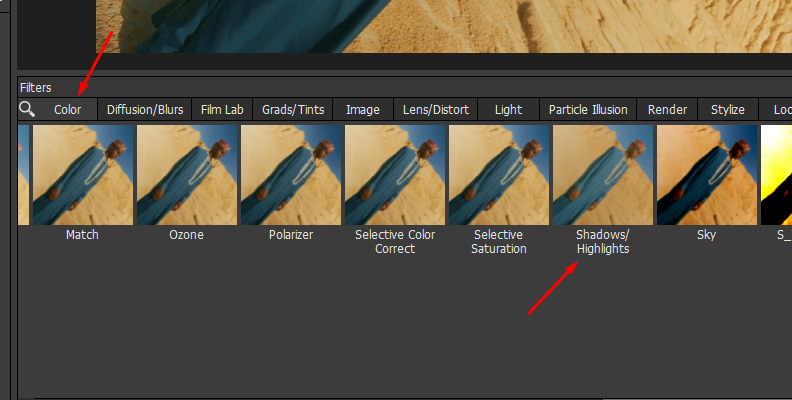
Before adjusting the parameters, check the preset panel and try some of them to see if any help reduce the shadows. You can tweak the preset using the Shadows slider to raise the brightness.

Add a new layer and add the Develop filter to it.
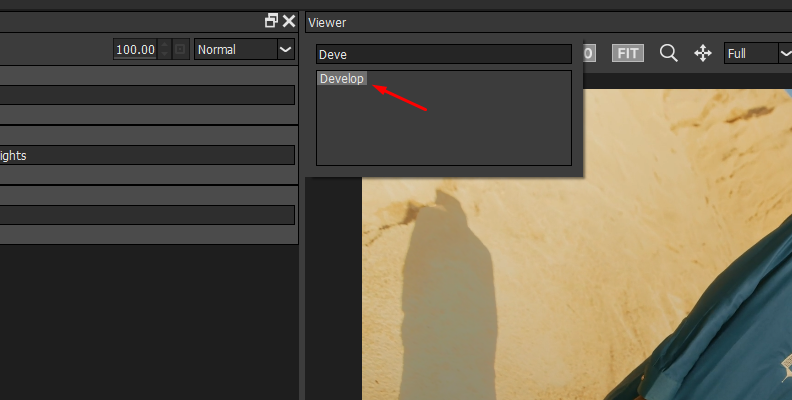
In the parameters, use the Exposure, Fill Light, and Brightness. Then, adjust the other settings to maintain the color balance in the rest of the photo. You can copy the shadows mask from the previous layer by clicking and dragging the mask thumbnail to the new layer.
If you want to lighten the shadows without adjusting highlights and exposure, use an external light filter. Try Ambient Light or Soft Light, and play with the settings to brighten the photo.
If the shadows are on a face, you can try Beauty Studio to remove blemishes, combined with lighting and the Shadows/Highlights filters.
-
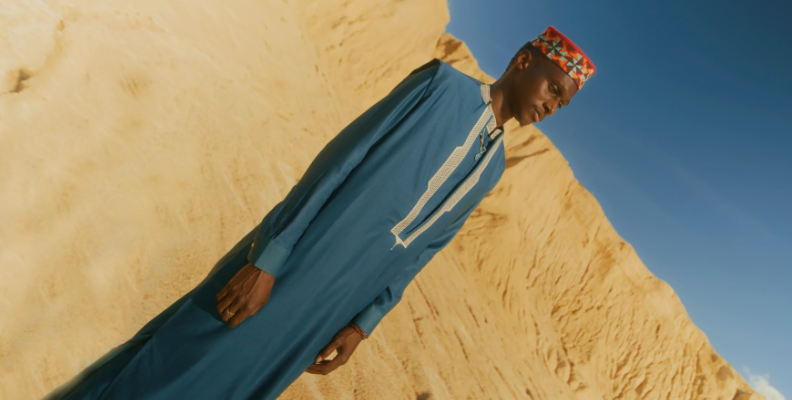
Step 4: Paint and Cleanup
To fine-tune the shadow removal, add a new layer and apply the Paint filter. This filter has the blur, clone, repair, and eraser tools that can help you blend the shadow removal better. You can also use the Paint filter from the beginning to manually paint over the shadow when it's on a solid color, such as floors or walls.
Select one of the Paint tools from the top bar, adjust the size and smoothness of the brush for better results, and start painting over the shadows.
If the corrections show harsh edges from the mask, click the mask and adjust the opacity, blur, and blend mode to smooth the edges.
-
Step 5: Save and Export Photo to Photoshop
Once you have removed or reduced the shadows, click the Save button to save changes and return to Photoshop to export the photo without shadows.
Final Words
With these five methods plus the Optics filters, you have all the tools you need to remove shadows in Photoshop! Save this guide to use whenever you find yourself struggling with unwanted shadows in a photo. And if you're looking to enhance the photo even further with Hollywood-grade effects, download Optics today for a 14-day free trial!
Good luck!