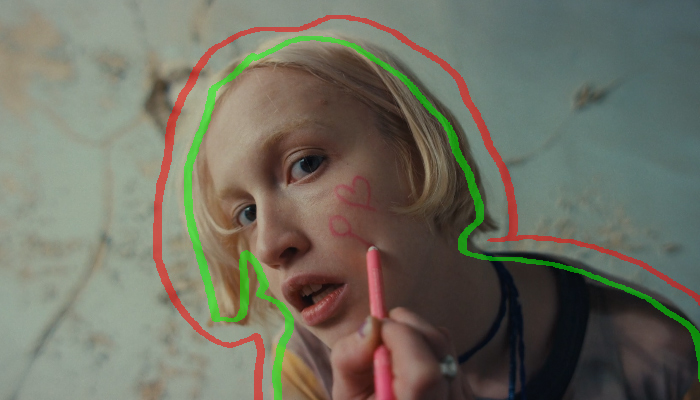
A vignette is a visual effect that subtly darkens or lightens the outer edges of a frame, drawing the viewer’s focus toward the center of the image.
Originally a byproduct of older camera lenses and film processing, vignettes have evolved into a deliberate stylistic choice used widely in modern video editing and cinematography. When used correctly, a vignette can help emphasize the subject, create visual depth, and add a professional, cinematic polish to your footage.
In video editing, vignettes are often applied to highlight emotion, enhance storytelling, or guide the viewer’s attention. For example, a soft, dark vignette can create a moody or intimate atmosphere, while a light vignette can evoke a dreamlike or nostalgic tone. The effect is especially useful in interviews, close-ups, or dramatic scenes where controlling visual focus is crucial.
This guide will help you learn more about creating your own Premiere Pro vignette effect through multiple methods, so without further ado, let's get straight into it.
Three Ways to Create a Vignette Effect in Premiere Pro with Built-in Tools

Adobe Premiere Pro offers a few ways to create a vignette effect, and in this section, we'll cover three effective methods: using the built-in vignette option in the Lumetri Color panel, creating a custom vignette manually using masks and adjustment layers, and the last method will cover the circle effect method in Premiere Pro.
All techniques are simple and flexible, giving you control over the final result.
Method 1: Using the Built-in Vignette in Lumetri Color
Premiere Pro comes with a built-in vignette feature that’s fast and intuitive. This method is perfect if you want to apply a subtle vignette without dealing with manual adjustments or masks.
-
Step 1: Select the Clip
Start by dragging your video clip onto the timeline. Select the clip you want to apply the vignette effect to by clicking on it in the timeline.
-
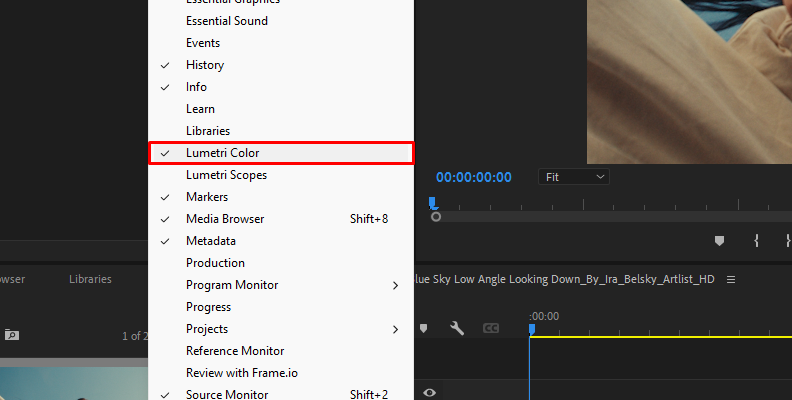
Step 2: Open the Lumetri Color Panel
If the Lumetri Color panel isn't already visible, go to the top menu and click on Window > Lumetri Color to bring it up. This panel is where many of Premiere Pro's color grading tools and different curves charts live, along with the vignette effect.
-
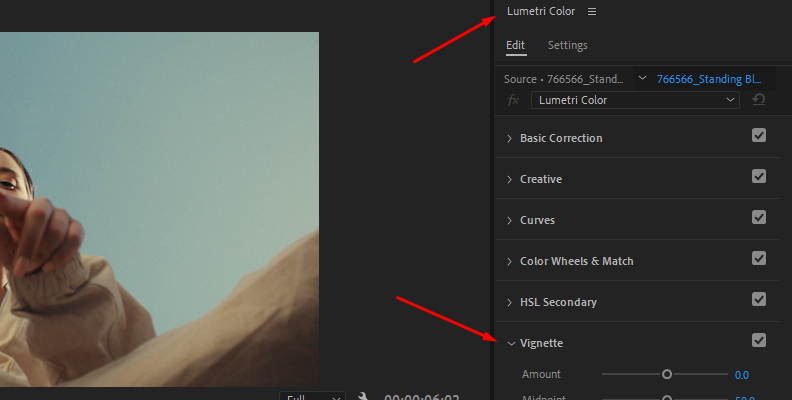
Step 3: Navigate to the Vignette Section
In the Lumetri Color panel, scroll down to find the Vignette section. It’s located at the bottom of the panel. Click the arrow if the section is collapsed to reveal its options.
-
Step 4: Adjust the Vignette Settings
There are four key parameters you can modify:
- Amount: Controls the strength and direction of the vignette. Negative values darken the edges, while positive values brighten them. A value around -1.0 to -2.0 is often ideal for a subtle cinematic effect.
- Midpoint: Adjusts how far the vignette reaches into the frame from the edges. Lower values bring the vignette closer to the center.
- Roundness: Alters the shape of the vignette. A value closer to 100 makes it more of a circle effect, while a lower value creates a more oval shape.
- Feather: Controls the softness of the vignette edges. Higher values produce a smoother, more natural transition between the vignette and the rest of the frame.
Start by lowering the Amount to around -1.5, then tweak the other settings to taste. A softer feather and a midpoint around 40–60 usually provide a balanced look.
-
Step 5: Fine-Tune and Preview
Once applied, scrub through the clip to ensure the vignette effect looks good across the entire sequence. You can return to the Lumetri panel at any time to adjust the settings further.
This method is quick, non-destructive, and ideal for editors looking for speed and simplicity. However, it’s limited to a centered vignette and may not be flexible enough for creative variations.
Method 2: Creating a Custom Vignette with an Adjustment Layer
If you want more control over the shape, size, position, or intensity of your vignette, creating one manually using an adjustment layer and masks is a powerful option. This method is especially useful when your subject is off-center or when you want to animate or stylize the vignette, but also when you want to experiment with a different blending mode style and adjust other creative parameters, too.
-
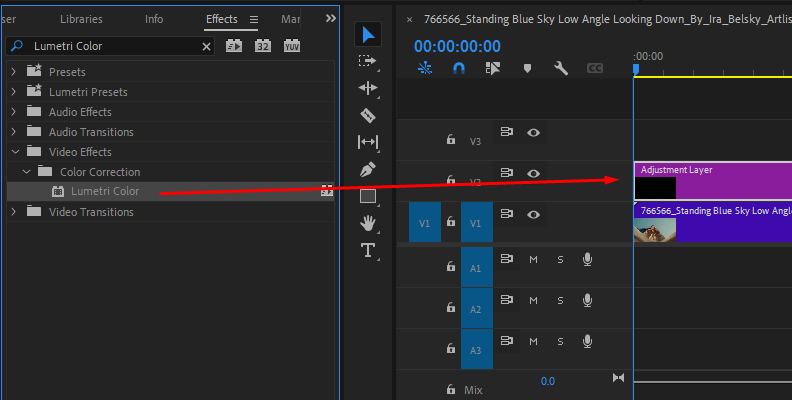
Step 1: Create an Adjustment Layer
Go to the Project panel, click the New Item icon at the bottom, and select Adjustment Layer. Use the default settings and click OK.
Drag the adjustment layer onto the timeline and place it above the video clip(s) you want to affect. Trim the adjustment layer so that it matches the duration of your clip or project you want to apply a vignette to.
-
Step 2: Apply the Lumetri Color Effect
With the adjustment layer selected, go to the Effects panel and search for Lumetri Color. Drag and drop this effect onto the adjustment layer.
Open the Effect Controls panel and expand the Lumetri Color settings.
You can now use the same Vignette controls we discussed in Method 1, but because the effect is applied to an adjustment layer, you can mask or keyframe it for more advanced results.
-
Step 3: For Customization Use the Mask Setting
In the Effect Controls panel, click on the Lumetri Color effect to highlight it, then use the Ellipse Mask tool to draw a circular mask directly on the Program Monitor. Resize and reposition the mask as needed to frame your subject or area of focus.
Once the mask is in place, scroll down to the Mask (1) section under Lumetri Color in Effect Controls. Here, you can adjust:
- Mask Feather: Softens the edges of the vignette for a natural falloff.
- Mask Expansion: Controls how far out the vignette reaches.
- Mask Opacity: Adjusts the visibility of the effect.
- Inverted: Check this box to apply the vignette effect outside the mask (the usual approach for vignettes).
-
Step 4: Tweak the Look to your Taste
You can now combine the mask settings with Lumetri Color tools for fine control. For example, go to the Basic Correction or Creative tab in Lumetri Color and lower the Exposure, Highlights, or Shadows to darken just the masked outer edges. This creates a more tailored vignette than the default one.
If your subject moves in the frame, you can even keyframe the Mask Path to follow them. This is especially useful in dynamic shots or narrative sequences where the subject doesn’t stay centered.
-
Step 5: Add a Blur for Extra Softness (Optional)
For even smoother edges, consider adding a Gaussian Blur effect (found in the Video Effects > Blur & Sharpen folder) to the adjustment layer. This adds an additional layer of softness to the vignette, which is especially useful if you want a more ethereal or dreamy look.
Method 3: Creating a Vignette Using the Circle Effect
The Circle tool in Adobe Premiere Pro is a lesser-known but powerful effect that can be used to manually create a vignette. Unlike the Lumetri Color vignette, which is preset and centered, the Circle offers more customization and control over placement, size, and feathering.
This method is useful for editors who want a stylized or off-center vignette effect with maximum flexibility. Here's how to do it:
-
Step 1: Add an Adjustment Layer
Start by creating an adjustment layer. Go to the Project panel, click the New Item icon, and choose Adjustment Layer. Use the default settings and click OK. Drag the adjustment layer onto the timeline and place it above the video clip you want to affect. Make sure the layer spans the same duration as your clip.
-
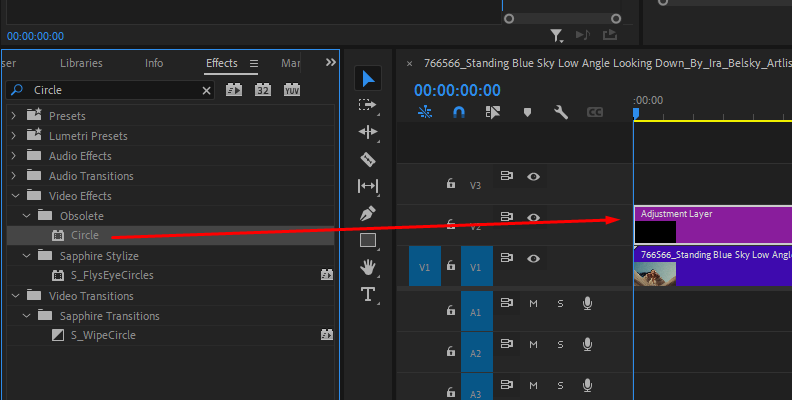
Step 2: Apply the Circle Effect
Open the Effects panel and search for Circle under Video Effects > Generate. Drag and drop the effect onto the adjustment layer. You will see a solid white circle appear in the center of the frame in the Program Monitor.
-
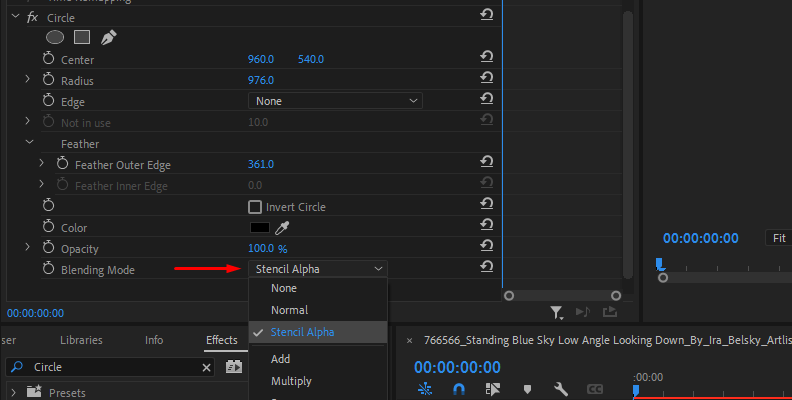
Step 3: Modify the Circle Parameters
In the Effect Controls panel, change the Color of the circle to black.
Adjust the Radius and Center parameters to make the circle large enough to nearly cover the frame. Then adjust the Feather setting to soften the edges, creating a gradual fade from the center to the edges, similar to a traditional vignette.
-
Step 4: Change the Blending Mode
Still in the Effect Controls panel, find the Blending Mode option for the Circle. Set it to Stencils Alpha or Multiply. These modes will darken the outer area while keeping the center exposed, effectively creating a vignette.
How to Add Vignette Effect in Premiere Pro with BCC+ Vignette
Using specialized plug-ins for some tasks that would otherwise require you to manually create something in an editing software will save you a lot of time, and usually, the final result will look a lot better, too.
Such is the case with adding vignettes in Premiere Pro using Continuum by Boris FX.
Continuum is a creator pack offering hundreds of presets, filters, transitions, effects, and everything else you need to take your video editing work to a whole new level, all while working from the comfort of your favorite editing program, as Continuum is compatible with almost all of them.
When you use Continuum, you drag and drop a Premiere Pro vignette template to your video, which takes just a few seconds, compared to manually crafting the effect yourself. On top of that, you also get tons of customization options, often a lot more than what built-in effects have to offer.
But, don't just take our word for it, here's exactly how to do it, step-by-step.
-
Step 1: Create a New Project and Import Media
The first step is to create a new project, just like you would with any other method, and then import the video clip(s) you wish to apply a vignette to.
Once the video is imported, drag it from the "Project" tab onto the timeline to create a sequence.
-
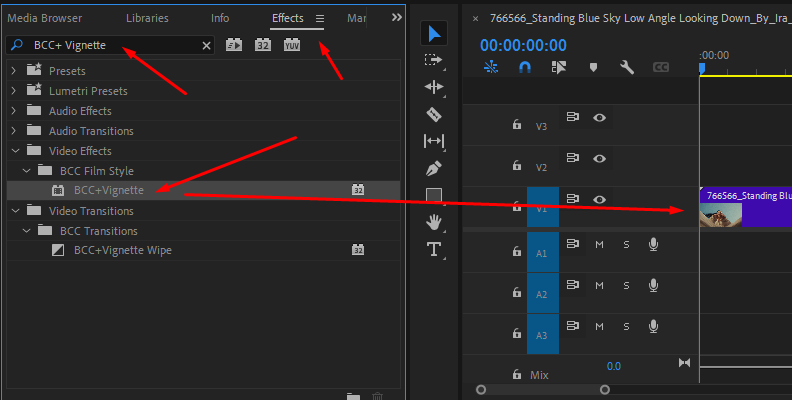
Step 2: Apply The Effect
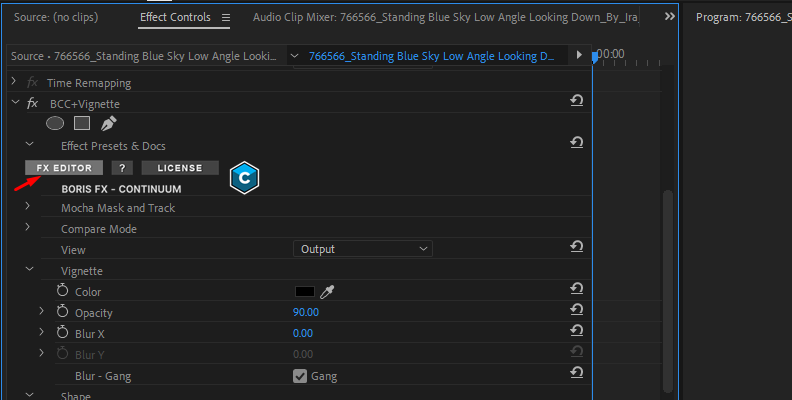
The second step is to search for the BCC+ Vignette effect in the Effects panel. You can use the search bar to locate it quickly.
Once you find it, drag and drop the effect over the video that's on your timeline.
-
Step 3: Adjust Settings if Needed
Once you apply the effect to your video, you will immediately notice the difference.
It's as easy as that, but if you require any modifications, Continuum's effects are very easily customizable.
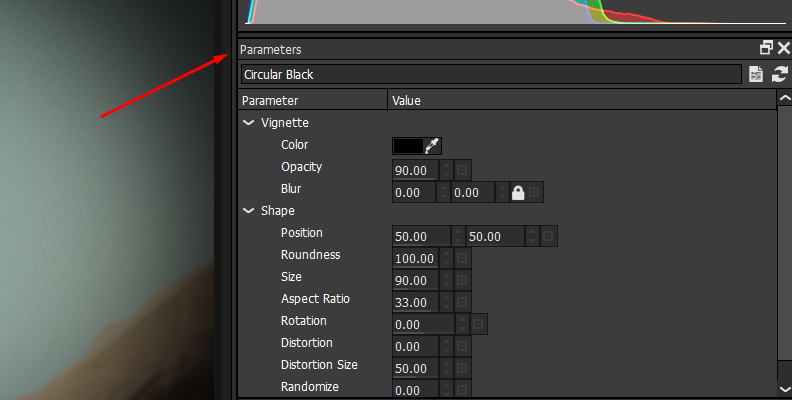
Simply open the "Effect Controls" panel, and you can find all adjustable settings there, such as color, opacity, roundness, aspect ratio, contrast parameters, and lots more.
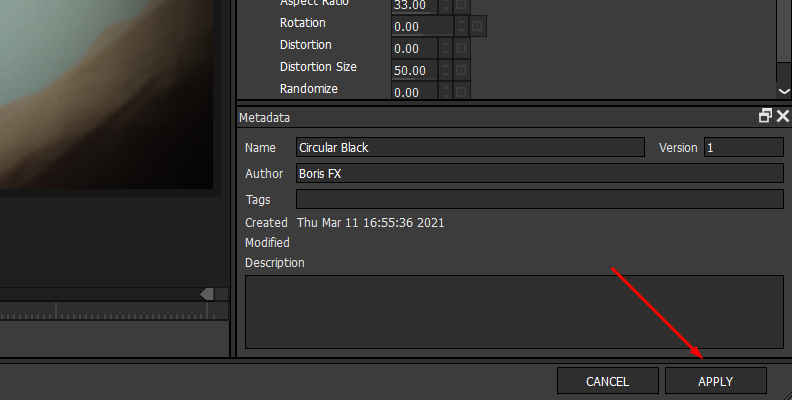
Most importantly, for an even easier workflow, you can click the "FX EDITOR" button to open a panel where you can find dozens of presets that can be applied with just the click of a button.
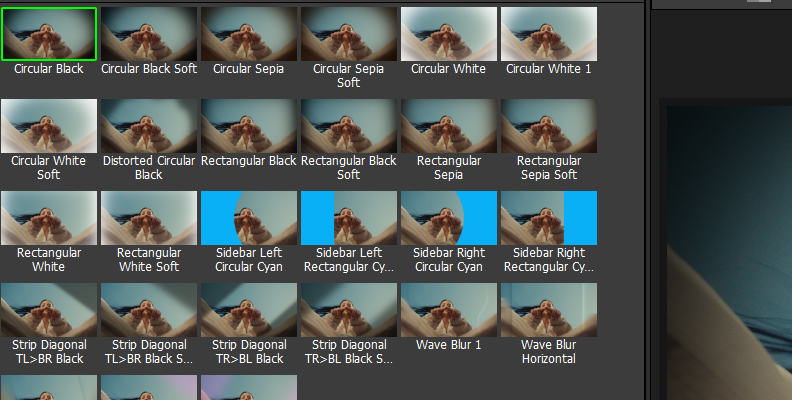
Once you click on a preset, you can adjust its values and modify it using the parameters on the right side, and when you're happy with how it looks, simply click the "Apply" button in the bottom-right corner.
-
Step 4: Save and Export
When you find what works for your specific case, you can save and export the project.
Final Words
Hopefully, this guide will help you create vignettes for all your future projects in the right shapes, forms, sizes, and colors.
When utilized correctly, the vignette can be a powerful tool with many different uses, and many editors would agree that it's one of the most versatile effects worth adding to your toolbox.
We thank you for reading and wish you the best of luck with your upcoming work!
FAQ
This section covers the most frequently asked questions and answers on the subject of adding vignettes in Premiere Pro.
What is the Best Setting to Use for a Vignette in Premiere Pro?
A: You are probably wondering what the best settings for your vignette effect are, such as the brightness and hue values, feather outer edge, color, opacity, and more. The truth is, it always depends on your project, the specific shot and scene, and what you're trying to achieve with it. As a general rule, try to keep the vignette subtle and not too distracting for the viewer's eye, unless you specifically need to do otherwise, in which case you can use something like the contrast effect to boost its appearance, along with many other settings.
Is There an Official Premiere Pro Vignette feature?
A: Premiere Pro is versatile software and allows you to take multiple approaches when it comes to creating your desired vignette effect. Above, you can find three different methods to add this effect to your video project including Premiere's built-in Lumetri color panel vignette tool.